Appearance
Quality
The Quality menu follows the QA/QC (quality assurance and quality control) work of the project: what must be inspected and when (inspection and test plans), the inspections themselves with their checklists, the defects found (NCRs and snags) and the laboratory test results.
WHO USES IT
The QA/QC Inspector and QA/QC Manager roles. Site engineers raise inspection requests and snags; the QA/QC team records the results and verifies the corrections. Only the QA/QC team can close an NCR.
Open the Quality menu
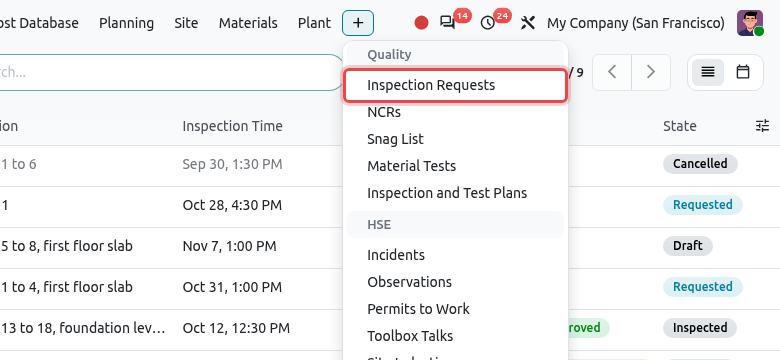
Click + at the right of the Construction top bar, then pick an entry under Quality.
| Menu | What it is for |
|---|---|
| Inspection Requests | Requests to inspect work (WIR) or delivered materials (MIR), with their checklist and result. |
| NCRs | Non-Conformance Reports: anything that does not meet the specification, with its correction. |
| Snag List | Small defects to fix before handover (also called punch list), with photos. |
| Material Tests | Laboratory and site tests: concrete cubes, slump, compaction, steel... |
| Inspection and Test Plans | ITPs: for each kind of work, the list of checks, who does them, and where the work must stop for inspection. |
The usual order of work is: prepare the checklists, write and approve the ITP, then raise inspection requests during the works. A failed inspection or a failed test leads to an NCR.
Checklist→ITP→Inspection Request→Result A / B / C→NCR if needed
Configuration: Inspection Checklists
A checklist is the list of items the inspector checks, each with its acceptance criteria. It is prepared once and reused by every inspection of that kind of work.
Open the menu and click New.
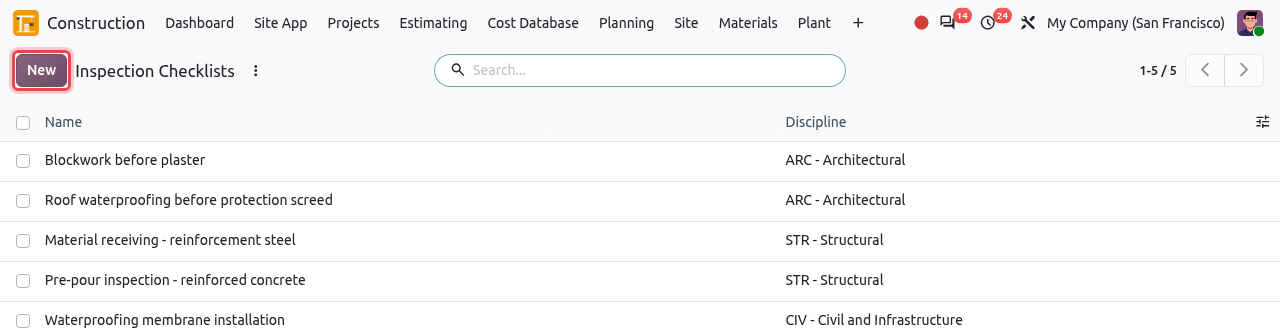
The checklists already defined. Type the name of the checklist (e.g. Roof waterproofing before protection screed) and choose the Discipline. Leave Company empty to share it with all companies. Then add one line per item with Add a line:
Column What to enter Item What is checked, e.g. Membrane dry film thickness. Kind Check (yes / no), Measurement (a value is measured) or Observation (free remark). Acceptance Criteria What is acceptable, e.g. 2.0 mm minimum. 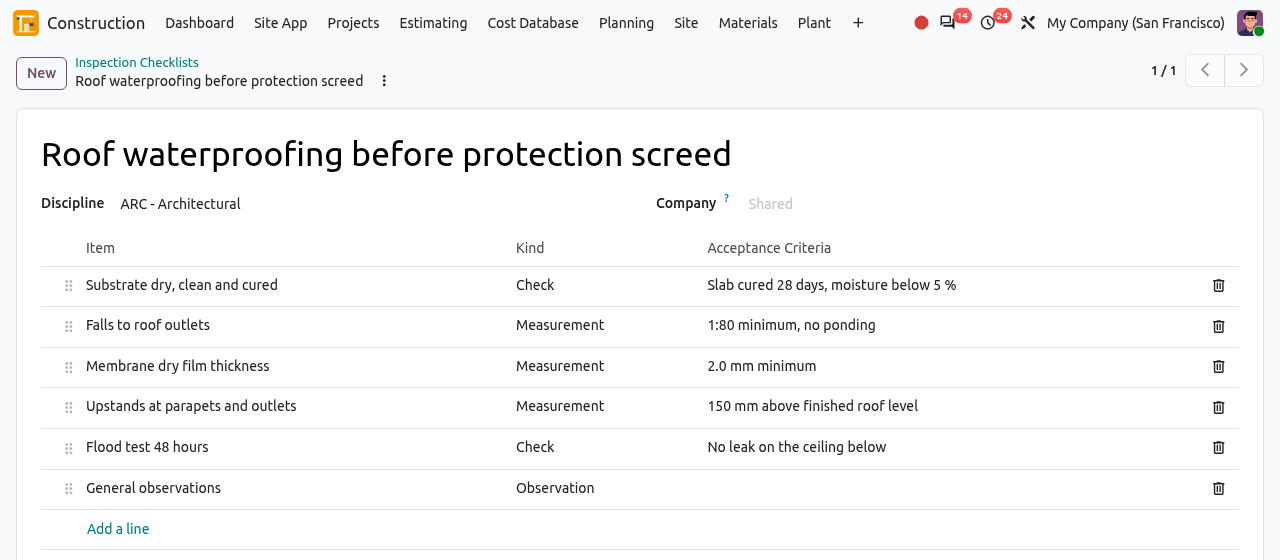
A checklist with six items. Drag the handles to change the order. Save. The checklist can now be linked to ITP operations and loaded in inspection requests.
Inspection and Test Plans (ITP)
An ITP lists the operations of a kind of work (for example roof waterproofing), how each one is verified and the involvement of the contractor and of the engineer. It is usually approved by the engineer through a submittal before the work starts.
| Point | Meaning |
|---|---|
| H - Hold | The work stops until it is inspected and approved. |
| W - Witness | The party is notified and may attend; the work can go on if they do not come. |
| R - Review | Review of records (certificates, reports). |
| S - Surveillance | Random checks. |
Draft→Approved→Obsolete
Click New. Enter the title (e.g. Roof waterproofing and thermal insulation), the Project, the Discipline and, if any, the Submittal under which the ITP was approved (see Submittals).
Add one line per operation with Add a line: the Operation, the specification Reference, the Acceptance Criteria, the Verifying Record (what proves it: inspection request, test certificate...), the Contractor and Engineer points (H, W, R, S) and the Checklist to use for this operation.
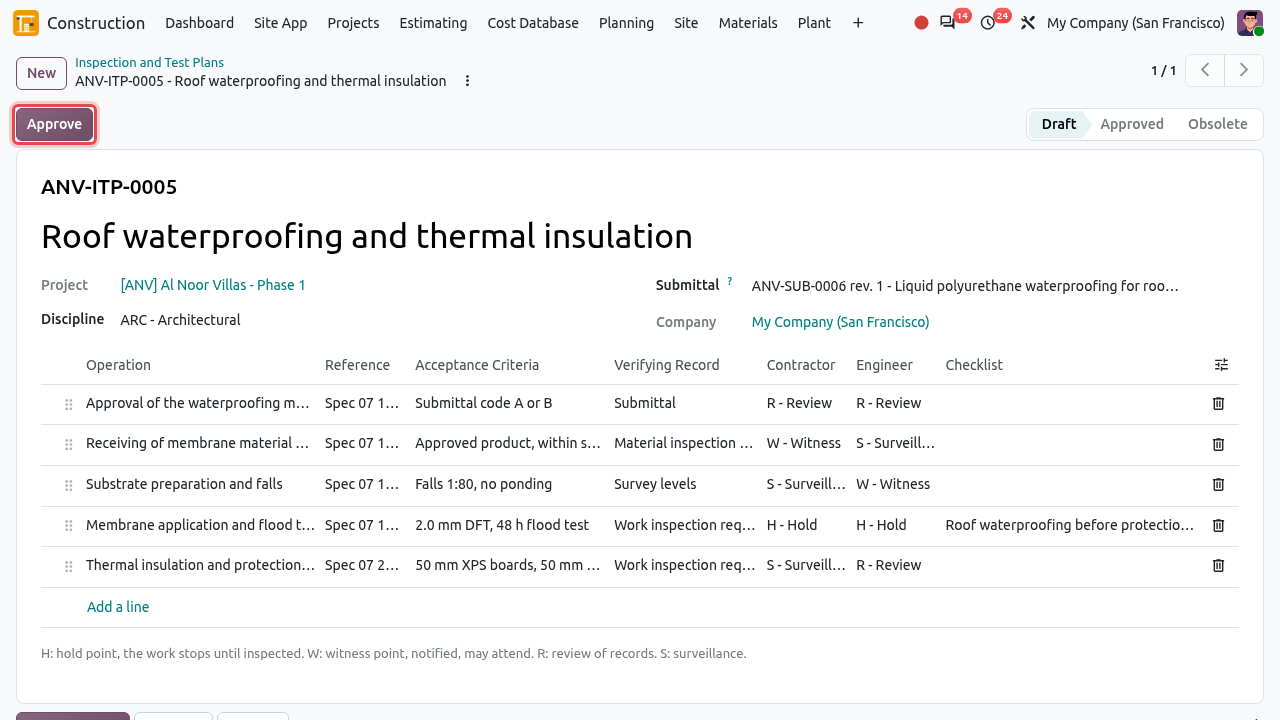
A draft ITP. Operation 4 is a hold point for both parties and uses the waterproofing checklist. Click Approve. Only Approved ITPs can be chosen in inspection requests, and an approved ITP can no longer be edited. To change it, click Reset to Draft; when a new version replaces it, click Obsolete.
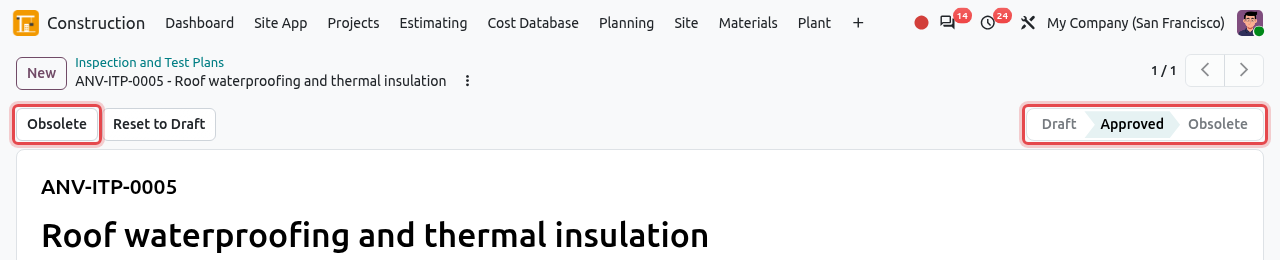
The ITP is approved.
GOOD TO KNOW
"Add the operations of ... first.": an ITP without lines cannot be approved.
Inspection Requests
Before covering up work (pouring concrete, laying a screed...) the contractor asks the engineer to inspect it with a Work Inspection Request (WIR). Delivered materials are checked with a Material Inspection Request (MIR). Each request has a checklist and ends with a result:
| Result | Meaning |
|---|---|
| A - Approved | Everything passed. The work can go on. |
| B - Approved with Comments | Accepted; the comments must be followed. |
| C - Rejected, Re-inspect | Refused. Correct the work and ask for a new inspection. |
(list or calendar view)
Draft→Requested→Inspected
Request an inspection
Click New. Type the title (what and where, e.g. Roof waterproofing villa 3 - before protection screed), keep Type on Work Inspection (WIR) and choose the Project.
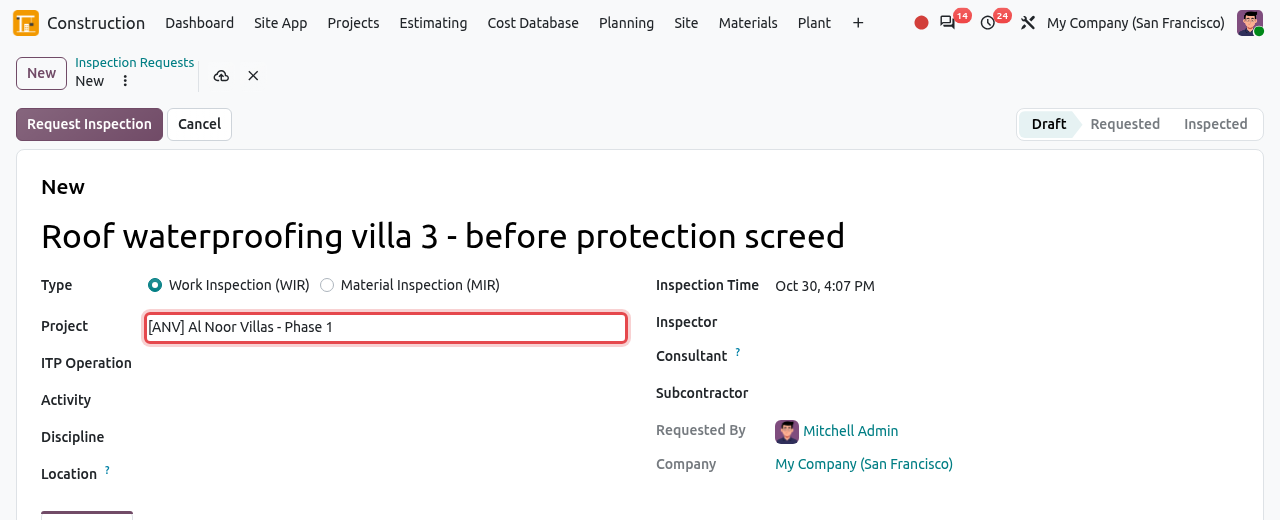
A new inspection request. Fill in the rest of the form:
Field What to enter ITP Operation The operation of an approved ITP. Its checklist is loaded automatically. If the engineer's point is H, a HOLD POINT ribbon appears. Activity The schedule activity concerned (optional). Discipline, Location e.g. Architectural, Villa 3, roof. Inspection Time When the work will be ready for inspection. Inspector The user who inspects. He or she gets a to-do on that date. Consultant The engineer's contact, who follows the request. Subcontractor The subcontractor who did the work. The Checklist tab shows the items. To use another checklist, choose it in the box above the items and click Load (it replaces the items). You can also add items with Add a line.
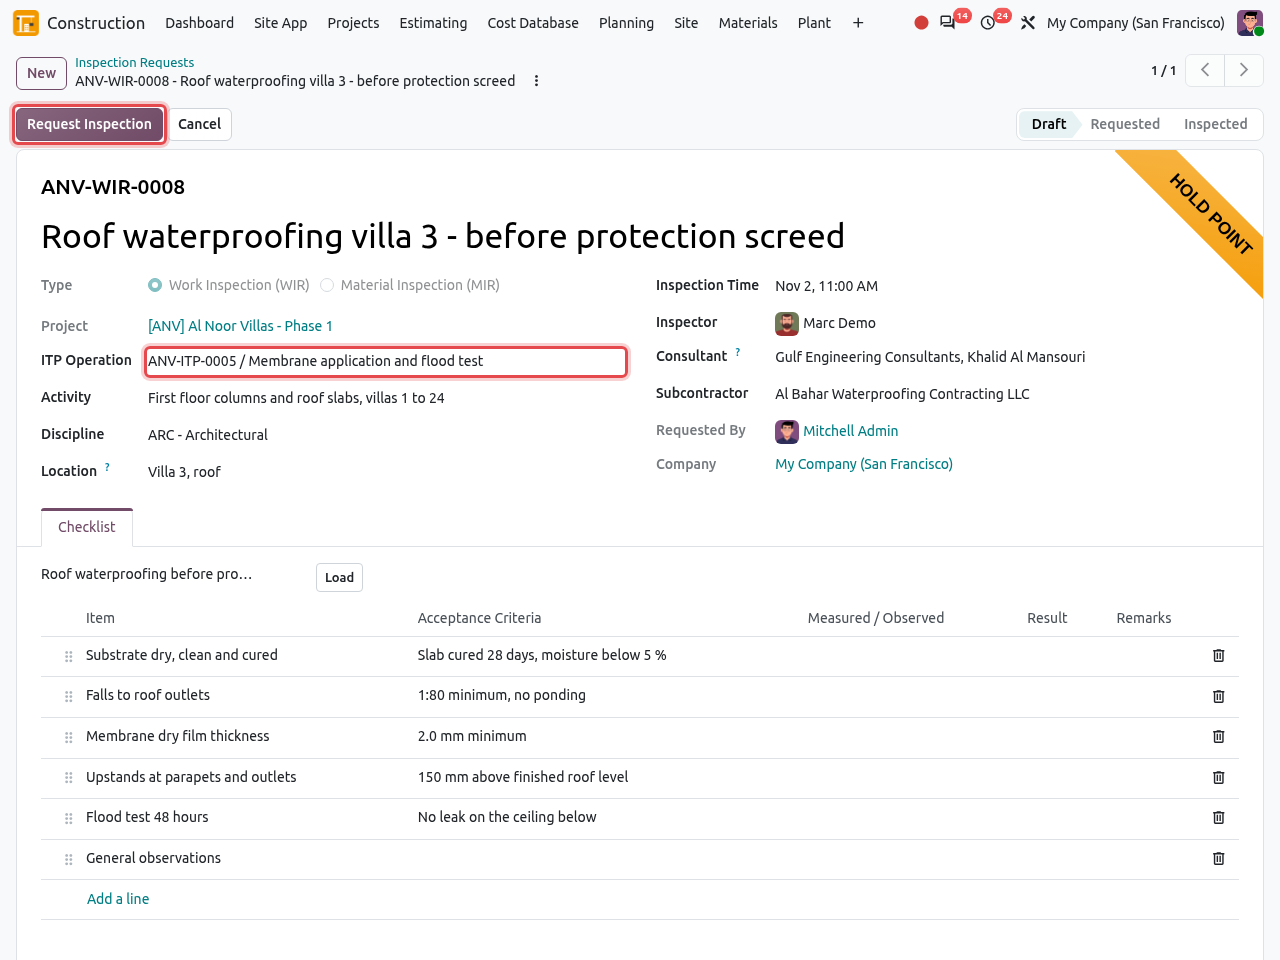
The ITP operation (framed) loaded the checklist and shows the HOLD POINT ribbon. Click Request Inspection. The request is Requested; the inspector gets a to-do for the inspection date and the consultant follows the request.
Fill in the checklist and record the result
During the inspection, open the request. In the Checklist tab, for each item, type the Measured / Observed value, choose the Result (Pass, Fail or N/A) and add remarks. Passed lines turn green, failed lines red.
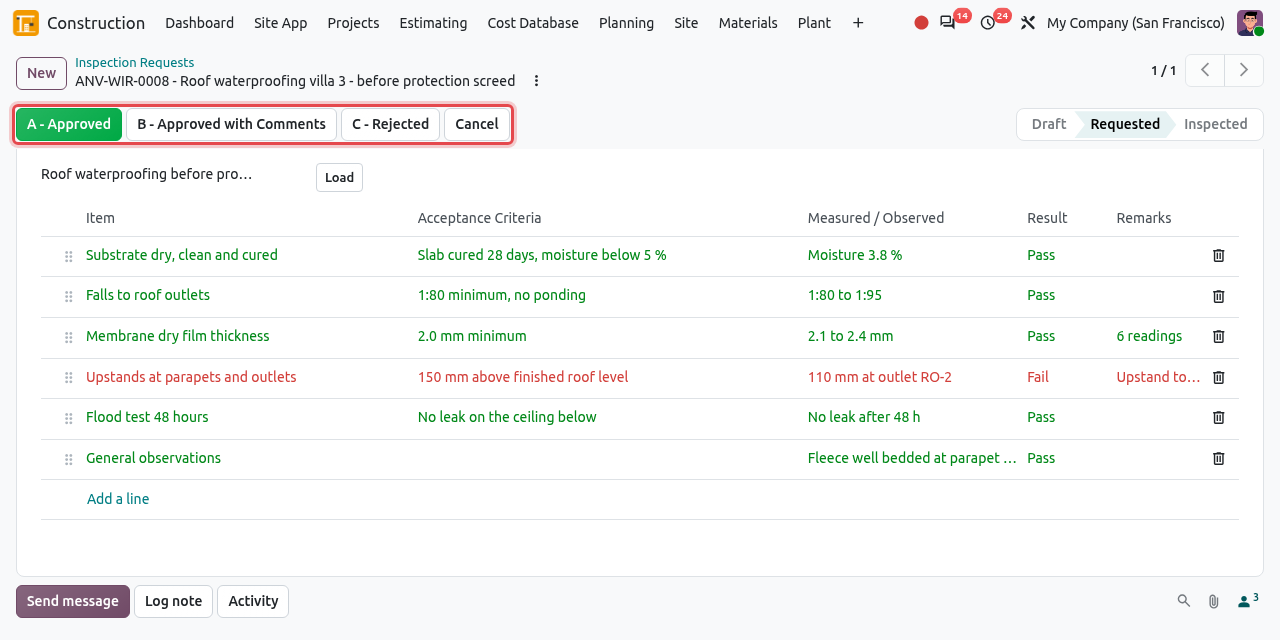
The checklist is filled in: the upstand at outlet RO-2 failed. The three result buttons are framed. Open the Result tab and write the inspector's remarks. Remarks are required for results B and C.
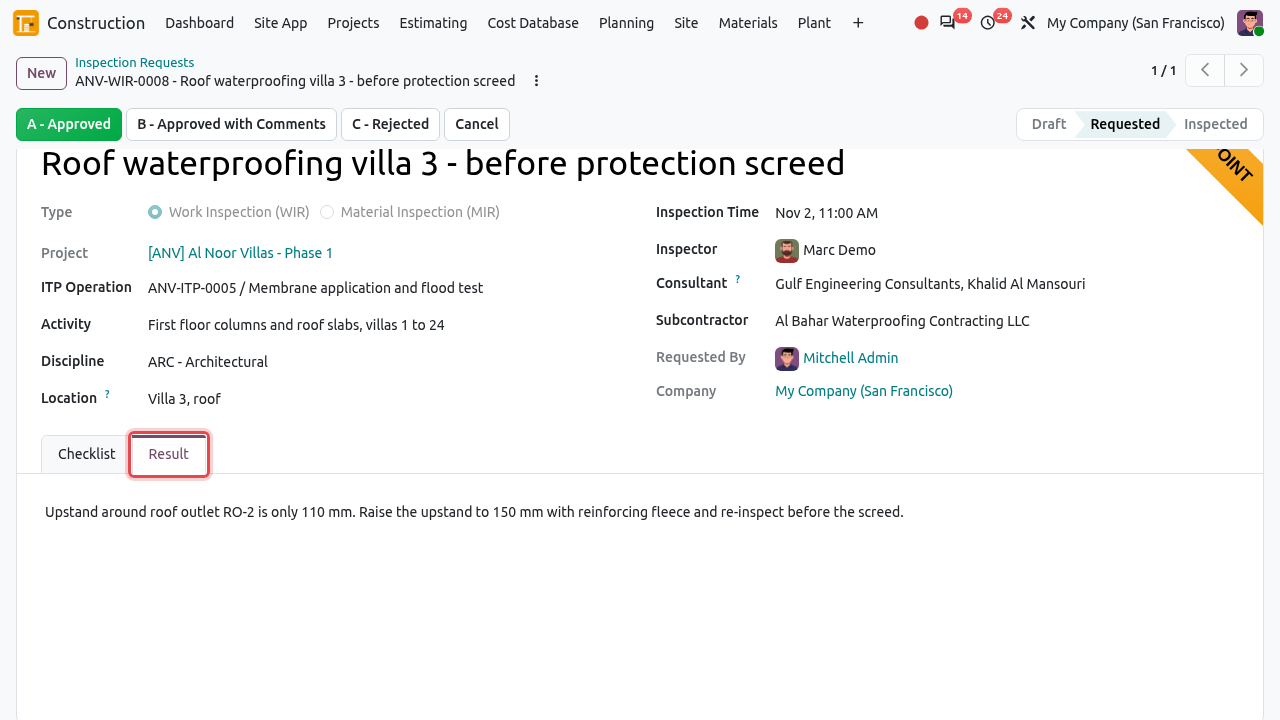
The inspector's remarks. Click the result: A - Approved, B - Approved with Comments or C - Rejected. Odoo checks the checklist first: every item must have a result, and a checklist with a failed item cannot be approved with A.
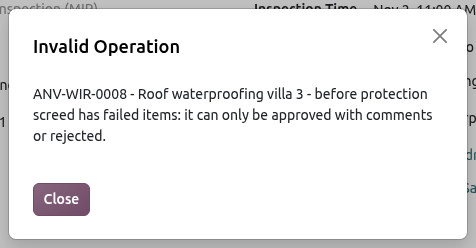
The message shown when clicking A with a failed item. Click Close and choose B or C. The request is Inspected with its result, and the inspection date is recorded. The checklist is locked. After a C result, two buttons appear: Request Re-inspection and Raise NCR (Raise NCR is also available after a B result).
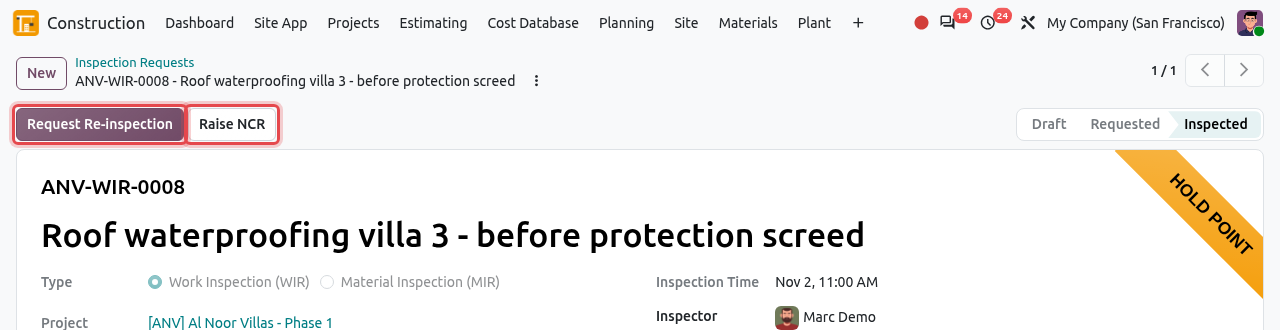
Result C: re-inspect and/or raise an NCR.
Re-inspection after a rejection
When the work is corrected, open the rejected request and click Request Re-inspection. Odoo creates a new request (next WIR number) with the same details and an empty copy of the checklist. Re-inspection Of points to the rejected one. Adjust the Inspection Time, then click Request Inspection.
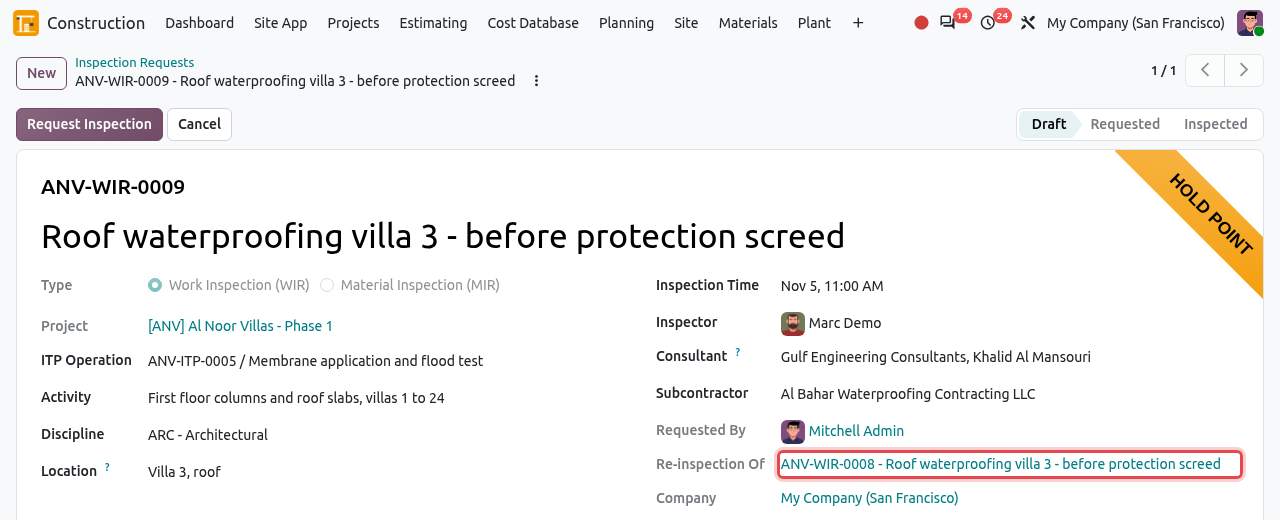
The re-inspection WIR-0009 refers to WIR-0008. Fill in the checklist again and record the result. Here every item passed, so the result is A - Approved.
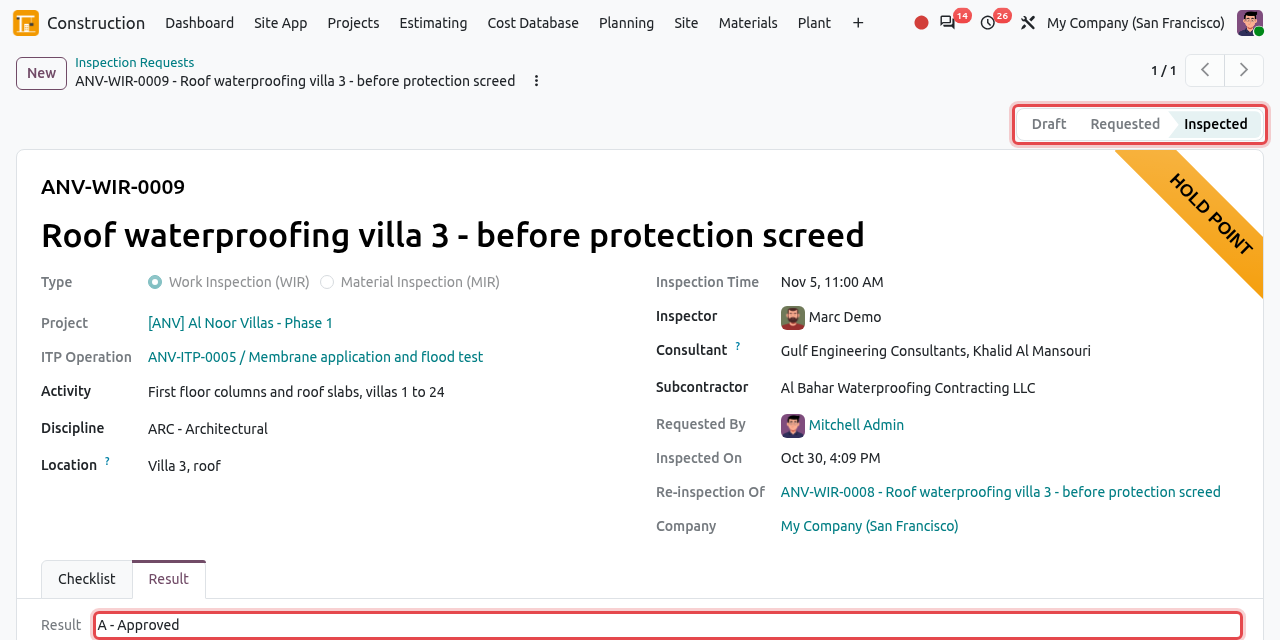
The re-inspection is approved.
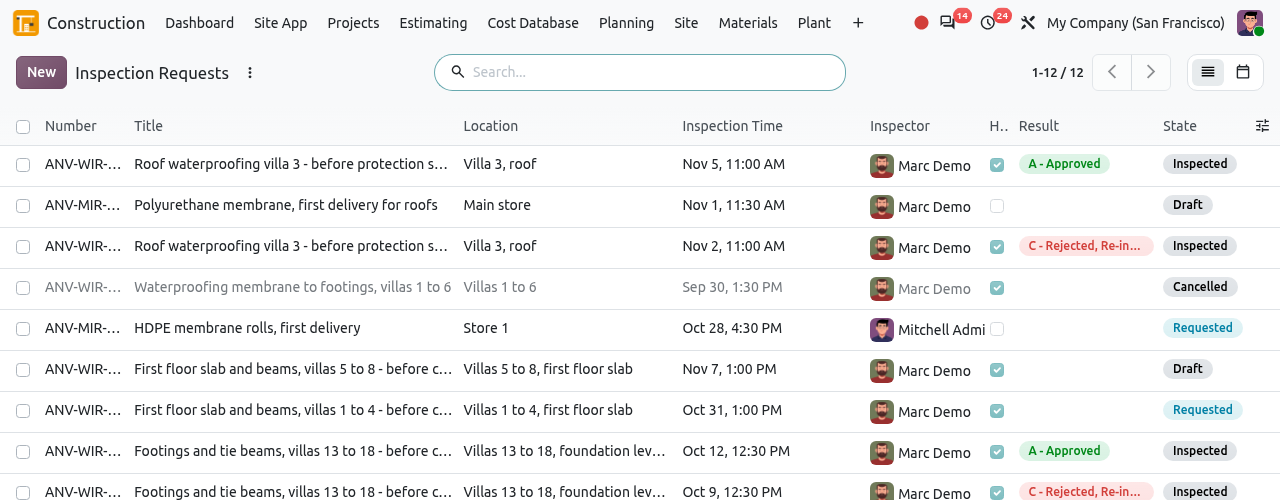
A request can be re-inspected only once; if the re-inspection is rejected too, request a re-inspection from it. The list shows the result of every request; use the filters To Inspect, Rejected, Hold Points and Mine, or switch to the calendar view to plan the inspectors' week.
Material inspection (MIR)
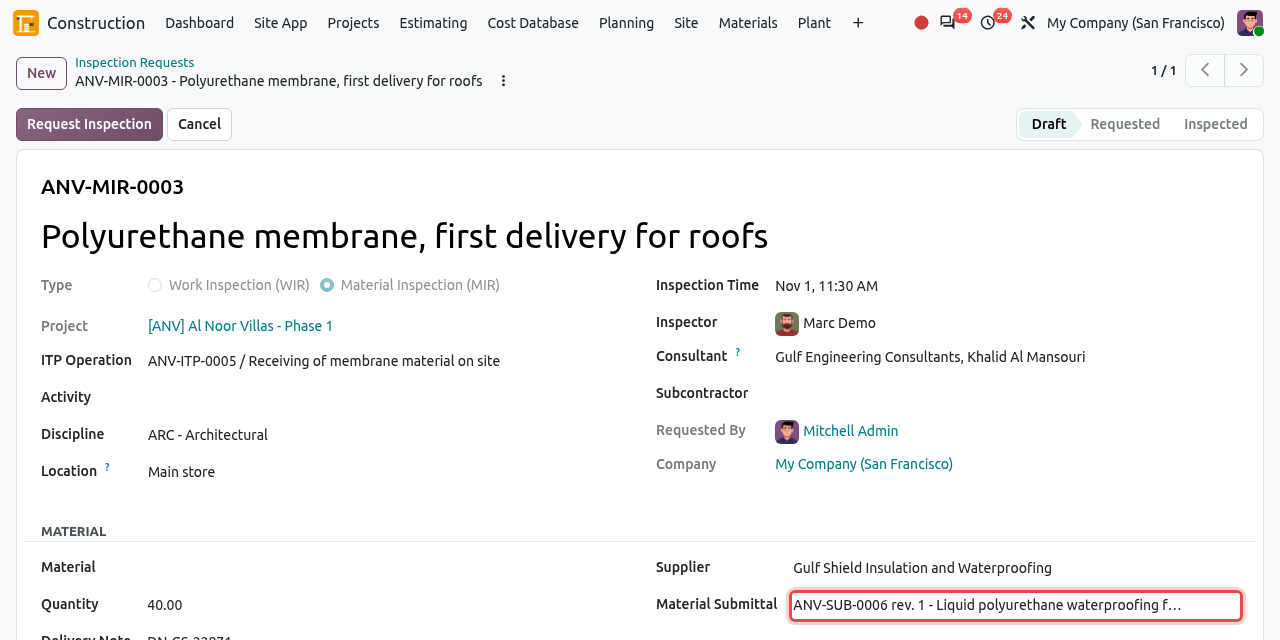
For a delivery of materials, choose Material Inspection (MIR) in Type. A Material section appears: enter the material, the Quantity, the Delivery Note, the Supplier and the approved Material Submittal. If the submittal is not approved (code A or B), a red warning is shown. The rest of the process is the same as for a WIR.
GOOD TO KNOW
- "Answer every item of the checklist of ... first.": give every line a result (use N/A when an item does not apply).
- "Write the remarks of the inspection of ...": results B and C need remarks in the Result tab.
- The type (WIR / MIR) and the project cannot be changed after saving. Inspected requests cannot be cancelled.
- To print the inspection report, click the ⋮ icon next to the record name, then Inspection Request.
NCRs (Non-Conformance Reports)
An NCR records work or material that does not meet the requirements, why it happened (root cause), what will be done (disposition and corrective action) and the verification by the QA/QC team. It can be raised from a rejected inspection, from a failed material test, or created directly (for example after a site observation or an audit).
Draft→Open→Corrective Action→Closed
Raise the NCR: click Raise NCR on the rejected inspection (or New in the NCR menu). From an inspection, Odoo fills in the project, source, discipline, activity, location, the subcontractor as Responsible Party, and the failed items in the description.
Complete the NCR:
Field What to enter Title A short description of the problem. Source Inspection, Material Test, Site Observation, Audit or Client / Engineer. Category Workmanship, Material, Design, Documentation or Method / Procedure. Severity Minor, Major or Critical. Responsible Party The subcontractor or supplier at fault. Action By The user who must propose and carry out the correction. He or she gets a to-do. Close Out Due The date by which the NCR must be closed. After it, the NCR is overdue (red). Cost of Non-Conformance The cost of the correction, for example to charge back to the subcontractor (see Back-charges). Non-Conformance tab What is wrong, the requirement, the evidence. 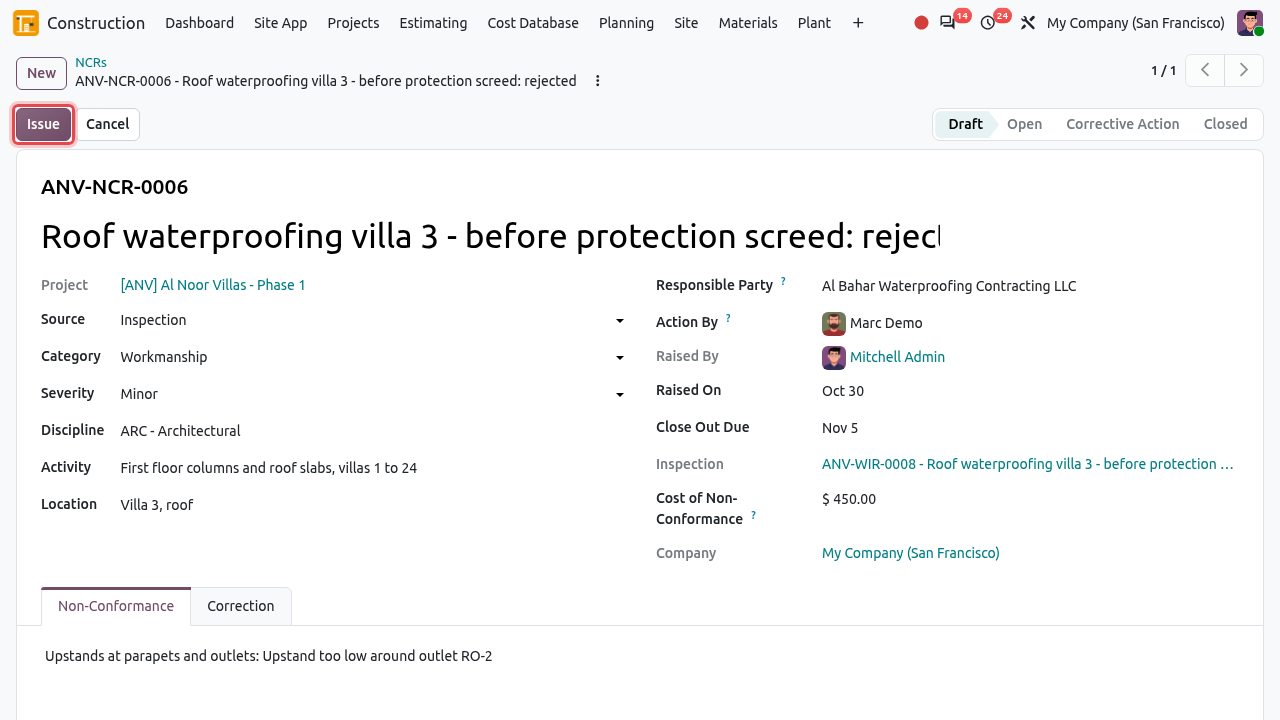
An NCR raised from the rejected inspection (see the Inspection field). Click Issue. Click Issue. The NCR is Open and the Action By user gets a to-do with the due date.
In the Correction tab, choose the Disposition (Rework, Repair, Use as Is (Concession), Reject and Replace) and write the Root Cause, the Corrective Action and the Preventive Action (what will avoid it next time). Then click Corrective Action Decided.
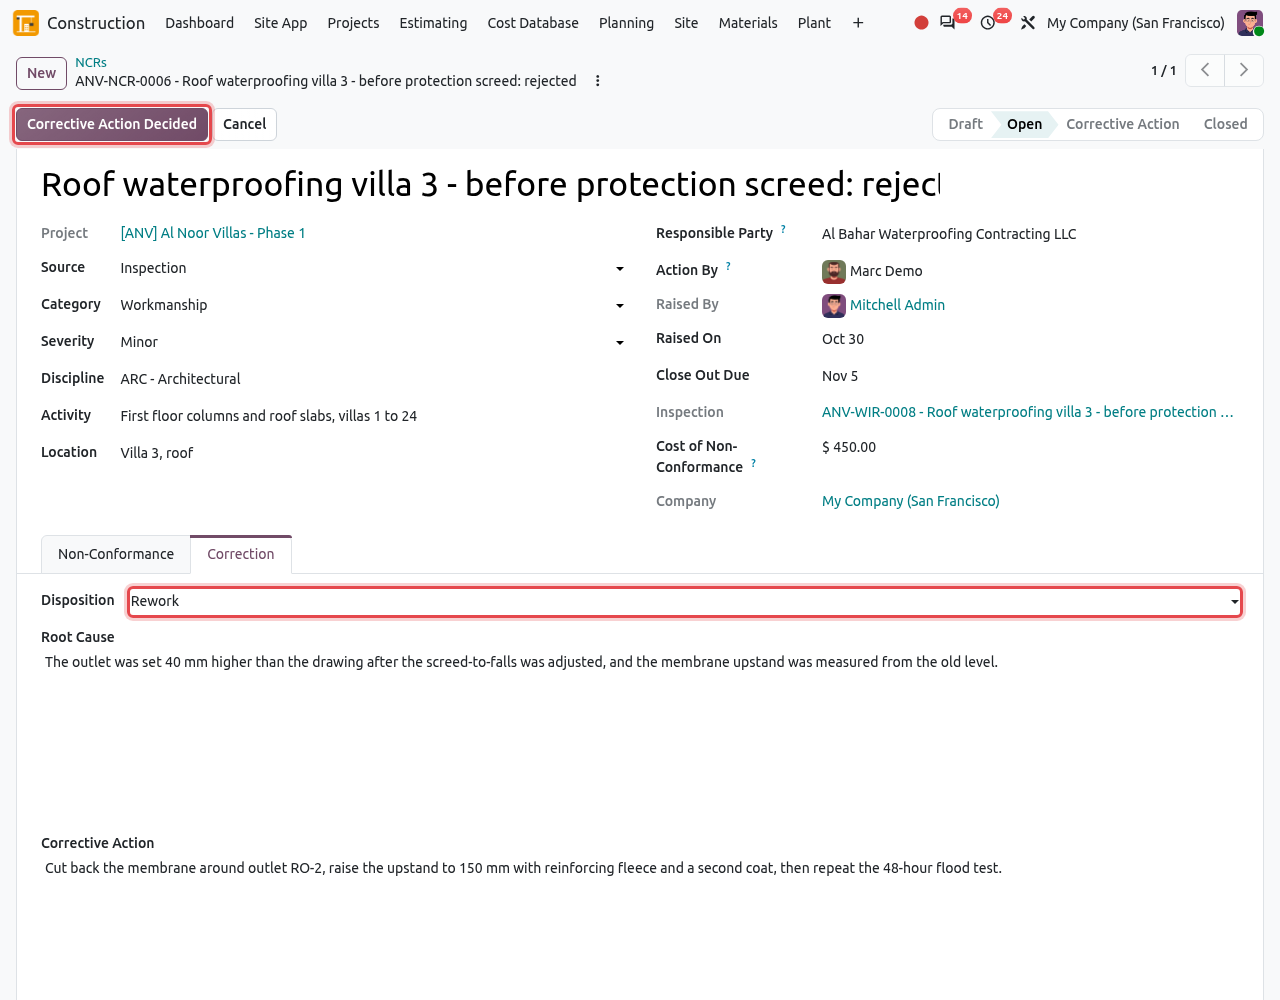
The Correction tab. Disposition and corrective action are required. The NCR is in Corrective Action. When the correction is done, a QA/QC inspector checks it on site and clicks Verify and Close. If the correction is not acceptable, he or she clicks Not Corrected: the NCR goes back to Open.
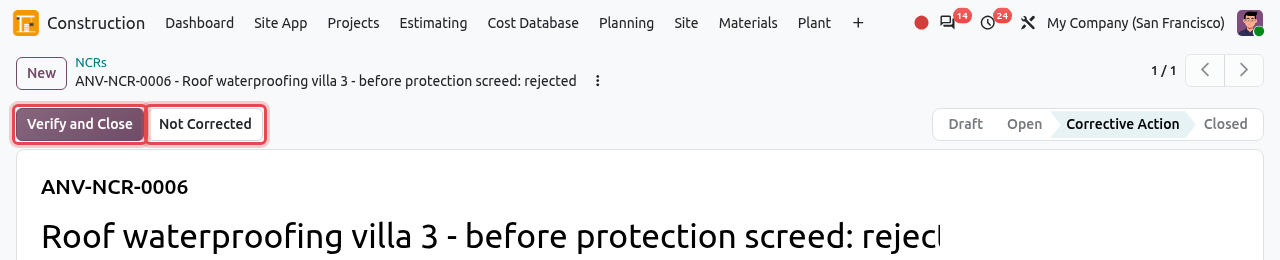
Verify and Close, or Not Corrected (QA/QC team only). The NCR is Closed; Verified By and Closed On are recorded.
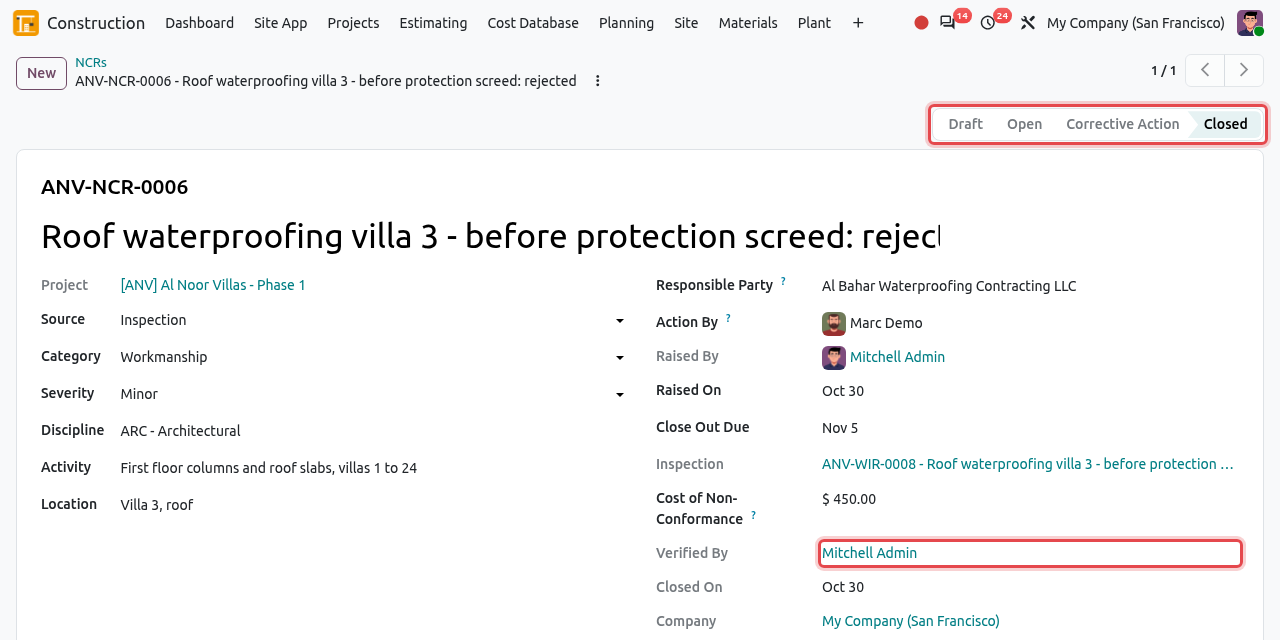
The closed NCR.
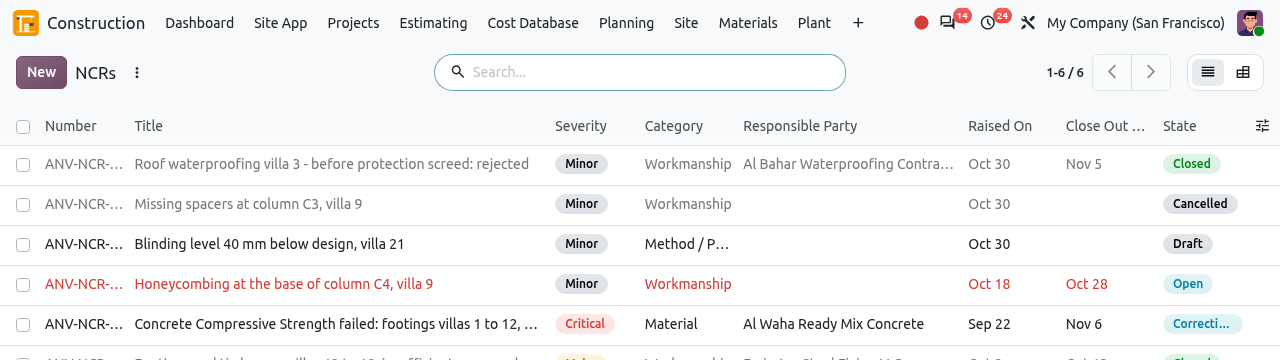
The NCR list shows severity and status; overdue NCRs are red. Use the filters Open, Overdue and Major and Critical, and the pivot view (category by severity) for reports. To print an NCR, use the ⋮ icon next to its name, then NCR.
RULES
- "Give the disposition and the corrective action of ...": both are required before Corrective Action Decided.
- "Only the QA/QC team closes NCRs.": Verify and Close needs the QA/QC Inspector role.
- "Someone else must verify the correction of ...": the Action By user cannot close his or her own NCR.
- Closed NCRs cannot be cancelled.
Snag List
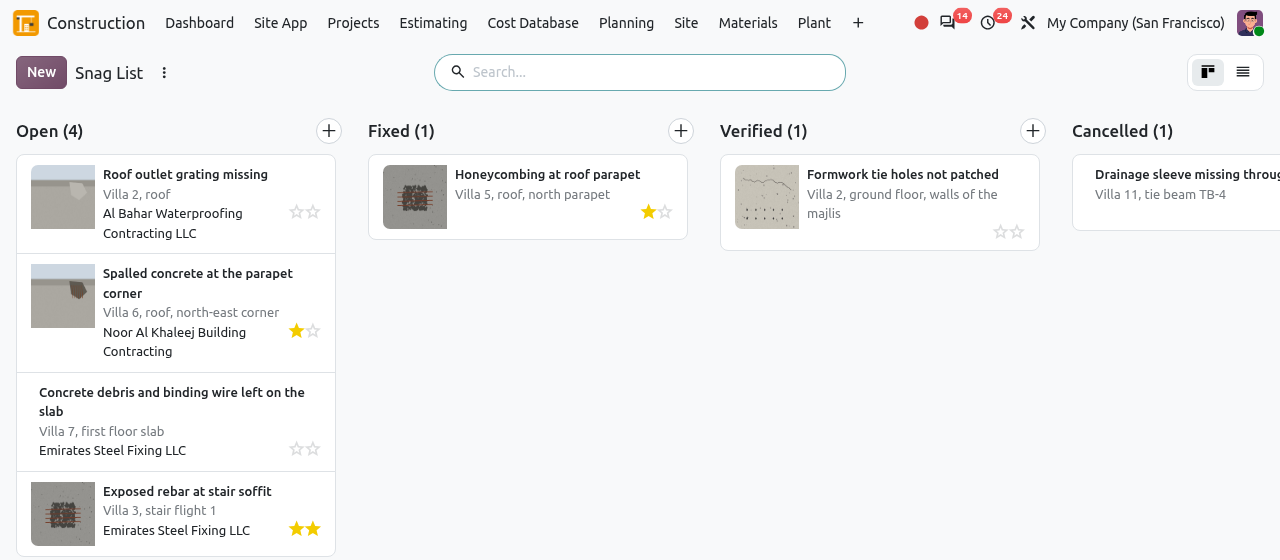
A snag is a small defect to fix before handover (paint touch-up, missing grating, crack...). Each snag has a photo before and a photo after the fix, and is verified by the QA/QC team. The Snag List is also available on phones in the Site App.
Open→Fixed→Verified
Click New. Describe the defect, choose the Project, enter the Location (building, level, room) and the Category, set the Priority (stars: high, urgent), the Responsible Party and the Fix By date. Click the camera under Before to upload the photo.
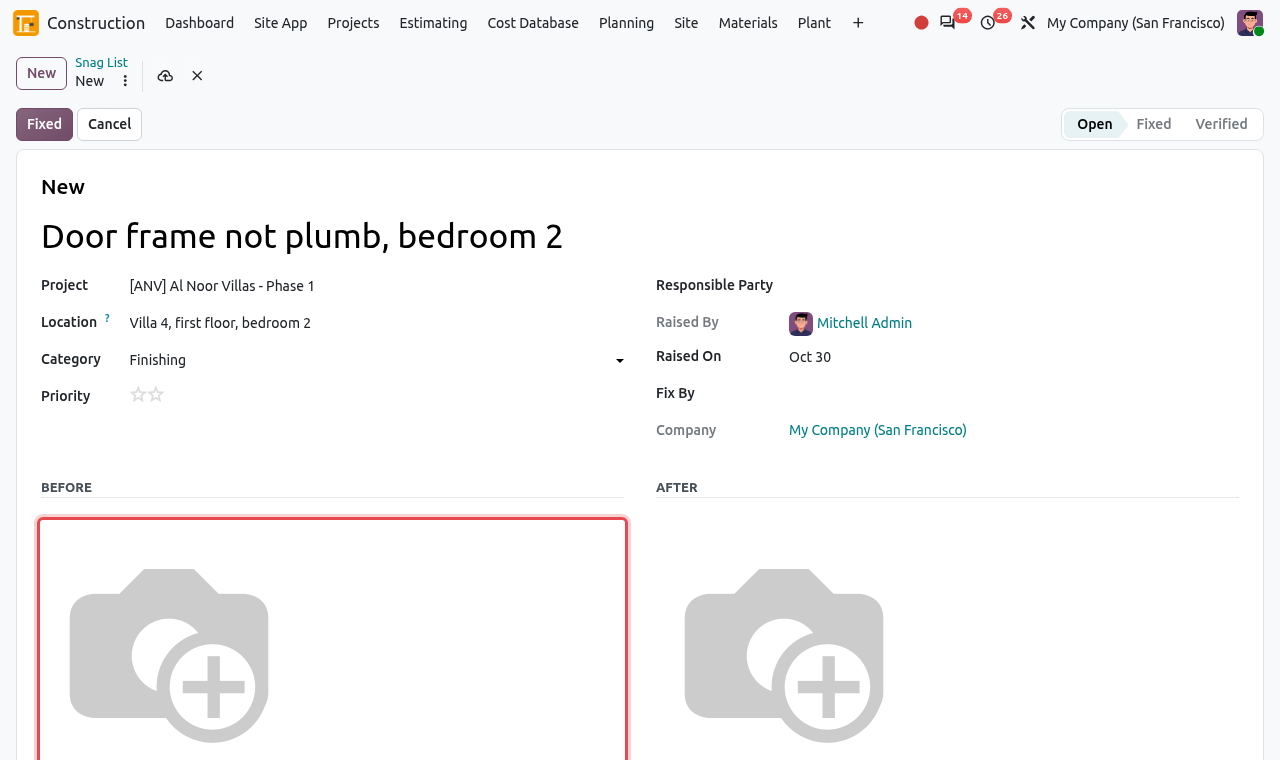
A new snag. Click the camera (framed) to add the "before" photo. Save. The snag is Open.
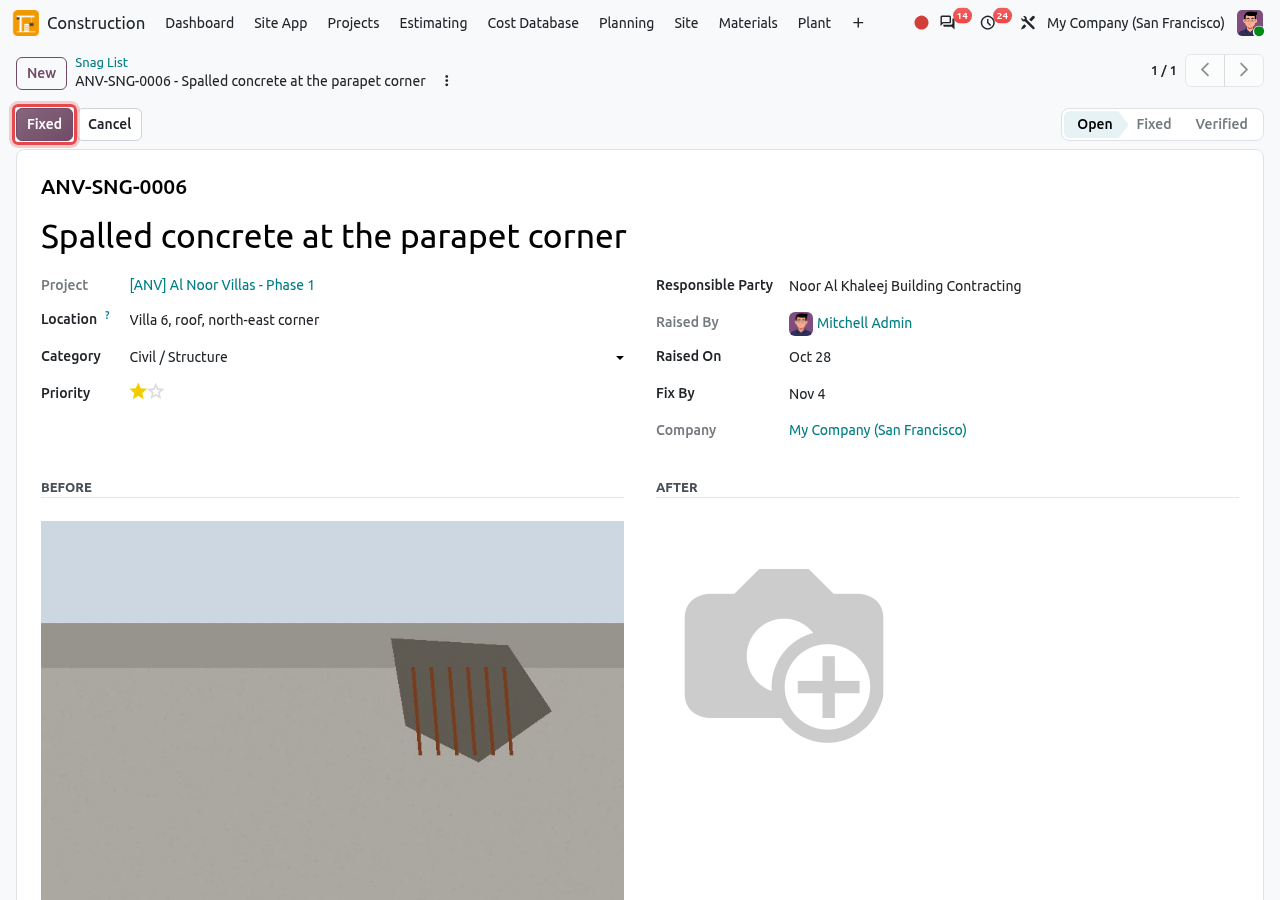
An open snag with its photo. When the defect is fixed, upload the photo under After and click Fixed. Without the "after" photo, Odoo refuses:
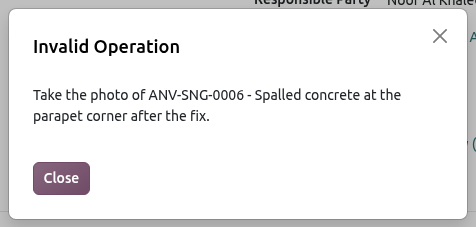
The message when the "after" photo is missing. The snag is Fixed, with the date. The QA/QC inspector compares the photos and checks on site, then clicks Verify, or Not Fixed to send it back to Open (the "after" photo is then removed).
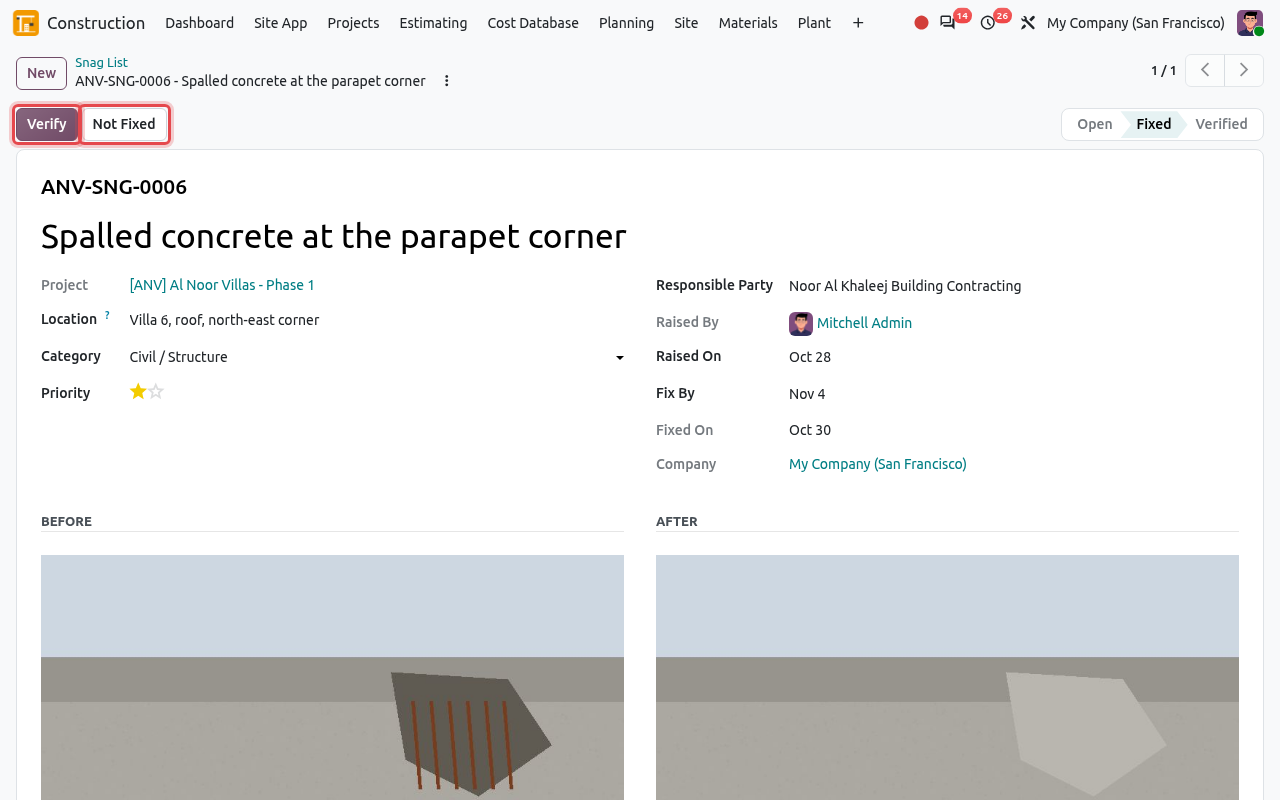
Before and after photos side by side. The snag is Verified; the verifier is recorded.
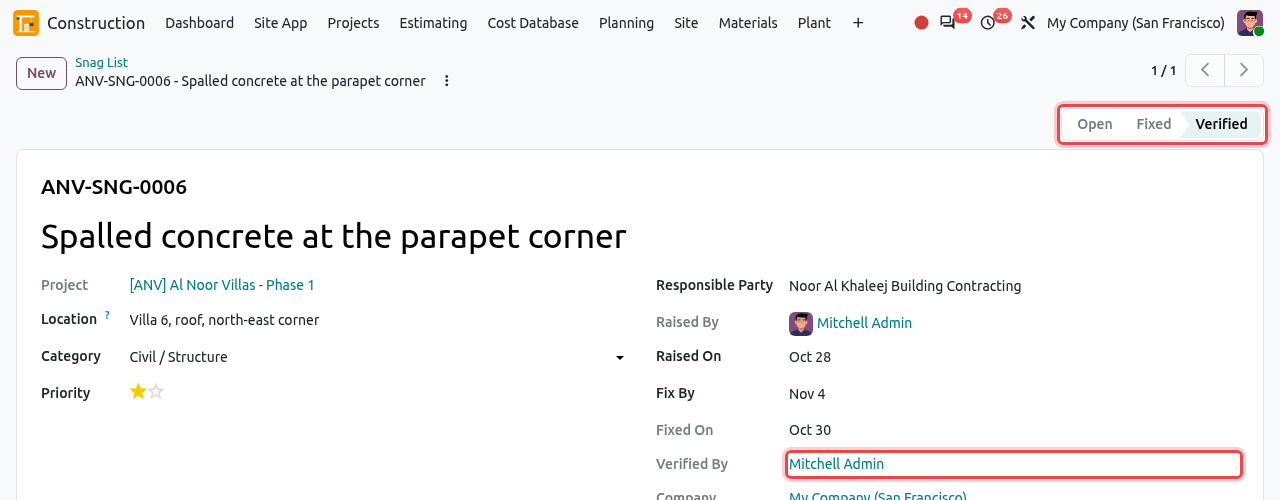
The verified snag.
TIP
For a handover walk, group the list by Location or by Responsible Party (in the search options) and send each subcontractor the list of its open snags. The filter To Verify lists the snags marked fixed.
Material Tests
Record here the tests of materials: concrete compressive strength (cubes), slump, soil compaction, steel tensile, blocks, asphalt, pipe pressure tests... Odoo compares the result with the required value and tells you if the test passed.
Pending→Result Recorded
When the sample is taken, click New and fill in the test:
Field What to enter Test The kind of test, e.g. Concrete Compressive Strength. Element The element or pour tested, e.g. Roof slab villa 3, pour R-03. Sample The sample or cube reference. Age (days) For cubes: 7, 28... Laboratory The testing laboratory. Sampled On The sampling date. Criterion At Least (e.g. strength) or At Most (e.g. slump). Required Value / unit e.g. 30.00 MPa. When the laboratory sends the result, open the test, enter the Result Value, attach the certificate with the Test Certificate button and click Record Result.
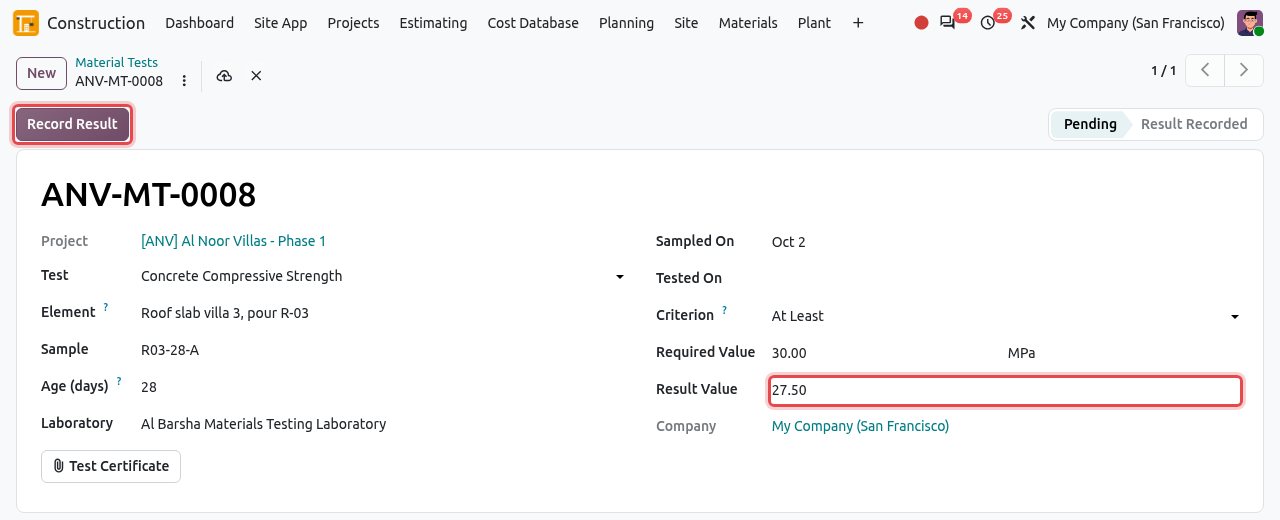
The result (27.50 MPa) is typed; click Record Result. The test is Result Recorded with today as Tested On. A green PASSED or red FAILED ribbon appears. For a failed test, a message is posted in the chatter and a Raise NCR button appears. If the result was typed wrongly, click Correct Result to go back to Pending.
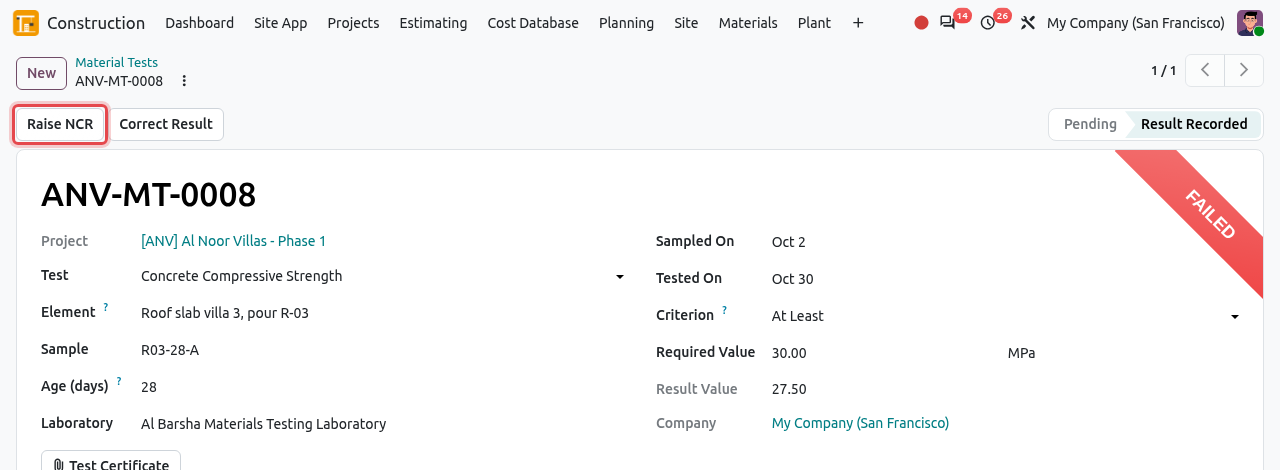
27.50 MPa is below the 30 MPa required: FAILED. Click Raise NCR. Odoo creates a draft NCR (source Material Test, category Material) with the measured and required values. Complete it and follow the NCR process.
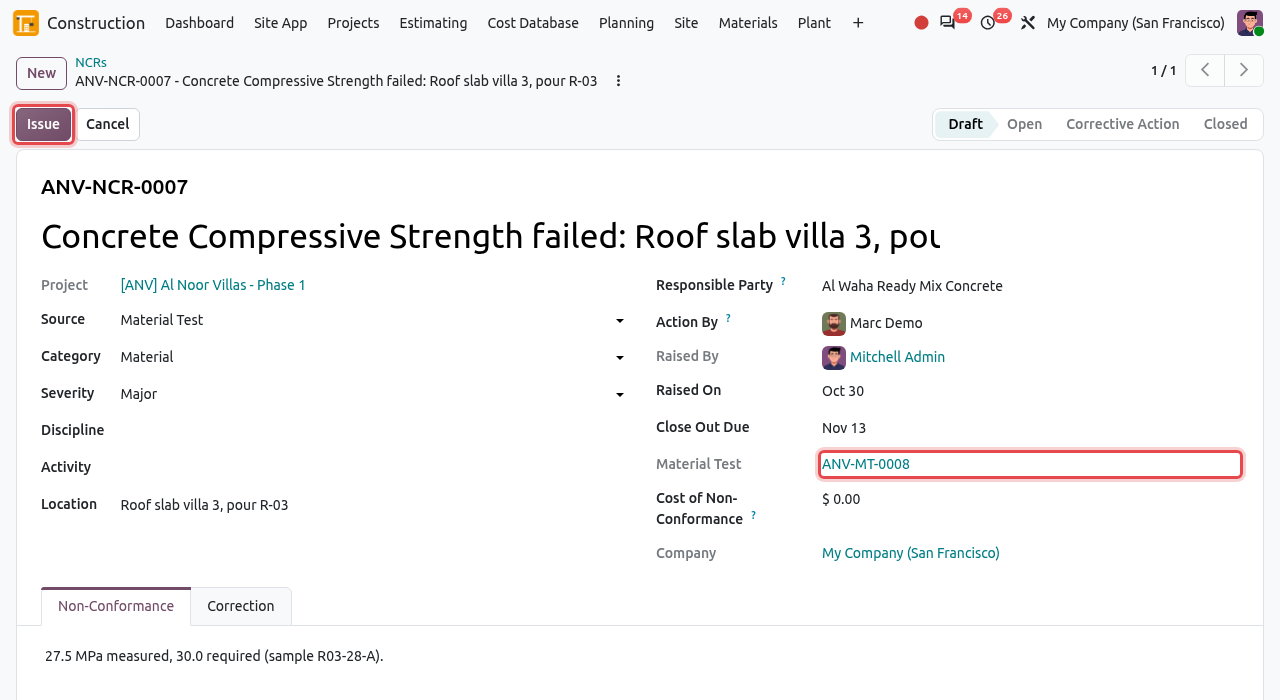
The NCR is linked to the material test (framed).
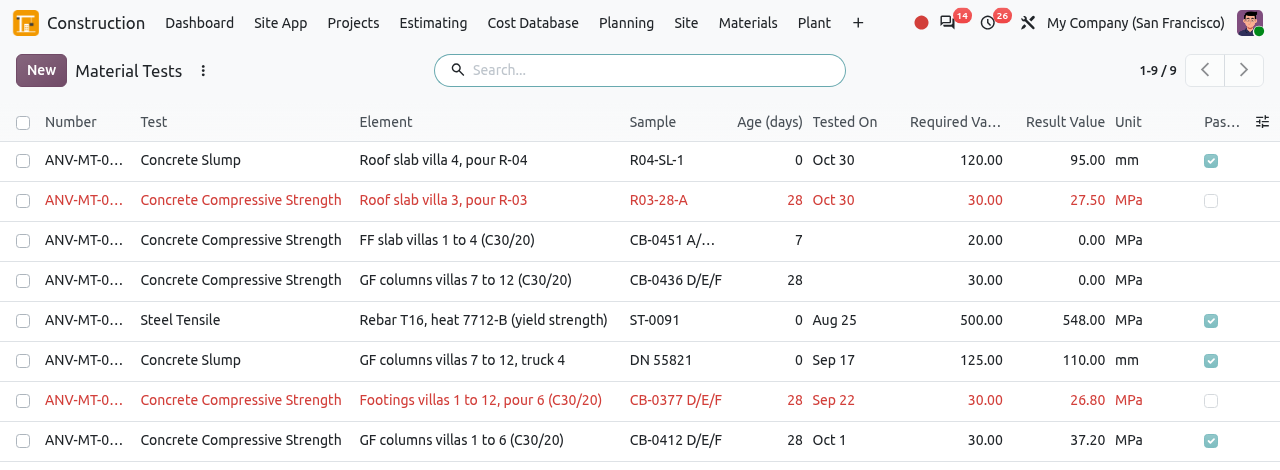
In the list, failed tests are red and the Passed column is ticked for passed tests. Use the filters Pending (results still awaited) and Failed.
Quality on the project form
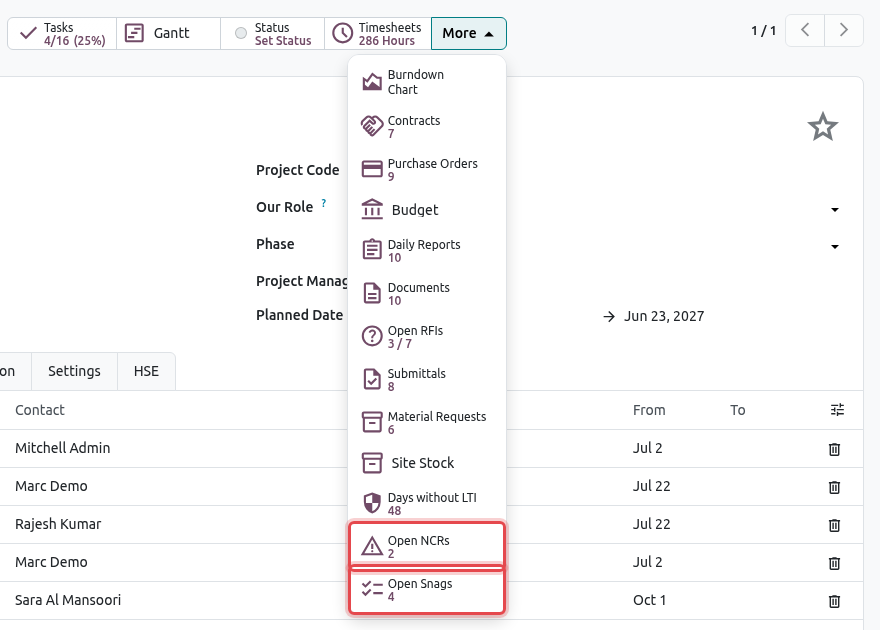
The project form shows Open NCRs (open and under corrective action) and Open Snags under the More smart button. Click them to see the list for this project; new NCRs and snags created from there get the project automatically.