
Appearance
Documents
The Documents menu is the document control office of the project. It keeps the drawings and documents with all their revisions, sends them to other parties with transmittals, and follows the questions (RFIs), the approvals (submittals), the letters and the meetings of the project.
WHO USES IT
The Document Controller registers documents and sends transmittals. Engineers and site staff (Document User role) raise RFIs and submittals, register letters and write meeting minutes. The consultant's answers can be recorded by the person named as Responder or Reviewer.
Open the Documents menu
The Documents menu is at the right of the Construction top bar. On a normal screen it is grouped under the + button: click +, then pick an entry under Documents.
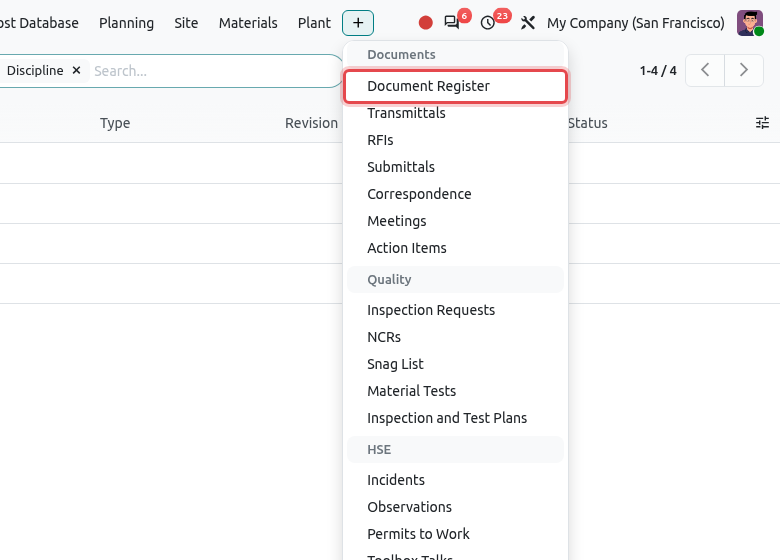
| Menu | What it is for |
|---|---|
| Document Register | The list of all drawings and documents, with their revisions and files. |
| Transmittals | Sending documents to another party (consultant, subcontractor...) and recording that they received them. |
| RFIs | Requests for Information: questions to the designer or the engineer, with a due date. |
| Submittals | Items submitted for the engineer's approval: shop drawings, materials, method statements... |
| Correspondence | The register of letters received (incoming) and sent (outgoing). |
| Meetings | Project meetings: agenda, attendees, minutes and action items. |
| Action Items | All the actions decided in meetings, in one list. |
Every record is numbered automatically per project, for example ANV-RFI-0006 (project code, kind of record, sequence).
Document Register
The register lists every document of every project. A document (for example a drawing) has one number and a title. Its content lives in its revisions: P01, P02... for preliminary issues, C01, C02... once contractual. Each revision has a file and a status code that tells what it may be used for.
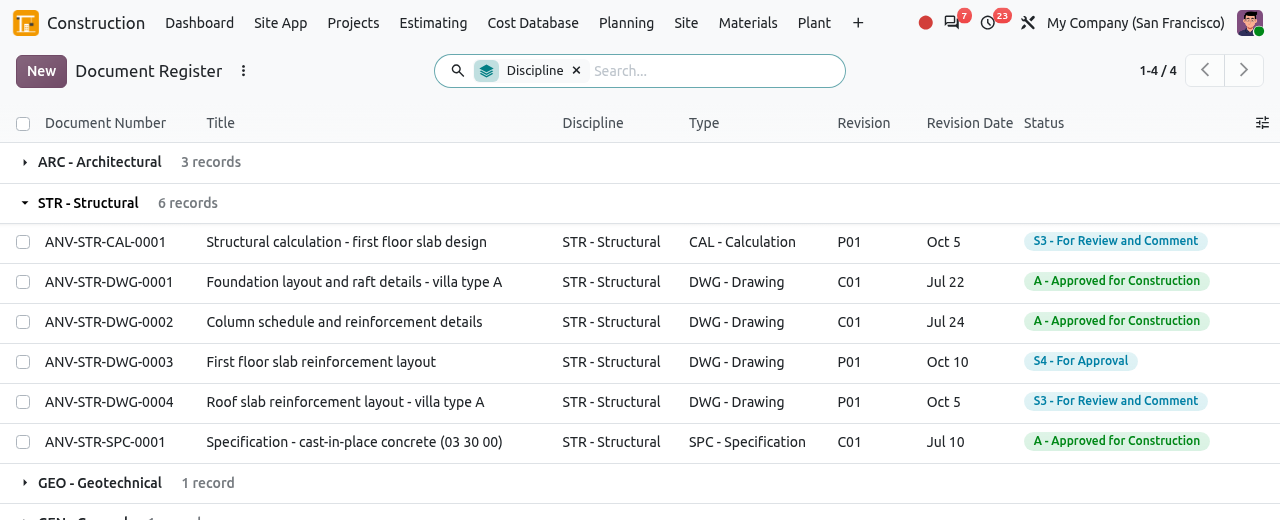
Status codes
| Code | Meaning |
|---|---|
| S0 | Work in Progress (not shared yet) |
| S1 | For Coordination between designers |
| S2 | For Information only |
| S3 | For Review and Comment |
| S4 | For Approval |
| A | Approved for Construction: the site may build from it |
| B | Partially Approved |
| CR | As Built (Record) |
The search filters For Construction (status A), Under Review (S3 and S4) and As Built (CR) find documents by status quickly.
Register a new document
Open and click New.
In Project, type a few letters of the project name or code and pick it in the list (here [ANV] Al Noor Villas - Phase 1).
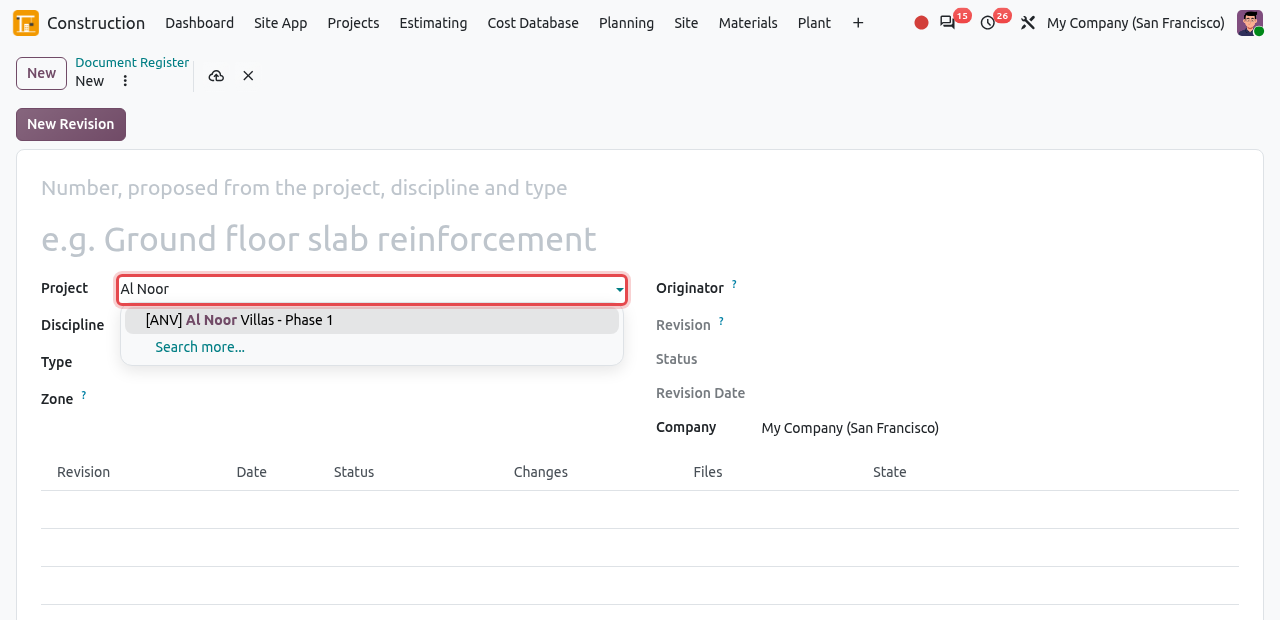
Choose the project first: the document number is built from its code. TIP
You can also start from the project: open it, click More in the smart buttons, then Documents, then New. The register is then filtered on the project and the Project is filled in for you.
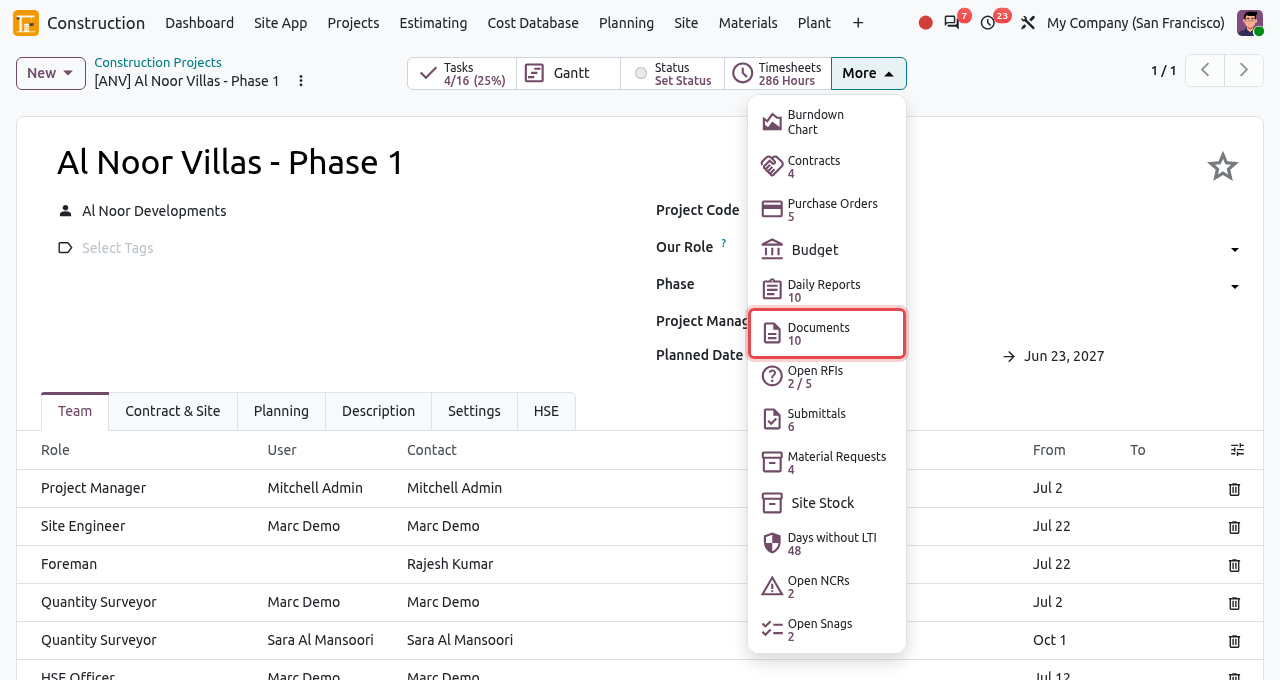
The project's smart buttons also show the open RFIs (open / total) and the submittals. Fill in the form. Choose the Discipline and the Type first: Odoo then proposes the document number from the project code, the discipline code and the type code (here ANV-STR-SCH-0001).
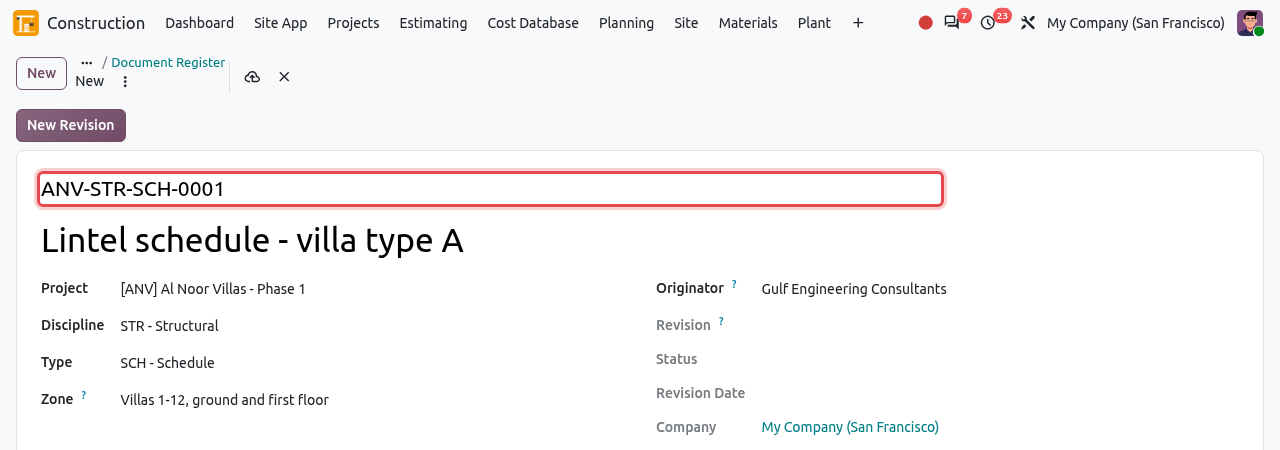
A new document. The number (framed) is proposed automatically; you can overwrite it with the designer's number. Field What to enter Title (large field) The title of the drawing, e.g. Lintel schedule - villa type A. Project The project of the document (already filled in when you start from the project). Discipline Architectural, Structural, MEP... (list in Configuration). Type Drawing, Specification, Schedule, Report... Zone Building, level or zone covered, e.g. Villas 1-12, ground and first floor. Originator The company that produces the document (designer, subcontractor...). Click the cloud icon (save). The document exists, but has no revision yet: add one as explained below.
Upload a new revision
Draft→Issued→Superseded
Open the document and click New Revision.
In the window, check the Revision (Odoo proposes the next one: P01 → P02 → P03; C01 → C02), pick the Status code, write what changed, and click Files to upload the file (PDF, DWG...). Click Save.
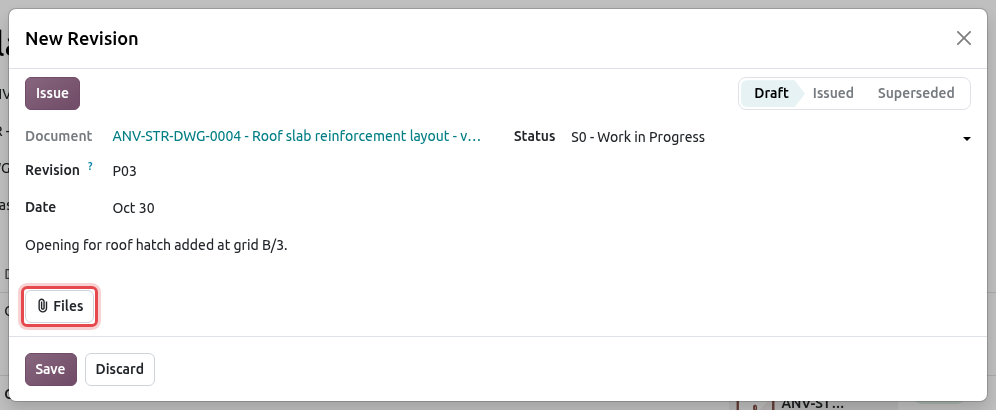
The New Revision window. Upload the file with the Files button (framed). The revision is added in Draft. A draft is not the current revision yet. To publish it, click Issue at the end of its line.
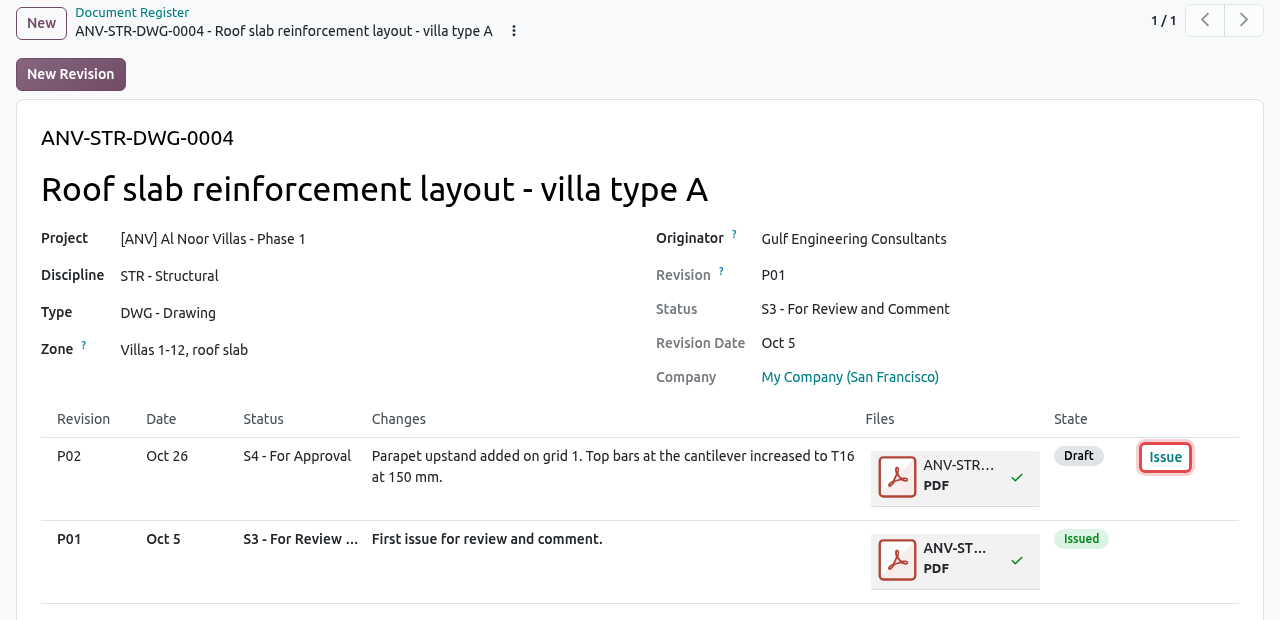
P02 is still a draft: the header still shows P01 as the current revision. Click Issue (framed). The new revision becomes Issued and the previous one is automatically Superseded (shown in grey). The header now shows the new revision, its status and date.
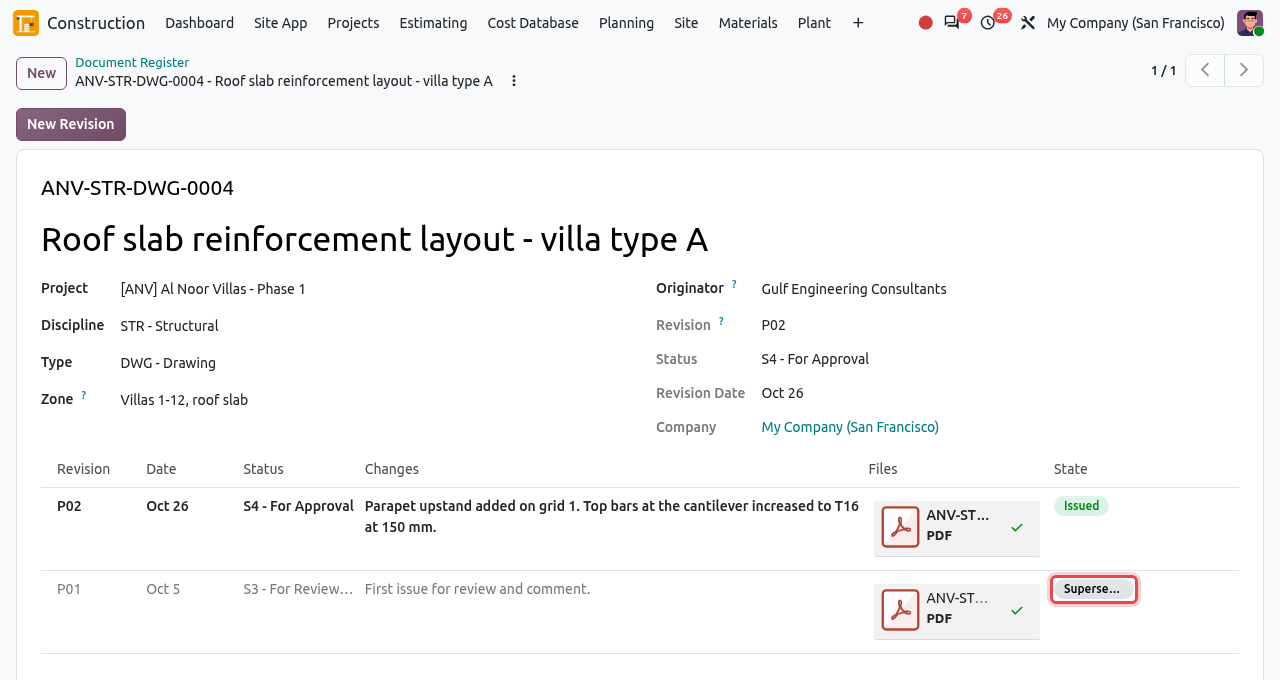
P02 is issued; P01 is superseded.
TIP
You can also leave a revision in draft and send it with a transmittal: sending the transmittal issues its draft revisions for you.
COMMON MESSAGES
- "Attach the file of ... before issuing it.": a revision without a file cannot be issued. Open the revision, upload the file, then issue it.
- "Document numbers are unique per project.": another document of the project already has this number.
- "A revision appears once per document.": the revision name (e.g. P02) is already used on this document.
Transmittals
A transmittal is the cover sheet sent with documents: it says which revisions are sent, to whom and why (for approval, for construction...). Odoo e-mails the files to the recipient and records when they acknowledge receipt.
Draft→Sent→Acknowledged
Click New and fill in the transmittal.
Field What to enter Project The project, e.g. [ANV] Al Noor Villas - Phase 1. To The recipient company, e.g. Gulf Engineering Consultants. Copy To Other people who receive a copy. Purpose For Approval, For Review and Comment, For Information, For Construction, For Tender or As Built. Date / Response Due The date sent and the date by which you expect an answer. Documents (lines) Click Add a line and tick the revisions to send. Superseded revisions are not offered. Note (bottom) Remarks for the recipient. 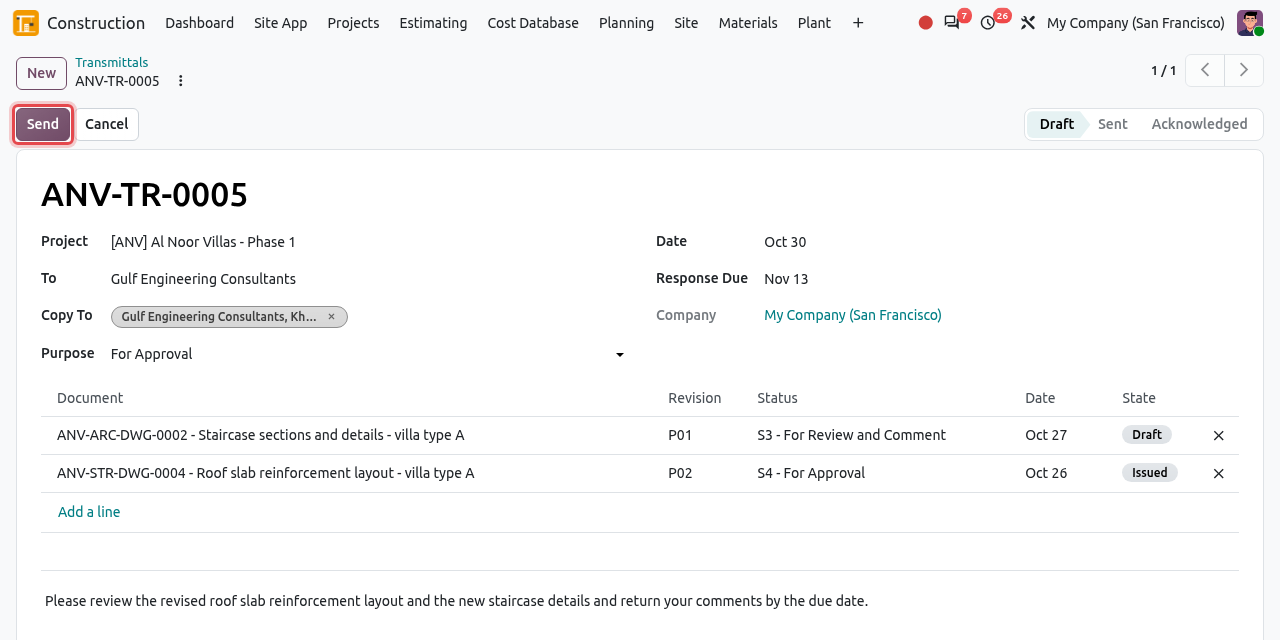
A draft transmittal with two documents. Click Send. Click Send. Odoo issues the draft revisions of the transmittal, e-mails the transmittal with the files to the recipient and the copies, and moves it to Sent. The e-mail is visible in the chatter below the form.
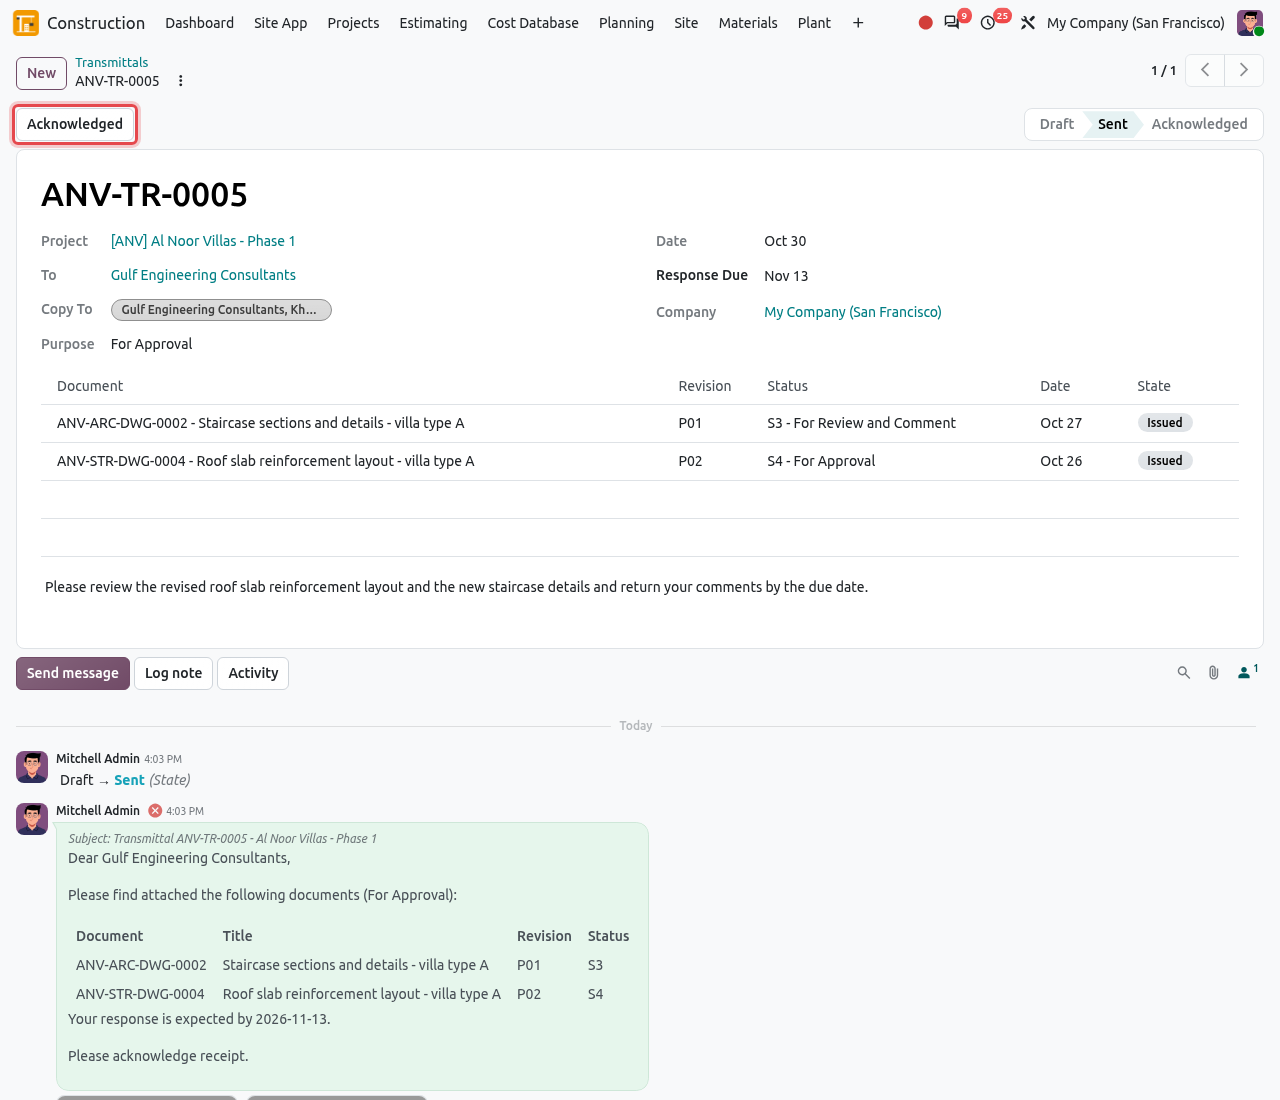
The transmittal is sent: the e-mail with the document list is in the chatter. When the recipient confirms receipt, click Acknowledged. When the recipient confirms receipt (by e-mail, signed copy...), click Acknowledged. The Acknowledged On date is recorded.
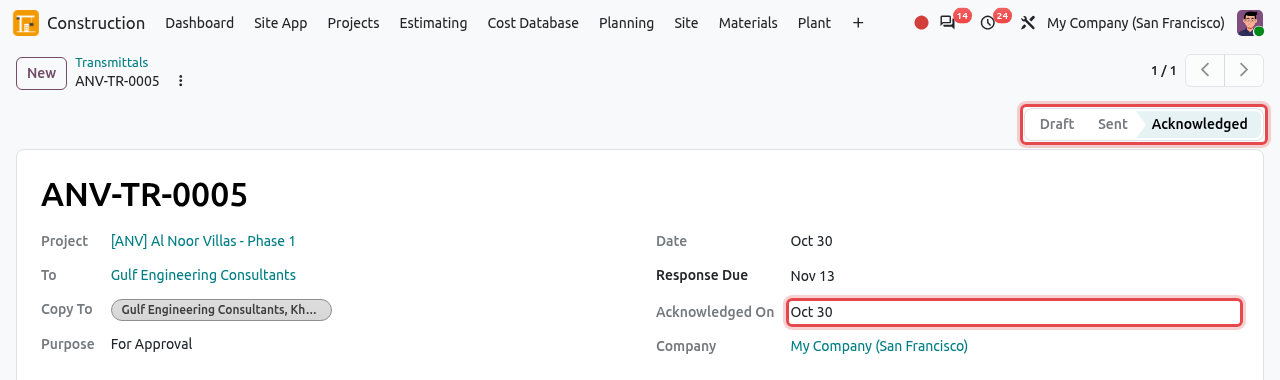
The acknowledgement date is filled in.
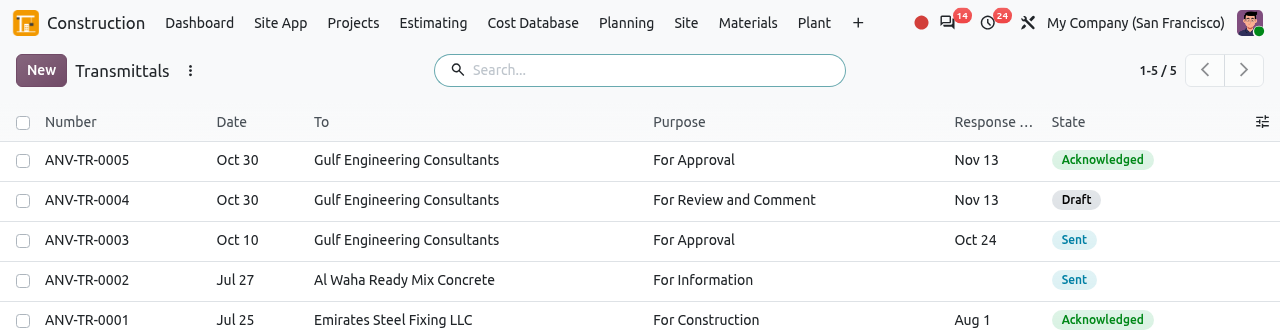
In the list, the filter Not Acknowledged shows the transmittals still waiting for a receipt. Only draft transmittals can be cancelled (Cancel).
E-MAILS
The e-mail is really sent only if an outgoing mail server is set up in Odoo. A red cross next to the message in the chatter means the e-mail could not be delivered; ask your administrator.
RFIs (Requests for Information)
An RFI is a formal question from the contractor to the designer or the engineer, for example when two drawings do not agree. Odoo follows the due date and keeps the answer with the documents concerned.
Draft→Open→Answered→Closed
Raise an RFI
Click New and fill in the RFI.
Field What to enter Subject (large field) A short subject, e.g. Parapet height on the roof of villa type A. Project, Discipline, Location Where the question applies, e.g. Roof, villas 1-12, grid 1/A-D. Addressed To The consultant or designer who must answer. Responder The Odoo user who records the answer (for example the engineer's representative). This user gets a to-do with the due date. Raised On / Answer Due Today, and the date by which you need the answer. Question tab The question, the options you considered and your proposal. Below it, add the document revisions concerned. 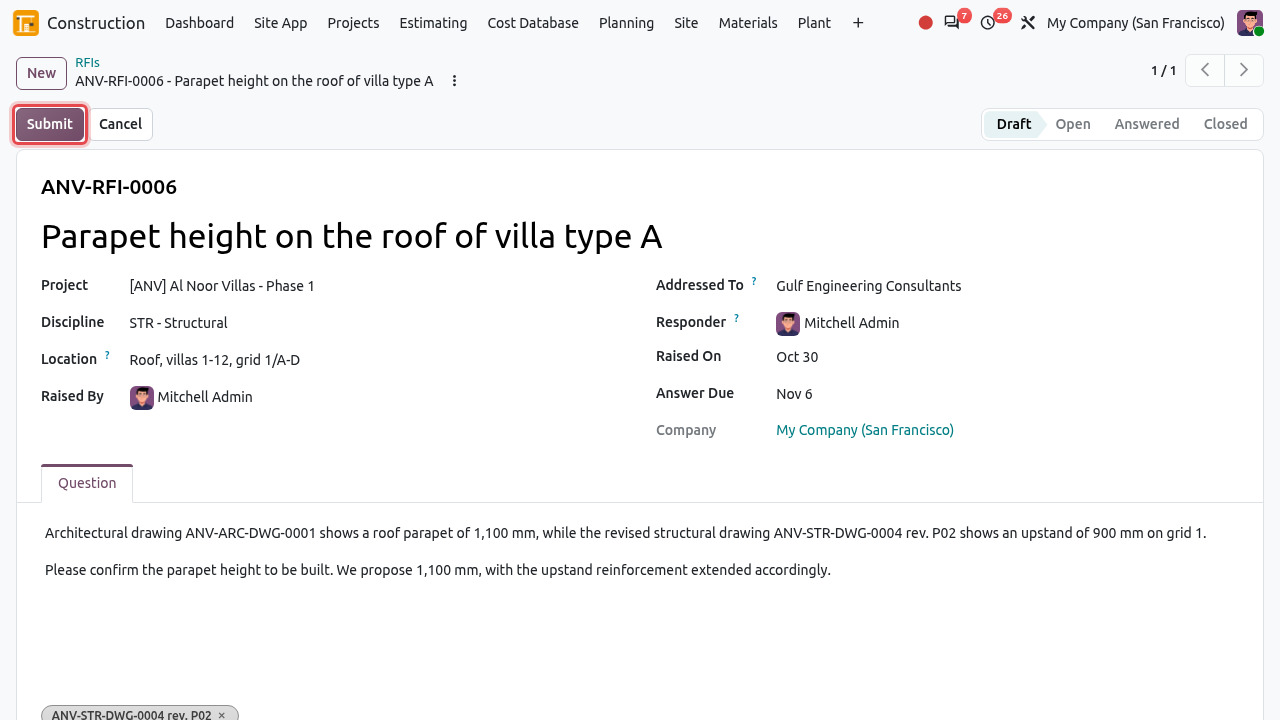
A draft RFI. The drawing revision concerned is linked at the bottom of the Question tab. Click Submit. The RFI becomes Open; the Responder gets a to-do activity and the addressee follows the RFI.
Answer and close an RFI
Open the RFI and click the Answer tab. Write the answer of the engineer. Tick Cost Impact and/or Time Impact if the answer changes the price or the programme (a variation or an extension of time may follow). Then click Record Answer.
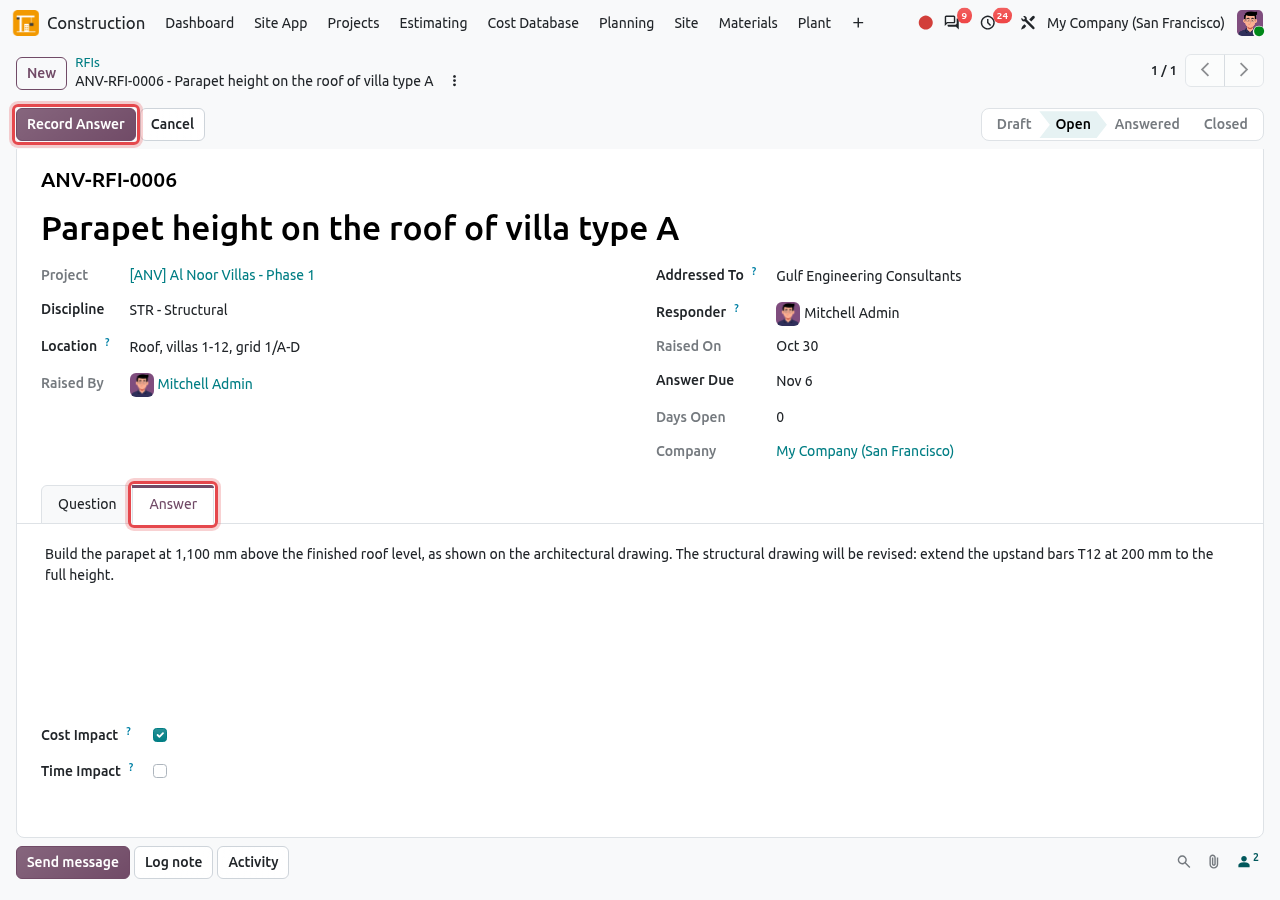
The answer is written in the Answer tab, then recorded with Record Answer. The RFI is Answered. Odoo records who answered and when, posts the answer in the chatter and notifies the person who raised the RFI. If the answer is good enough, click Close. If it is not, click Not Answered Enough: the RFI goes back to Open and the responder gets a new to-do.
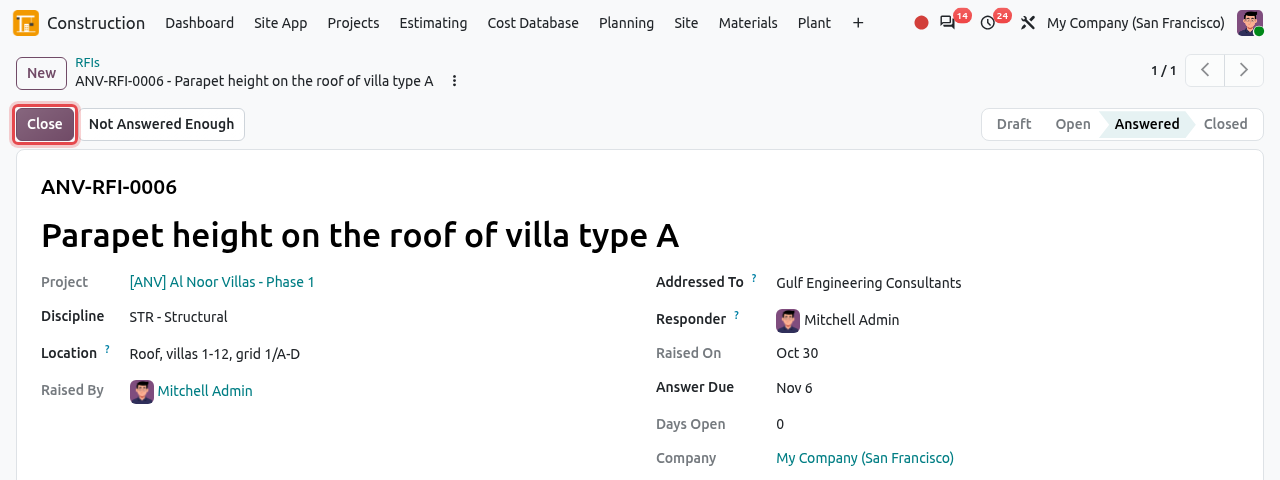
An answered RFI: Close or Not Answered Enough. The RFI is Closed.
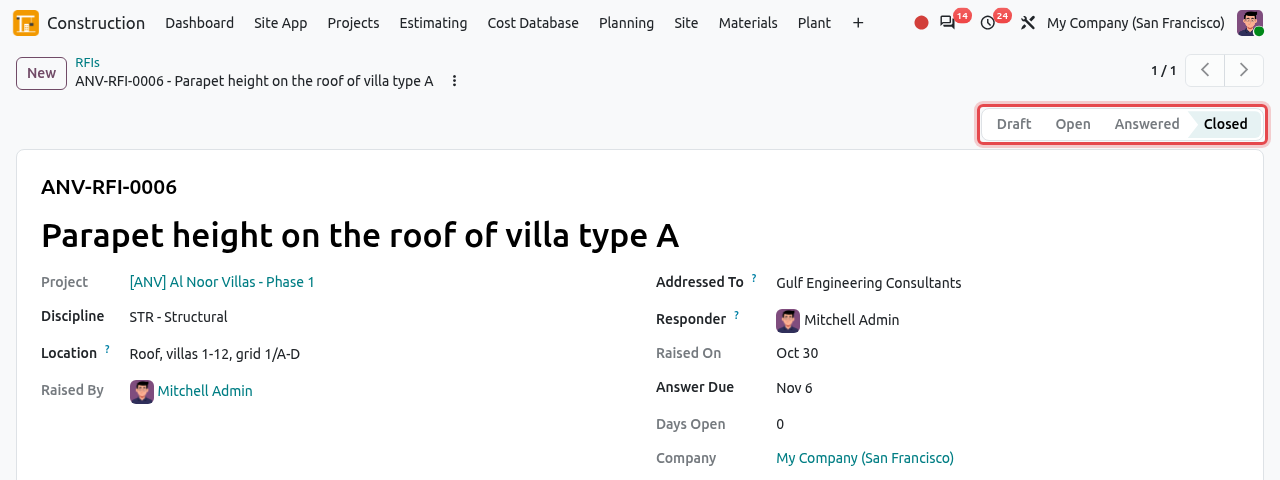
The closed RFI.
Overdue RFIs
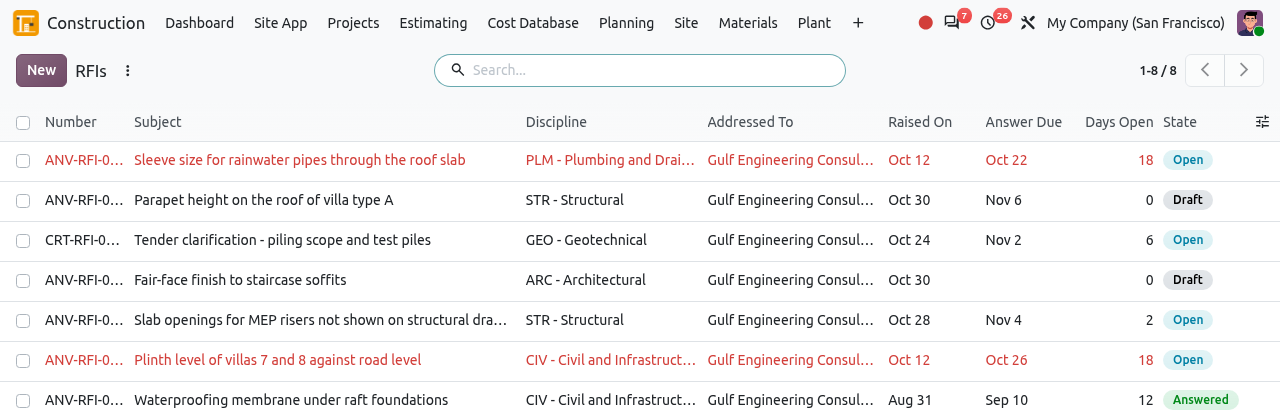
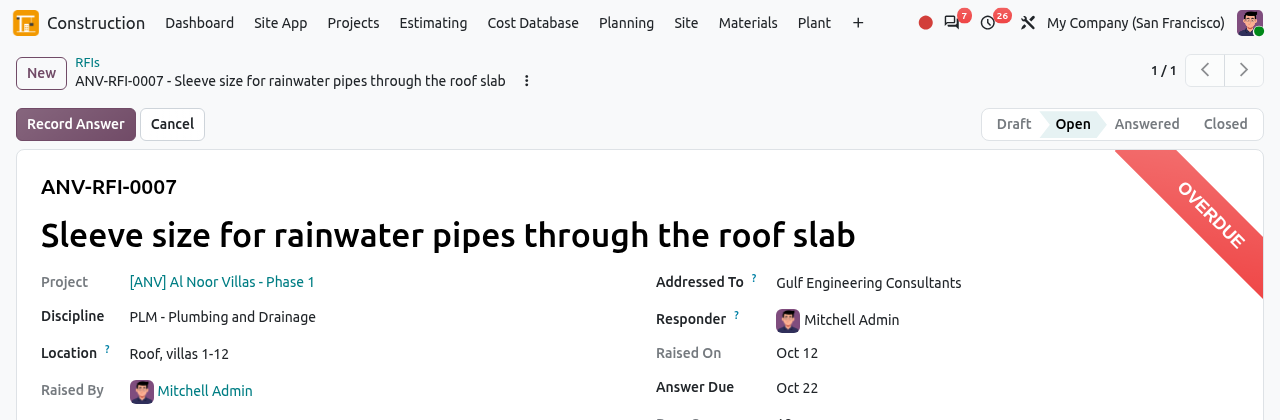
An open RFI whose Answer Due date has passed is overdue: it is shown in red in the list and gets a red OVERDUE ribbon on its form. The Days Open column counts the days since it was raised. Use the Overdue filter to chase them.
GOOD TO KNOW
- Subject, question and project can only be changed while the RFI is a draft.
- "Write the answer of ... first.": Record Answer needs a text in the Answer tab.
- Answered RFIs cannot be cancelled: close them instead.
Submittals
A submittal is something the contractor must have approved by the engineer before using it: a shop drawing, a material, a method statement, a sample, a test report... The engineer answers with a review code.
Draft→Under Review→Reviewed
| Review code | Meaning | What happens next |
|---|---|---|
| A - Approved | Accepted as submitted. | Use it. |
| B - Approved as Noted | Accepted with the reviewer's comments. | Use it and follow the comments. |
| C - Revise and Resubmit | Not accepted yet. | Correct it and resubmit (next revision). |
| D - Rejected | Refused. | Propose something else in a new submittal. |
Click New and fill in the submittal: the title, the Type (Material, Shop Drawing, Method Statement...), the Specification Section, the Supplier / Subcontractor, the Reviewer (the Odoo user who records the review) and the Review Due date. Describe the submission in the Submission tab and link the documents (data sheets, drawings) from the register.
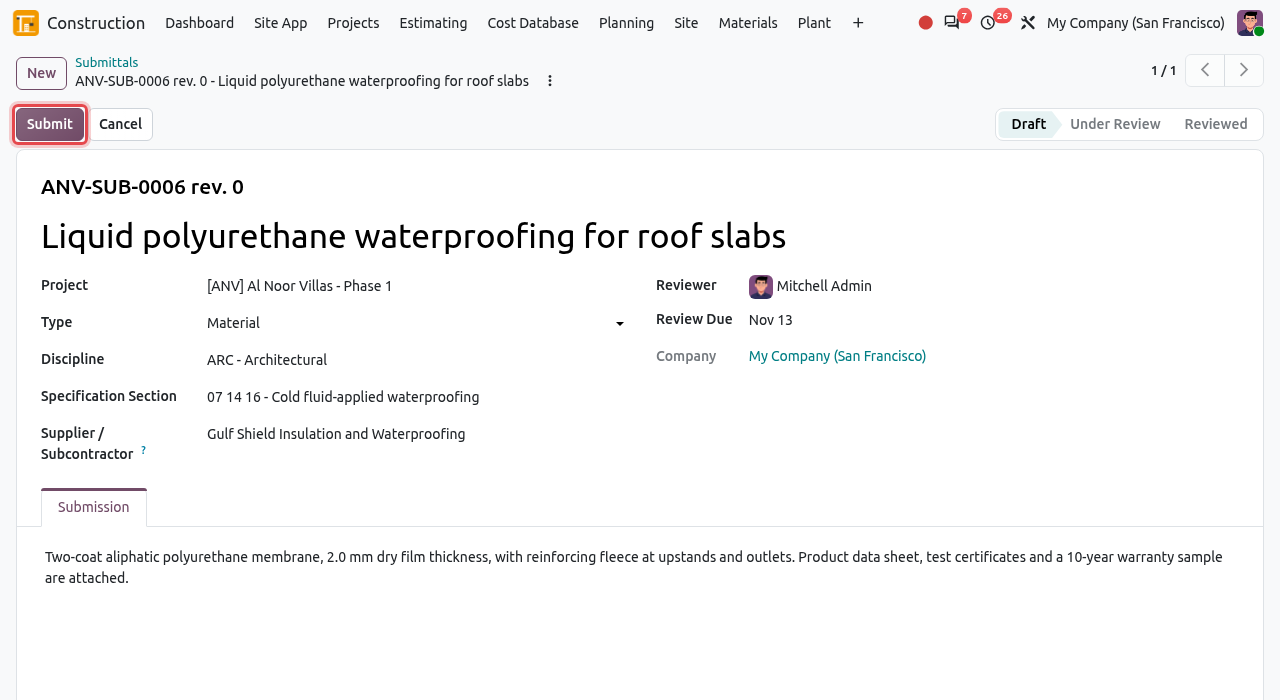
A material submittal in draft. The number ends with rev. 0 (first submission). Click Submit. The submittal is Under Review, the submission date is recorded and the reviewer gets a to-do.
When the engineer's answer arrives, open the Review tab and write the reviewer's comments. Then click the button of the review code: A - Approved, B - Approved as Noted, C - Revise and Resubmit or D - Rejected.
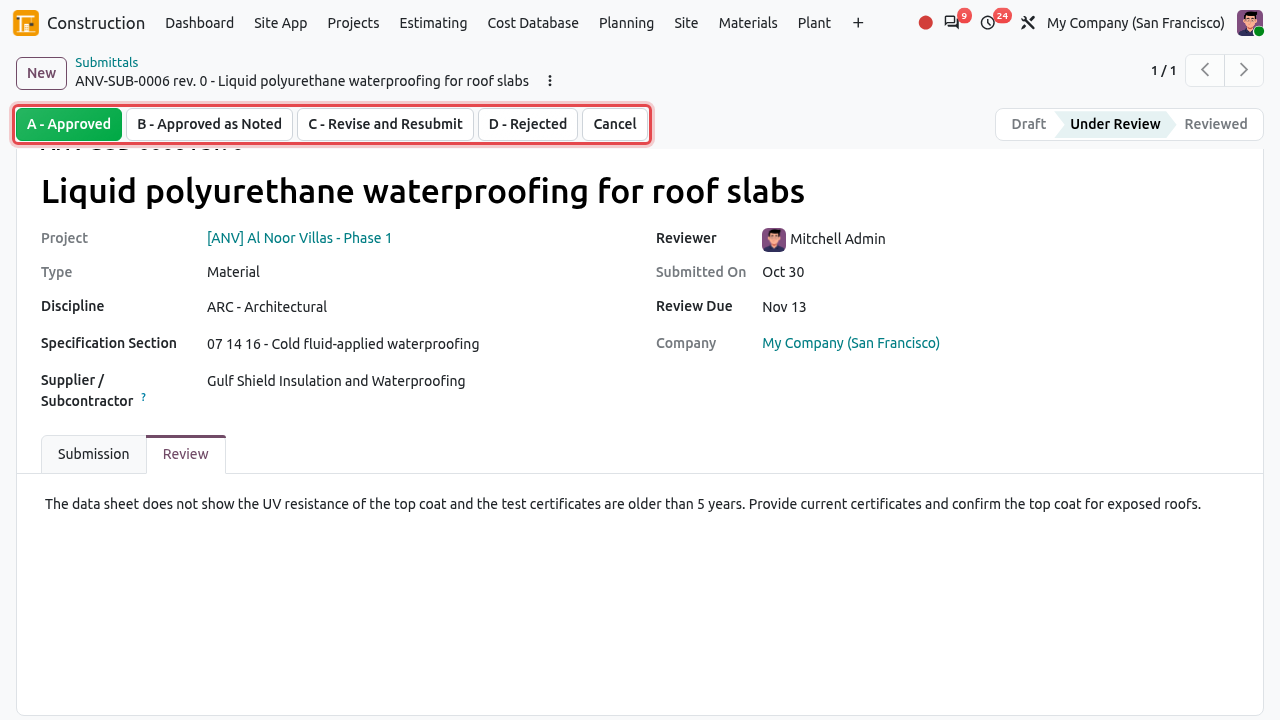
The four review buttons (framed). The comments are written in the Review tab first. The submittal is Reviewed with its code. With code C, a Resubmit button appears.
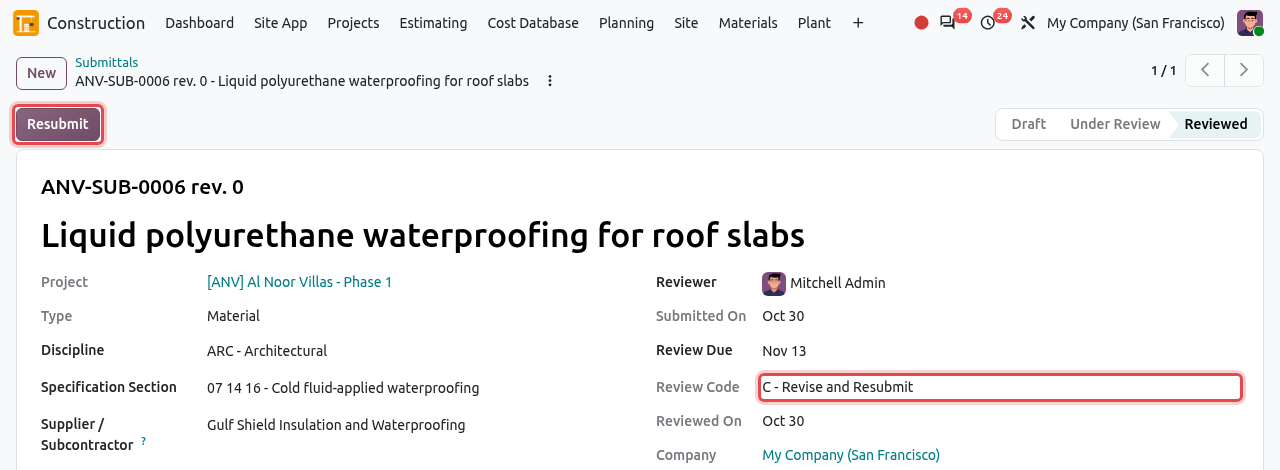
Code C: click Resubmit to prepare the next revision. Click Resubmit. Odoo creates rev. 1 of the same submittal number, in draft, linked to the previous submission. Update the description and the documents, then click Submit again. The cycle repeats until the code is A or B.
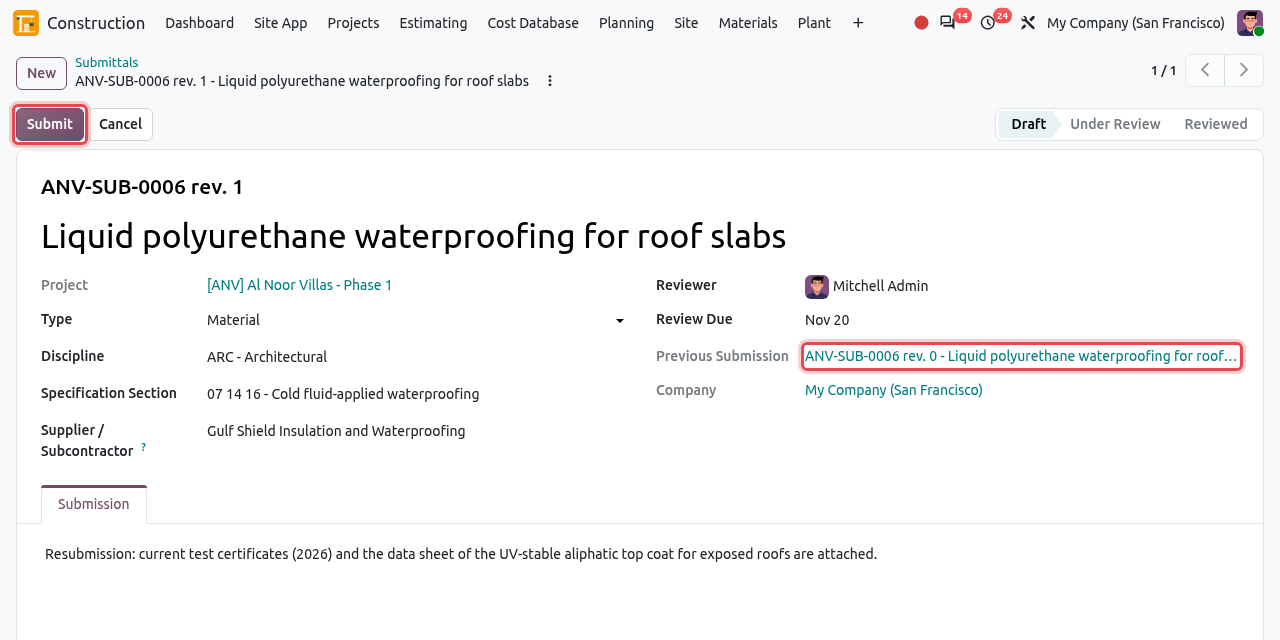
Rev. 1 shows the Previous Submission.
The list shows by default only the Latest Revisions (older revisions are hidden). The filter To Resubmit lists the code C submittals not resubmitted yet.
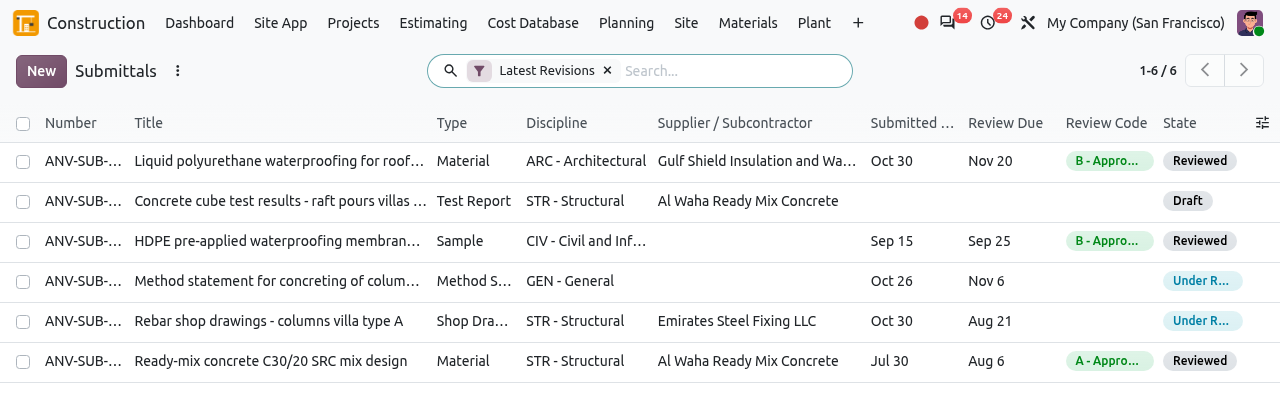
GOOD TO KNOW
- "Explain why the submittal is not approved in the review comments.": codes C and D need comments in the Review tab.
- Only code C can be resubmitted, once per revision. For code D, create a new submittal.
- Reviewed submittals cannot be cancelled.
- An approved material submittal (A or B) can be linked to a material inspection in Quality.
Correspondence
The correspondence register keeps every formal letter of the project. Incoming letters are numbered IN-0001, IN-0002..., outgoing letters OUT-0001, OUT-0002... per project.
Open→Replied→Closed
Click New and register the letter.
Field What to enter Subject The subject of the letter. Direction Incoming (received) or Outgoing (sent). It cannot be changed after saving. Project, Correspondent The project and the sender (or recipient). Their Reference The reference printed on their letter, e.g. GEC/ANV/L-0412. Category General, Instruction, Notice, Claim, Payment, Design, Health and Safety. Response Required / Reply Due Tick if the letter needs a reply, and give the date. Letter tab Upload the scanned letter with the Letter button, and type a summary. 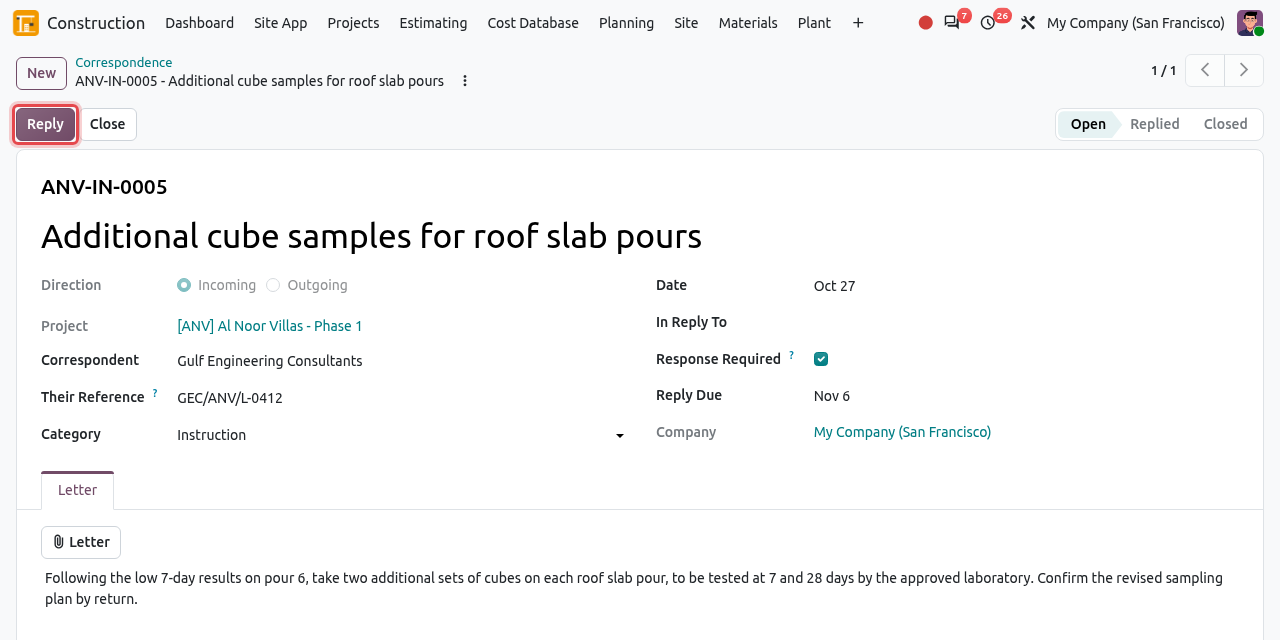
An incoming instruction from the consultant that needs a reply. Click Reply to answer it. To answer, click Reply. A new outgoing letter opens with the project, the correspondent, In Reply To and the subject "Re: ..." already filled in. Write the text, attach the signed letter and save.
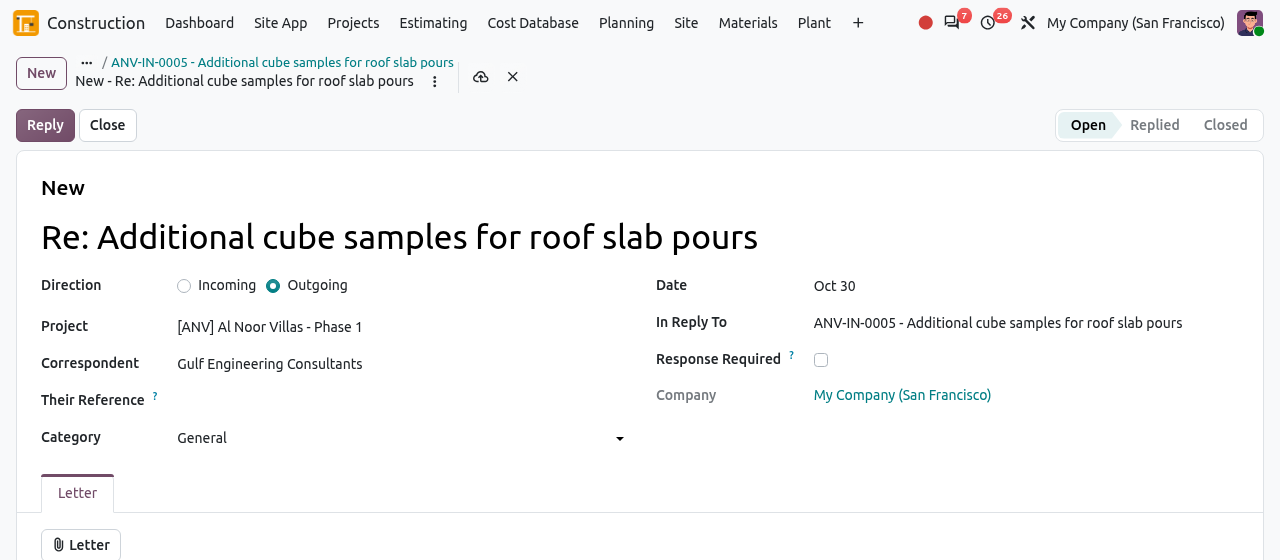
The reply is pre-filled from the incoming letter. The incoming letter is now Replied and its Replies tab lists the answer. Click Close when the matter is finished (Reopen brings it back).
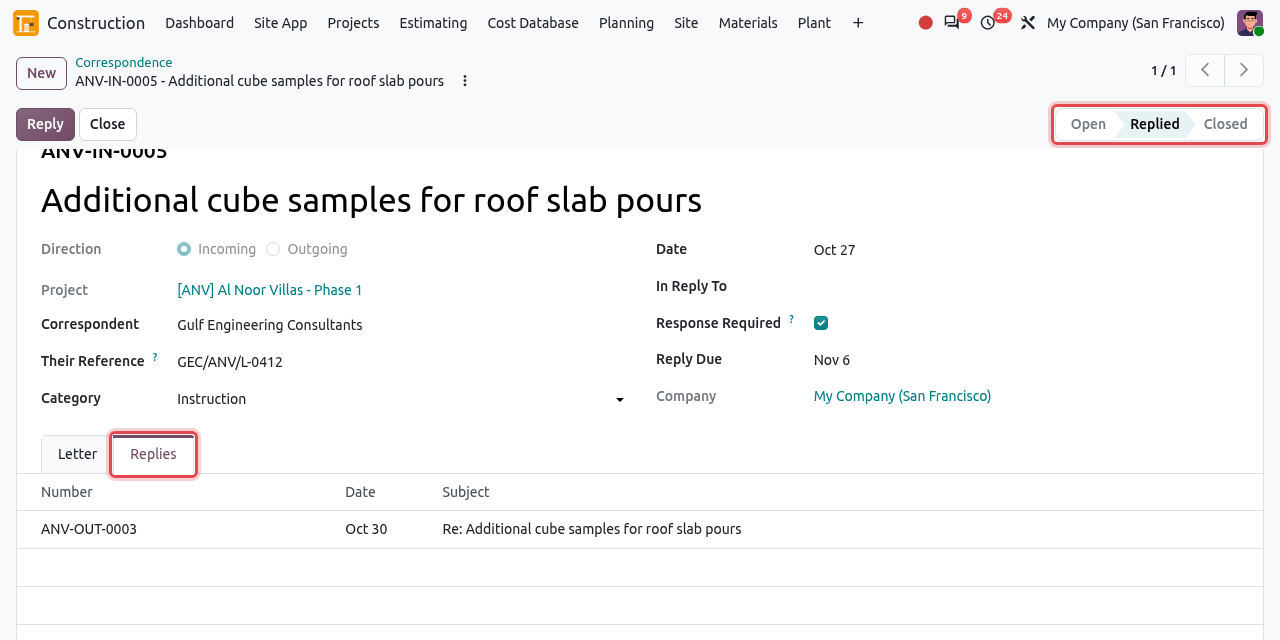
The status changed to Replied by itself when the reply was saved.
The filter Awaiting Reply lists the letters that need a reply and have none yet.
Meetings
Use Meetings for progress, coordination, design review, safety and handover meetings: plan them, invite the attendees, write the minutes, send them, and follow the actions until they are done.
(list or calendar view)
Planned→Held→Minutes Issued
Click New. Enter the title (e.g. Roof works coordination No. 1), the project, the Type, the Date, Duration and Location, and add the attendees. Write the agenda in the Agenda tab. Save.
Click Send Invitations: Odoo creates a calendar event with all the attendees and the agenda (the event appears in the Calendar Event field).
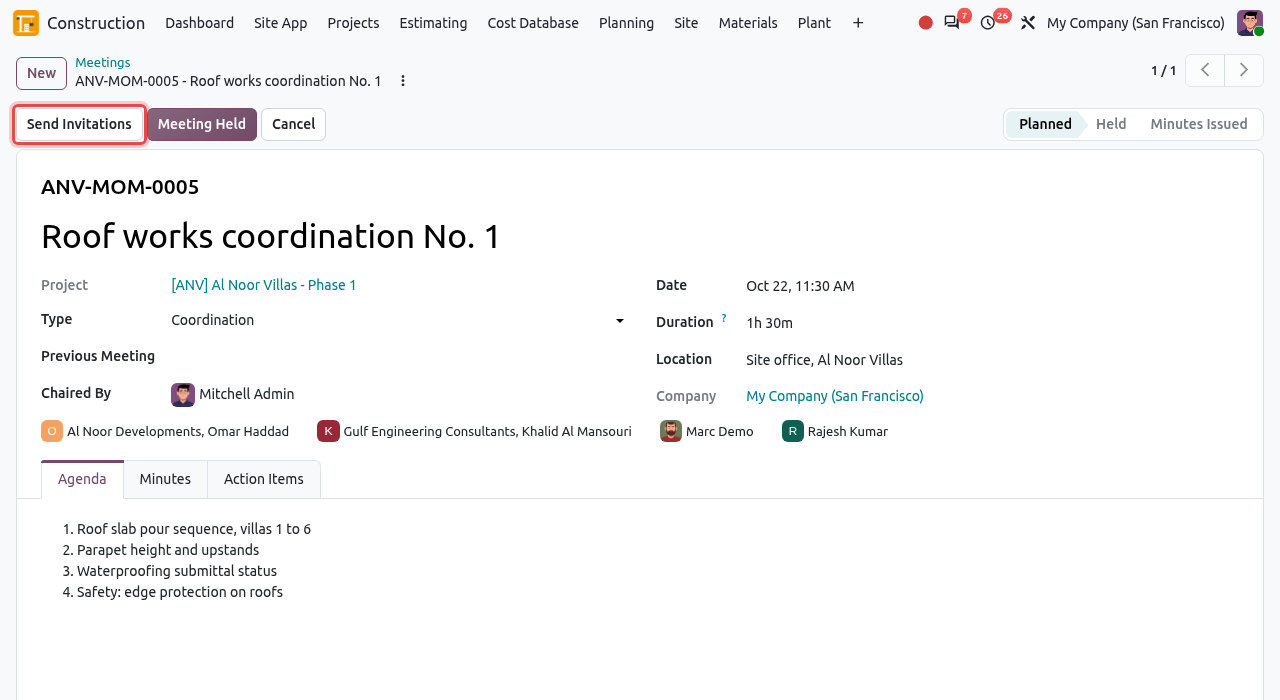
A planned meeting with its agenda. During the meeting, list the actions in the Action Items tab: click Add a line, write the action, the party who must act (By (Company)), or the Odoo user (By (User)), and the due date. Overdue actions turn red.
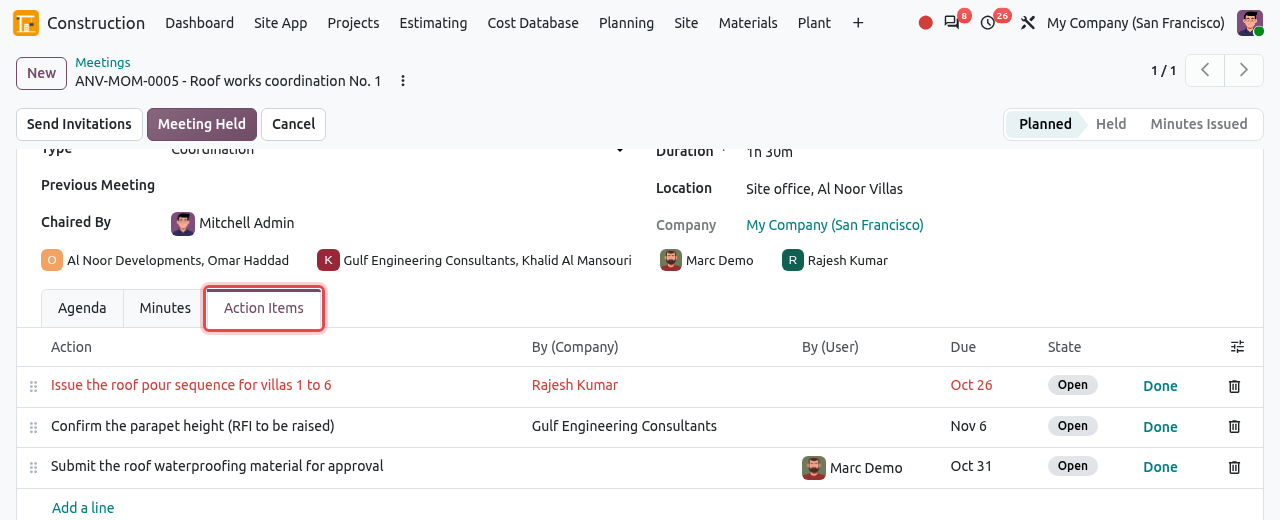
Action items of the meeting. After the meeting, click Meeting Held. Write the minutes in the Minutes tab, then click Issue Minutes.
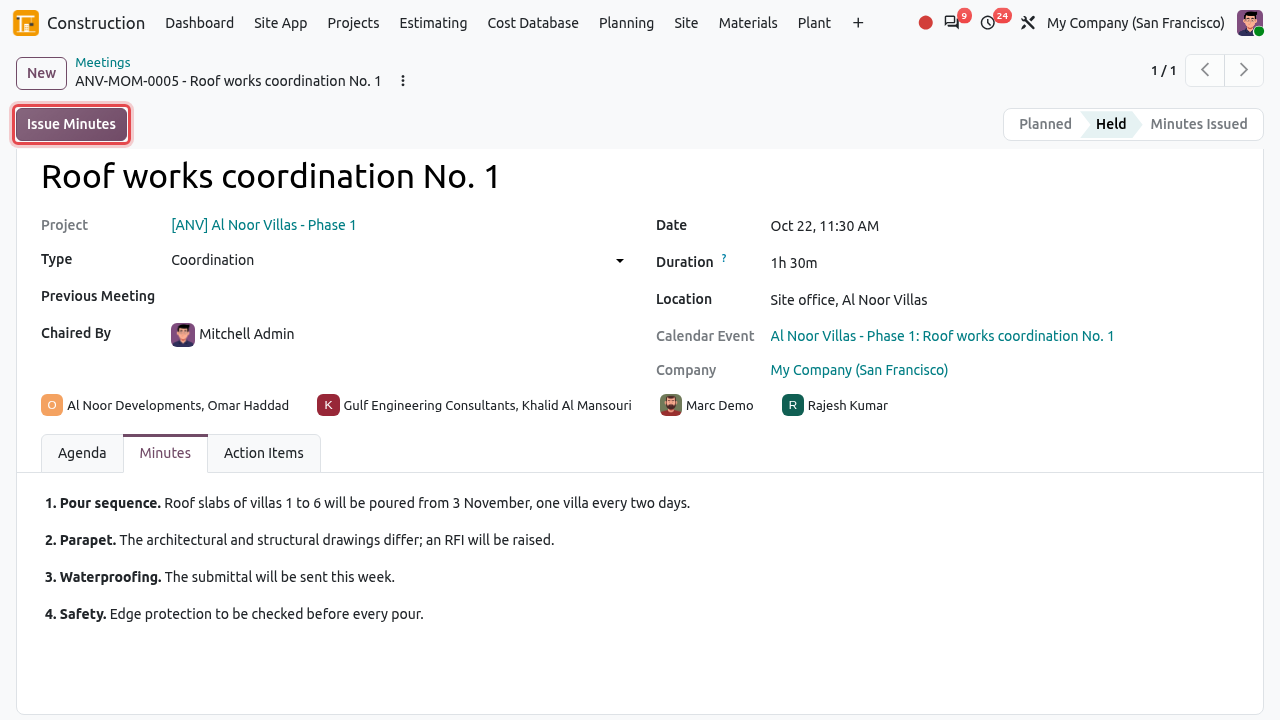
The minutes are written; click Issue Minutes. The meeting is Minutes Issued. The minutes are e-mailed to the attendees, the minutes can no longer be edited, and every action with a By (User) gives that user a to-do with the due date.
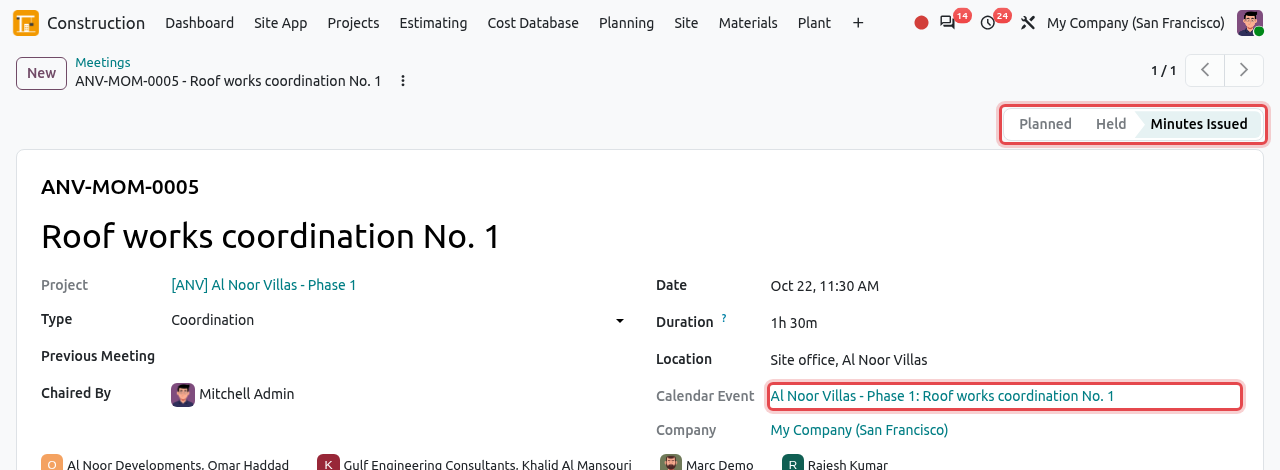
Minutes issued. The calendar event created by Send Invitations is linked.
Carry the open actions to the next meeting
Create the next meeting and choose the earlier one in Previous Meeting. Click Carry Forward Open Actions.
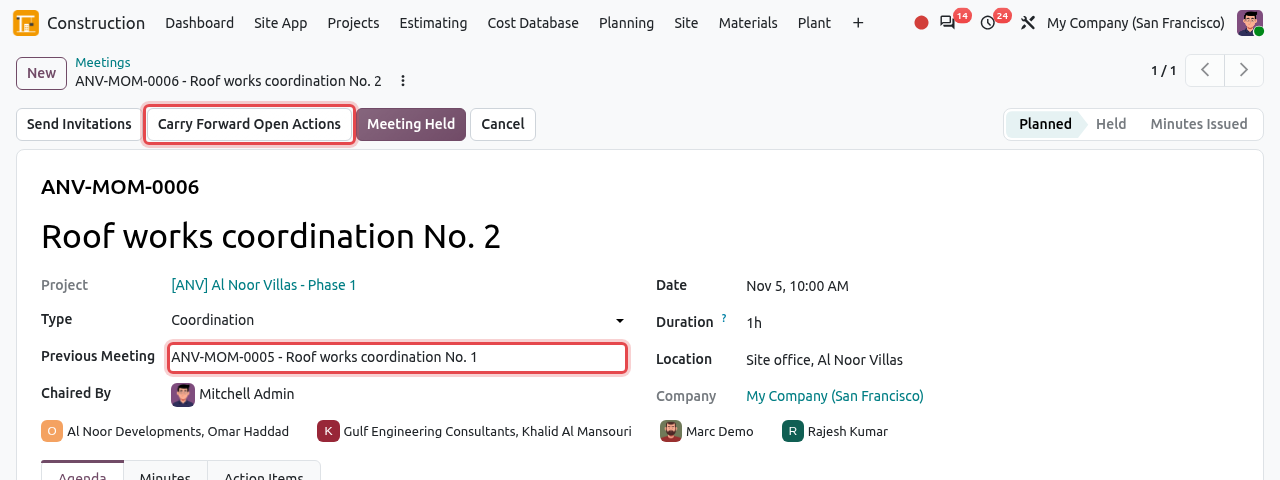
Meeting No. 2 points to meeting No. 1. The actions still open in the previous meeting are copied into this one. Actions already done are not copied. When you click Done on a carried action, it is marked done in every meeting it went through.
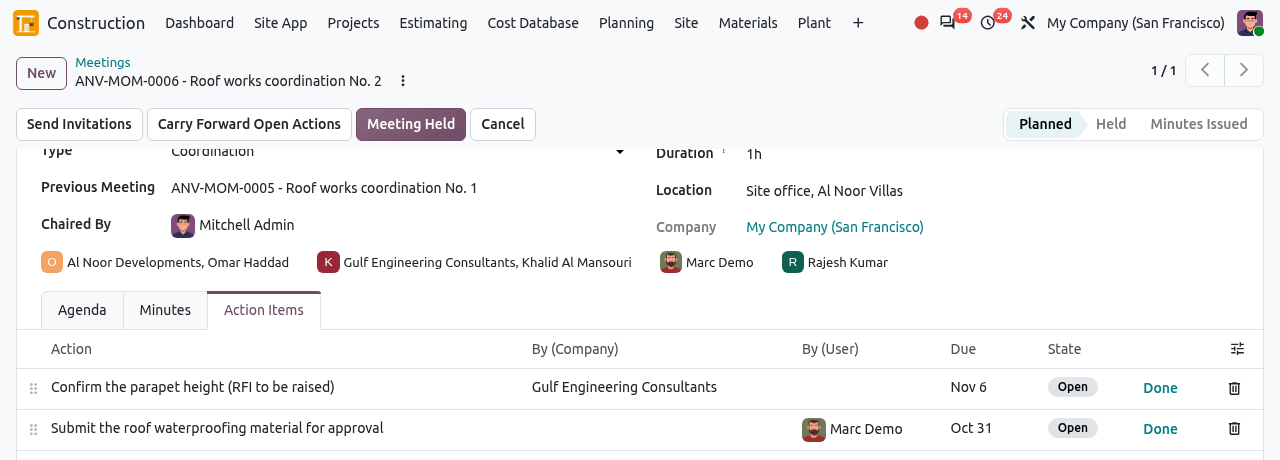
Two open actions were carried forward; the one done in meeting No. 1 was not.
To print the minutes, open the meeting and use the ⋮ (actions) menu next to the record name, then Minutes of Meeting.
Action Items
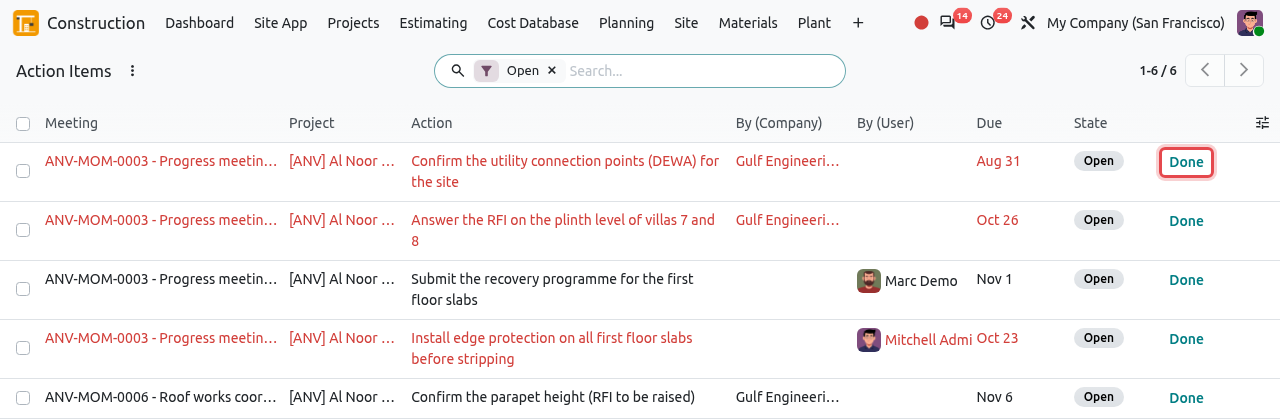
lists the actions of all meetings in one place. By default the Open filter is on (actions already carried to a later meeting are hidden, so each action appears once). Use Mine for your own actions, group by project or by party, and click Done when an action is finished. Actions are created in the meetings, not in this list.
Prints and smart buttons
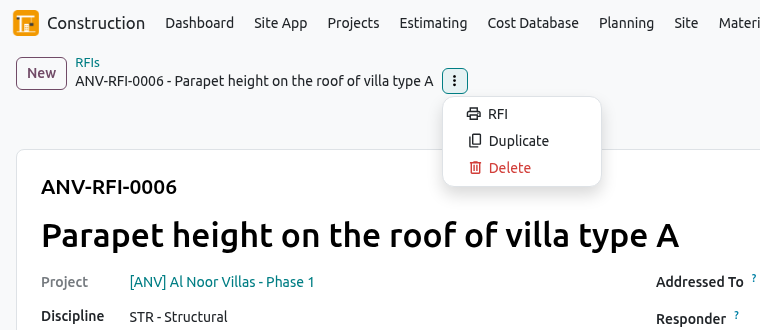
- Prints: open a transmittal, an RFI or a meeting and click the ⋮ icon next to its name. The print entry (Transmittal, RFI or Minutes of Meeting) downloads a PDF.
- Project smart buttons: the project form shows Documents, Open RFIs (open / total) and Submittals (under More). They open the records of that project, and new records created from there get the project automatically.
Configuration: Disciplines and Document Types
The discipline and type codes build the document numbers (ANV-STR-DWG-0004 = project ANV, discipline STR, type DWG, number 4). Many are provided; add your own if needed.
and
Open the menu. The list is edited directly: click New, type the Code (short, in capitals, e.g. FAC) and the Name (e.g. Facade), then press Enter or click outside the line to save. Drag the handle to change the order in the drop-down lists.
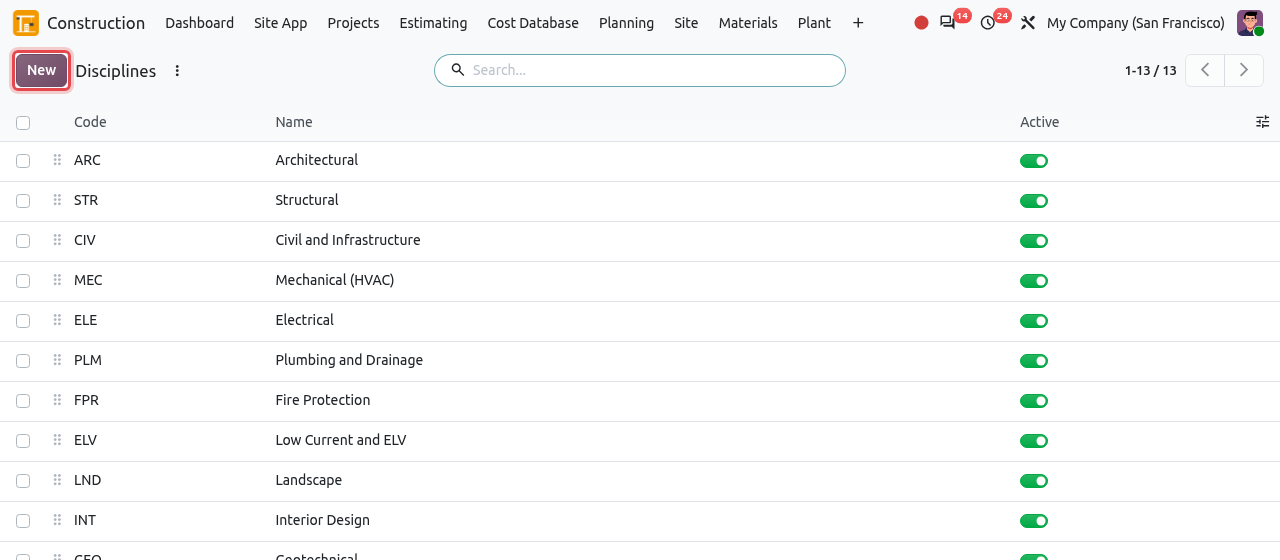
The disciplines. Each code must be unique. 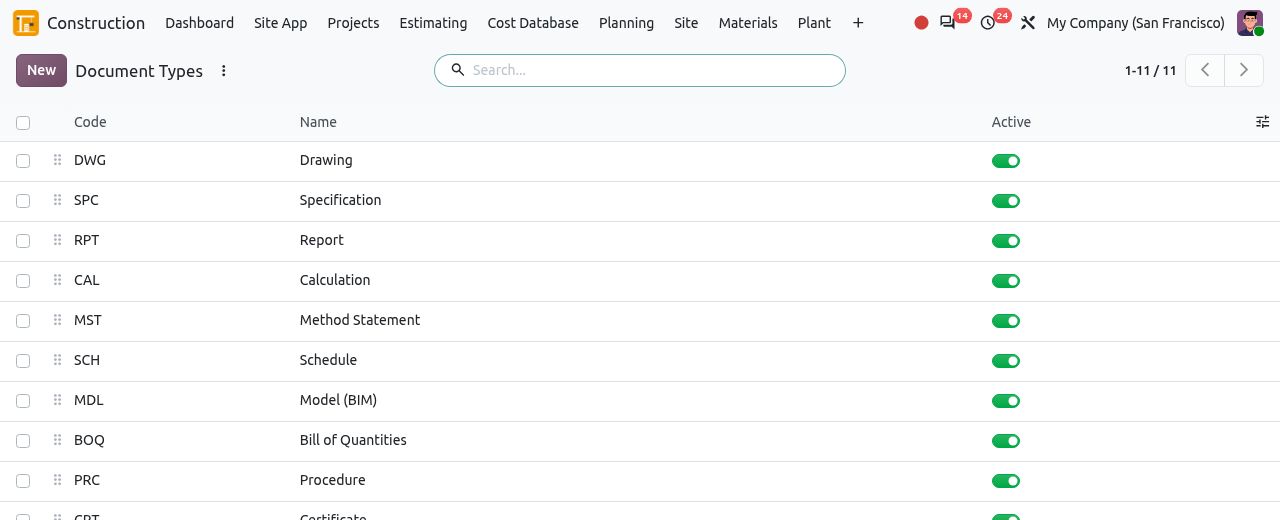
The document types work the same way. To stop using a discipline or type without losing history, switch off Active: it is hidden from new documents but kept on old ones.
WARNING
Changing a code does not renumber existing documents: only new documents use the new code.