
Appearance
Teams, Roles & Approvals
This chapter explains who can do what. You give each user construction rights (what they may do in the app), put people in the project team with a role (what they do on a given project), and set approval rules so that important documents, such as contracts, variations and payment certificates, are checked by the right person before they go out.
User rights→Project team & roles→Approval rules→Approval requests
WHO DOES THIS
User rights are given by an Odoo administrator. Project teams are managed by the project manager. Roles, role templates and approval rules are set up by a Construction: Administrator. Everybody may have to approve documents.
Giving a user construction rights
Each user has construction rights, one per area (Construction, Estimation, Commercial, Planning...). The rights decide which menus and buttons the user sees. In this example, we look at the user Sara Al Mansoori, a quantity surveyor.
Open the Settings app, then . Click New to create a user (enter the name and the email, which is also the login), or open an existing user.
In the Access Rights tab, find the CONSTRUCTION section. For each line, choose the level the person needs. Leave No for areas they do not work in.
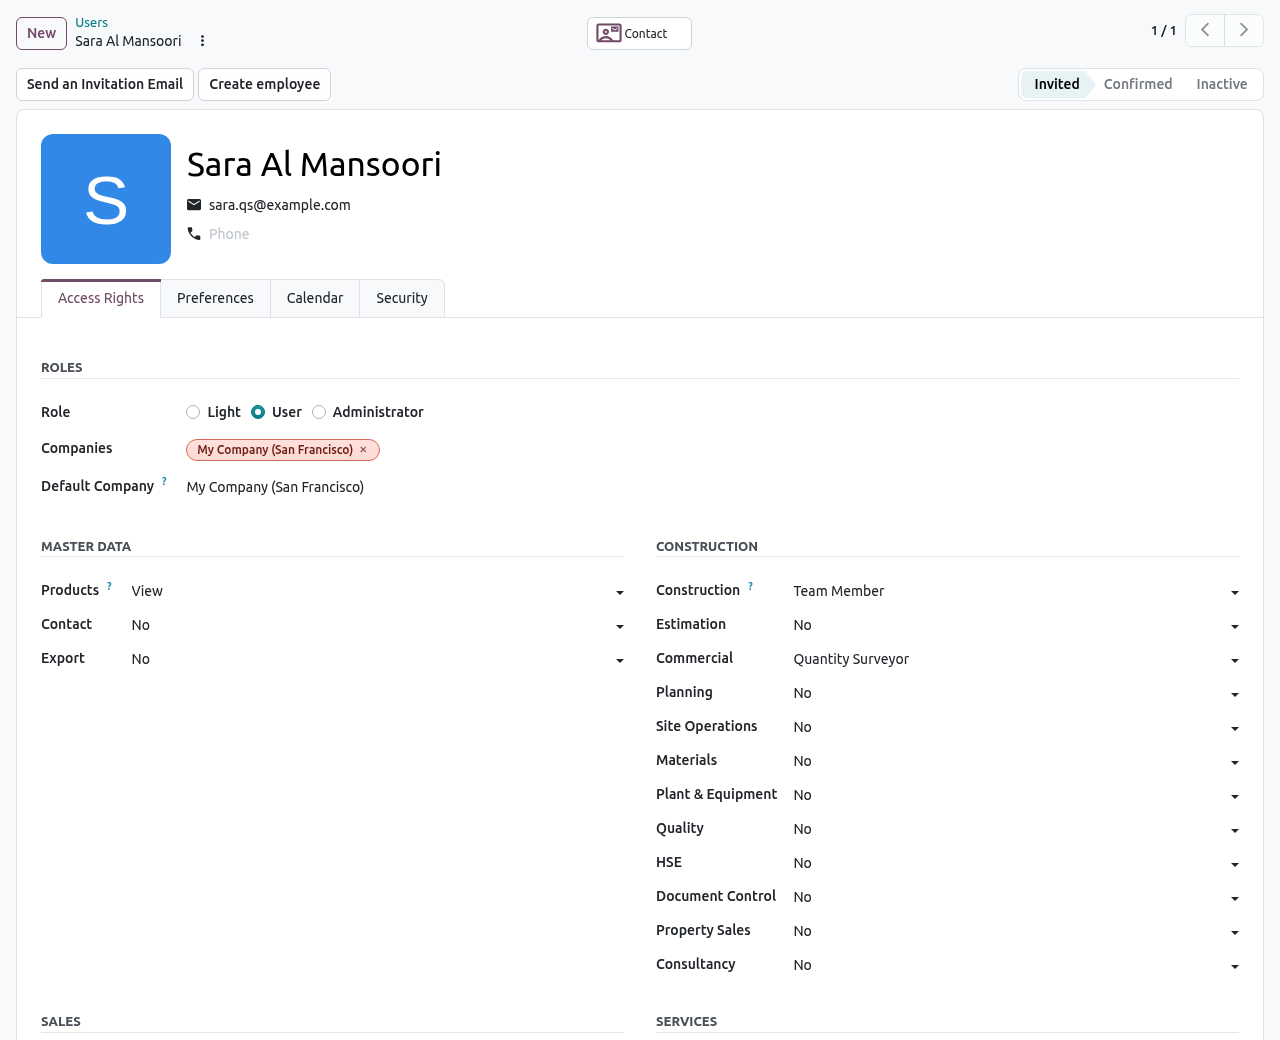
Sara is a Team Member in Construction and a Quantity Surveyor in Commercial. Check that the Companies field contains the company (or companies) where the person works.
The user is saved automatically when you leave the form. Odoo sends an invitation email so the person can choose a password.
The Construction line is the main one:
| Level | What the user can do |
|---|---|
| Team Member | Sees only the projects of which they are a team member. |
| Project Manager | Creates projects and manages the team and approvals of their projects. |
| Construction Director | Sees every project of the allowed companies and approves above thresholds. |
| Administrator | Configures roles, approval rules, cost codes and classifications. |
The other lines (Estimation, Commercial, Planning, Site Operations, Materials, Plant & Equipment, Quality, HSE, Document Control, Property Sales, Consultancy) are explained in Who does what. A higher level always includes the lower ones.
TIP
Instead of setting each line by hand, use a role template: it gives all the rights of a job title in one click.
Project Roles
A project role is the job a person holds on one project: Project Manager, Site Engineer, Quantity Surveyor, Client Representative... Roles are used in the project team and in approval rules (for example "the quantity surveyor of the project checks the certificate").
Open . The app comes with the usual roles.
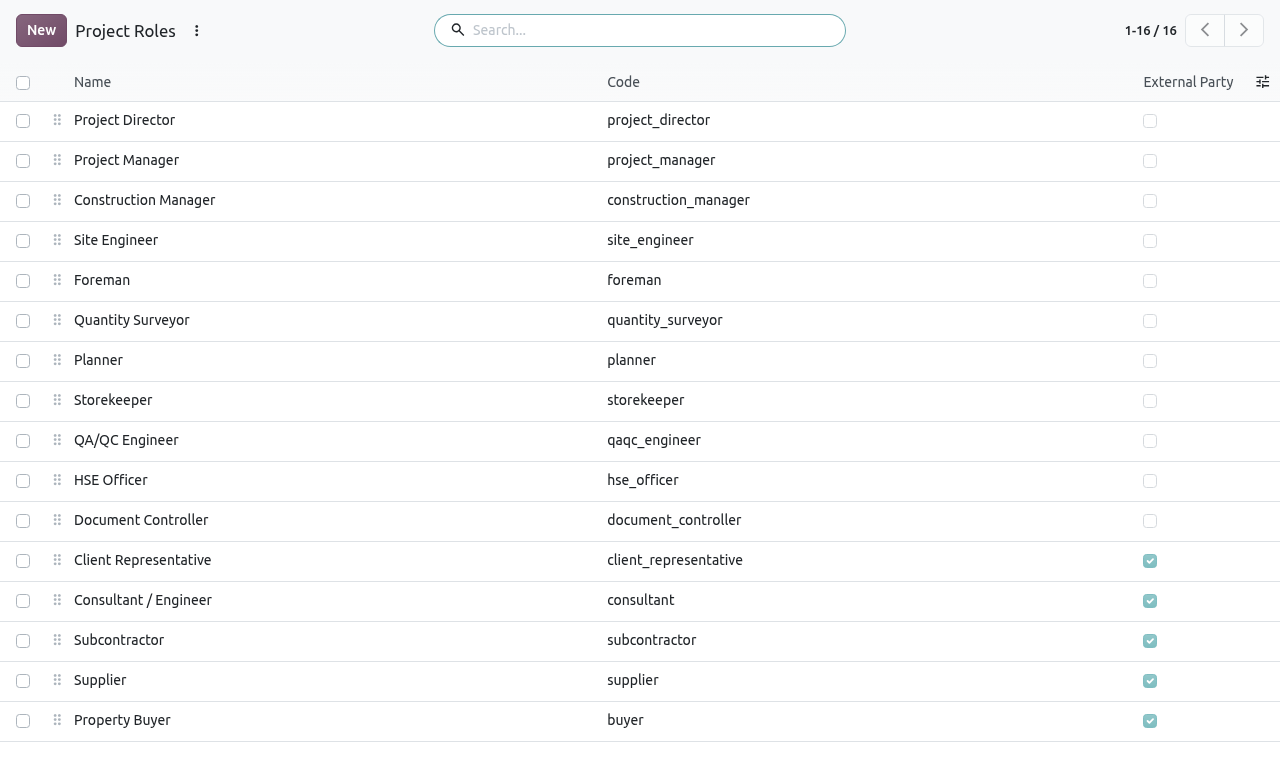
Project roles. Roles marked External Party are held by people outside your company. To add a role, click New and fill in the Name (for example MEP Coordinator), a unique Code (for example mep_coordinator), and tick External Party if the role is held by a client, consultant, subcontractor or supplier.
WARNING
A role used in a project team cannot be deleted. Archive it instead. The code must be unique.
Role Templates
A role template is a ready-made set of access rights for a job title, for example Quantity Surveyor = Estimation / Estimator + Commercial / Quantity Surveyor. Applying it to users gives them all these rights at once.
Open .
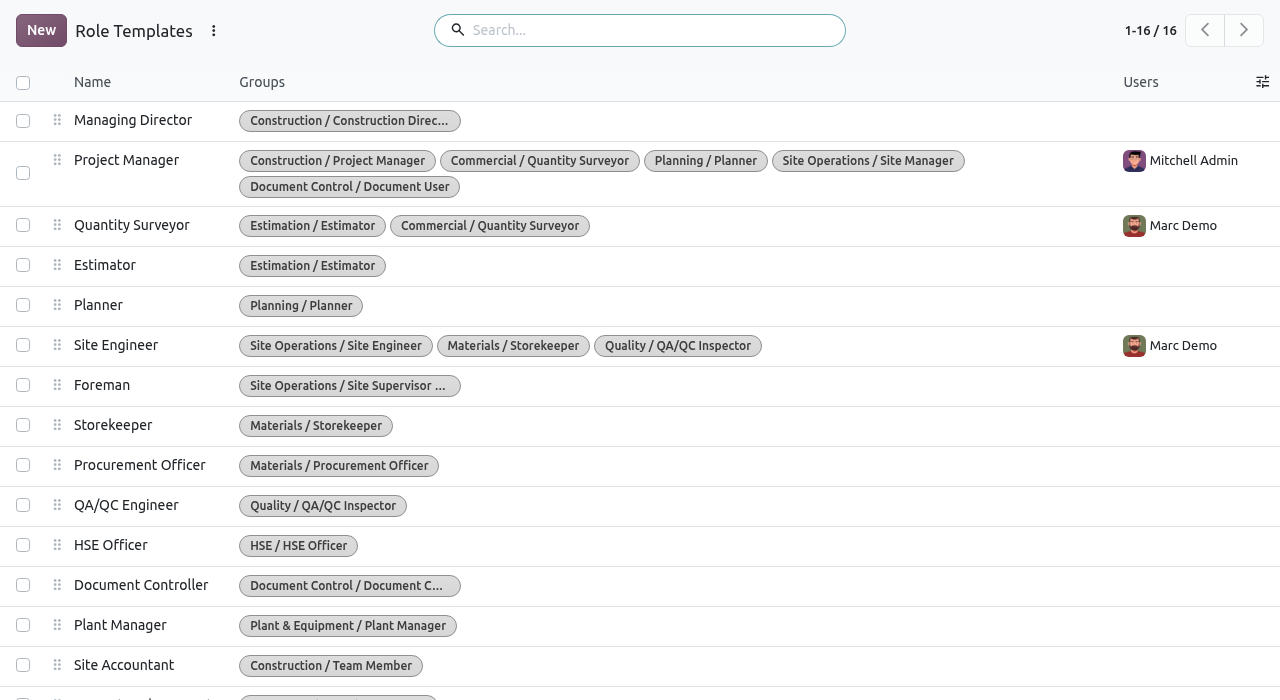
The role templates delivered with the app. Open a template. The Groups tab lists the rights it gives. In the Users tab, click Add a line and choose the users who hold this job.
Click Apply to Users. Every user of the template receives the rights of the template.
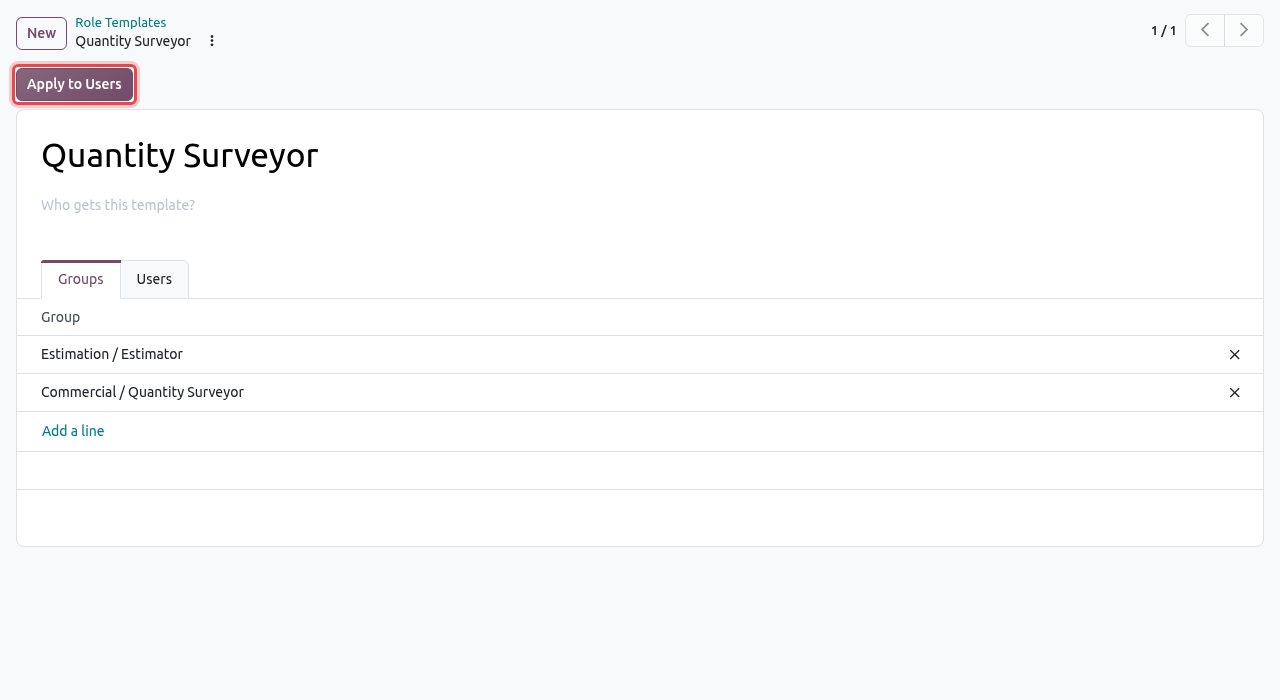
The Quantity Surveyor template and its Apply to Users button.
GOOD TO KNOW
Applying a template only adds rights: removing a user from a template does not take any right away. Only users who manage access rights (Settings administrators) can click Apply to Users; other users get the message Only users who manage access rights can apply role templates.
Project Teams
The project team says who works on a project and in which role. It matters a lot:
- users with the Team Member level only see the projects of which they are a team member;
- team members automatically follow the project and receive its messages;
- approval rules based on a project role send the request to the team member who holds that role;
- external parties (client, consultant, subcontractor) can be given access to the customer portal.
Add a person to a project team
Open the project () and click the Team tab.
Click Add a line. Choose the Role, then either a User (a person of your company who logs in to Odoo) or a Contact (an outside person, for example the client's representative). Optionally enter the From and To dates when the person holds the role.
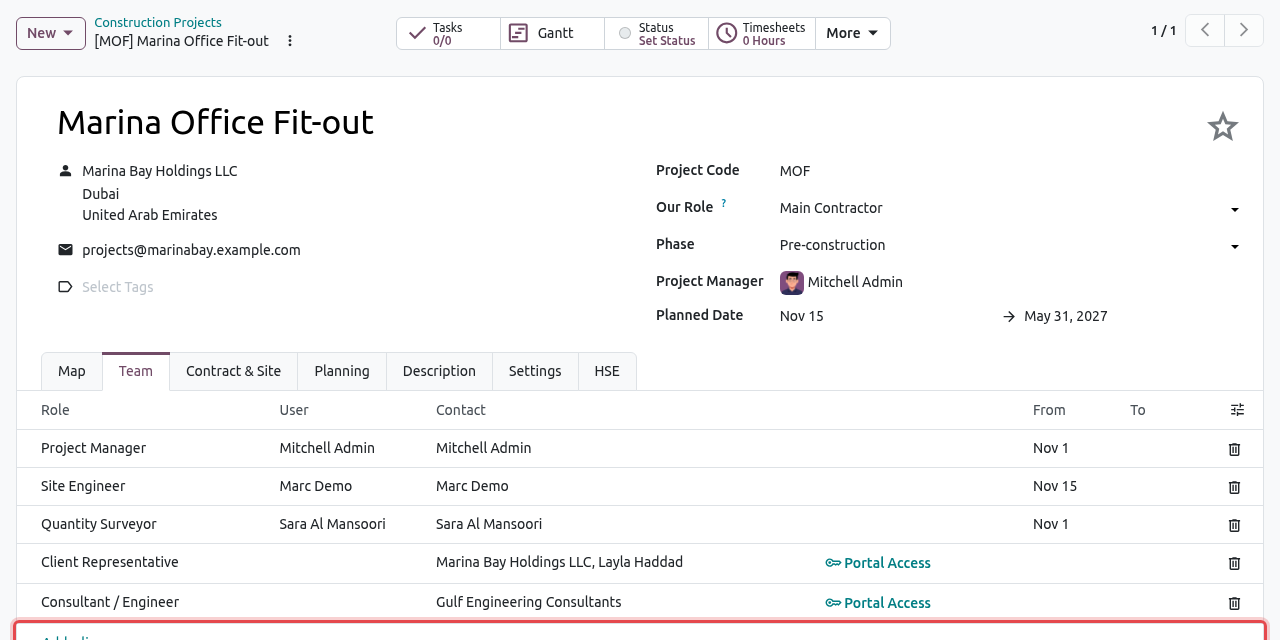
The team of [MOF] Marina Office Fit-out: three internal users and two external contacts. Save the project. The new member can now see the project and follows it.
For an external party, click Portal Access on its line to open the standard portal wizard and invite the person to the customer portal (see Customer Portal).
| Field | What to enter |
|---|---|
| Role | The role on this project, from the Project Roles list. |
| User | For internal staff. The contact is filled in automatically. |
| Contact | For outside people. Required when there is no user. |
| From / To | Optional dates. Outside these dates the person is not used as an approver for this role. |
COMMON MISTAKES
This user already holds this role on the project.: the same user cannot have the same role twice on one project. A team member needs a user or a contact.: fill in one of them. The end date of a team member cannot be before the start date.: check the From / To dates. When a user is removed from the team, they no longer see the project (unless they are its project manager or hold another role on it).
All teams in one list
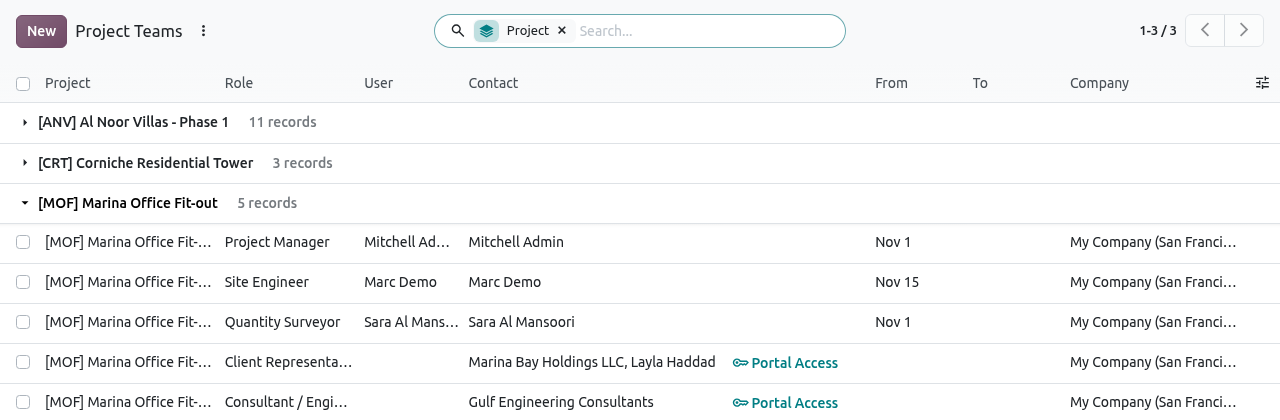
shows the members of all projects, grouped by project. Use it to answer questions such as "on which projects is Marc?" (type his name in the search bar) or to add the same person to several projects. The filters Internal, External and My Assignments help too.
Approval Rules
An approval rule is one step of checking for a kind of document. When someone asks for approval of a document, Odoo takes all the rules of that document type (in their Sequence order) that match the document, and creates one step per rule. The document can only move on once every step is approved.
Open .
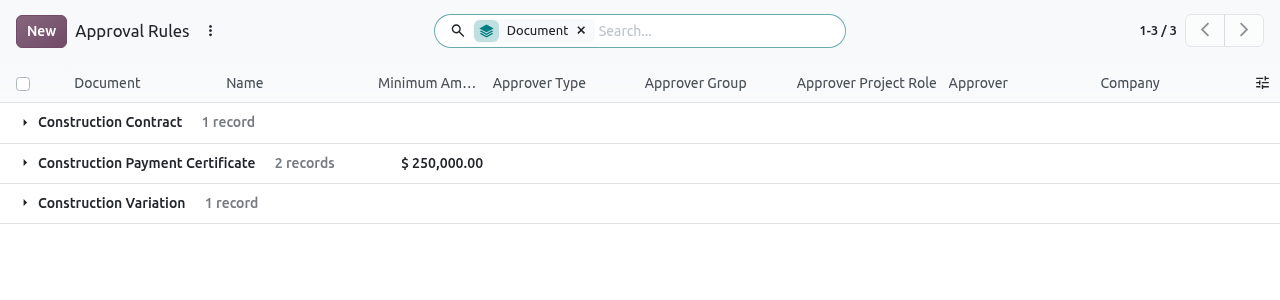
The rules of the demonstration company: client contracts, client certificates (two steps above $250,000) and variations. Open a rule to see how it works. This rule adds a second step, by the Construction Director, for payment certificates of $250,000 or more.
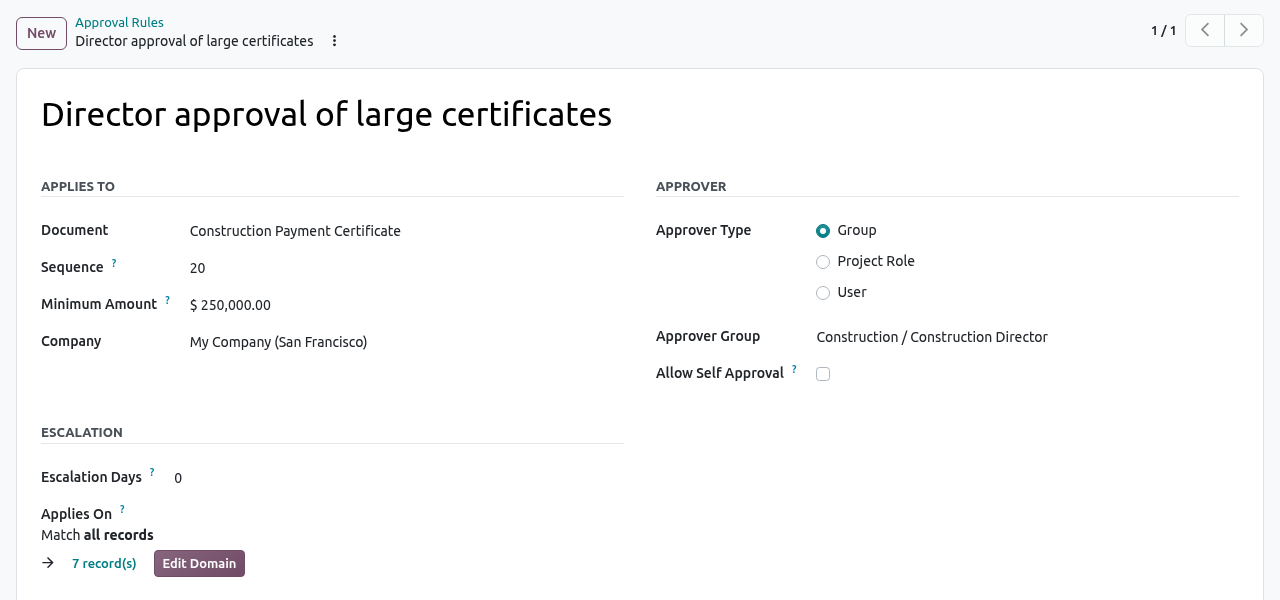
A rule with a Minimum Amount and a Group of approvers. To create a rule, click New, enter a name that describes the step, choose the Document, then choose who approves.
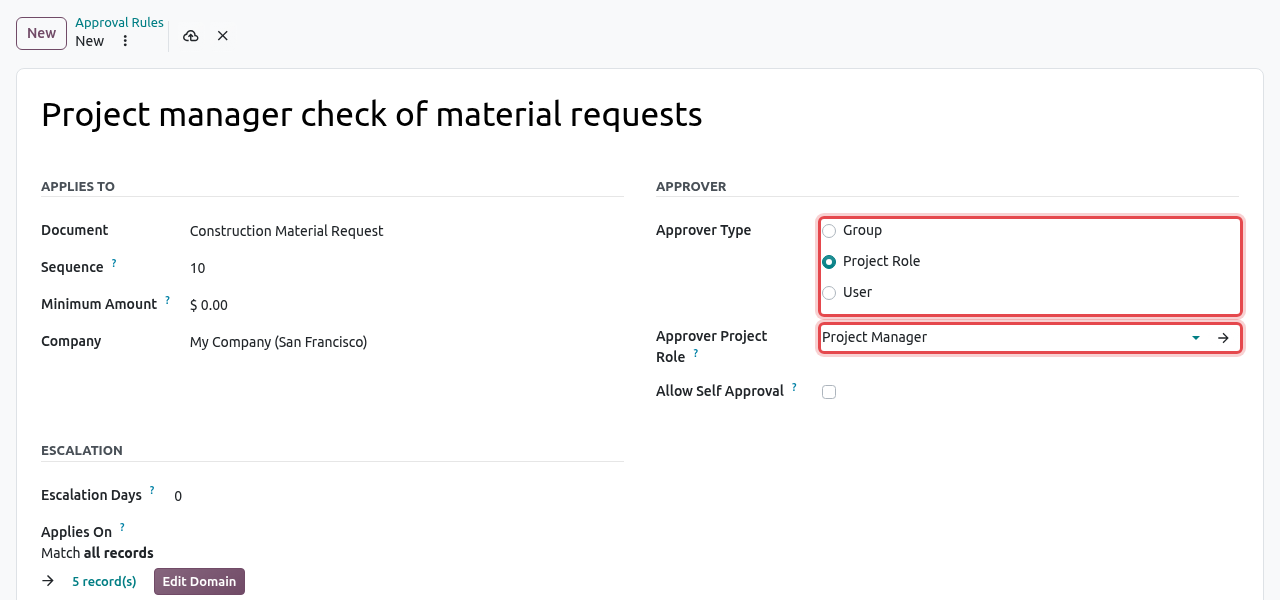
A new rule (not saved in this example): material requests approved by the project manager of each project. Click Save.
| Field | What to enter |
|---|---|
| Document | The kind of document: Construction Contract, Construction Payment Certificate, Construction Variation, Construction Budget, Construction Material Request or Construction Estimate. |
| Sequence | The order of the steps when several rules apply. 10 comes before 20. |
| Minimum Amount | The step only applies from this amount (in the company currency). 0 = always. |
| Approver Type | Group: anybody with a given right (for example Commercial / Commercial Manager). Project Role: the team member holding a role on the document's project (for example the Project Manager). User: one named person. |
| Allow Self Approval | Tick it only if the person who asked for approval may also approve this step. By default they cannot. |
| Escalation Days / Escalate To | If the step waits more than this number of days, Odoo gives a reminder activity to the escalation user. 0 = no escalation. |
| Applies On | A filter to apply the step only to some documents, for example only client contracts. Click Edit Domain to build it. Leave all records to apply it always. |
IMPORTANT
As soon as one rule exists for a document type in a company, every document of that type in that company must be approved before it can move on (submitted, confirmed...), even if the Applies On filter excludes it. Documents that match no step are approved at once when the user clicks Request Approval, so the user still has to click it.
COMMON MISTAKES
Nobody can approve step '...'. Check the approval rule and the project team.: the rule found no approver. Typical causes: a Project Role rule but nobody holds that role in the project team (or their From/To dates exclude today); the only approver is the requester and Allow Self Approval is not ticked; the approver is not allowed in the company. Approval rule '...' has no approver.: choose the group, role or user that matches the approver type.
An approval from start to finish
This example follows a client variation on [ANV] Al Noor Villas - Phase 1. The rule Commercial review of client variations and claims says that a Commercial Manager must approve every client variation. Sara, the quantity surveyor, prepares the variation; Mitchell, the commercial manager, approves it.
Draft document→Request Approval→To Approve→Approved or Rejected
1. Ask for approval
Sara opens her draft variation CON/2026/0001/VO-05 - Additional boundary wall coping stones - villas 1 to 6 (see Variations) and clicks Request Approval.
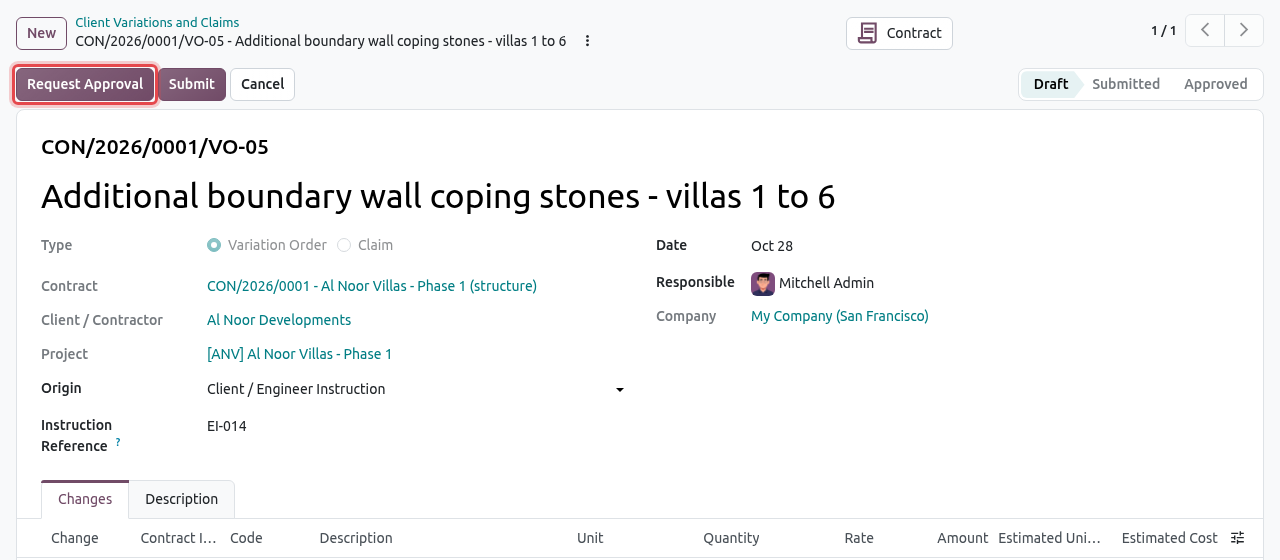
The Request Approval button on a draft variation. The same button exists on contracts, payment certificates, budgets, material requests and estimates. The Approval State becomes To Approve and an Approvals smart button appears. The document cannot be changed while it is under approval; to change it, click Withdraw Approval Request, edit it and ask again.
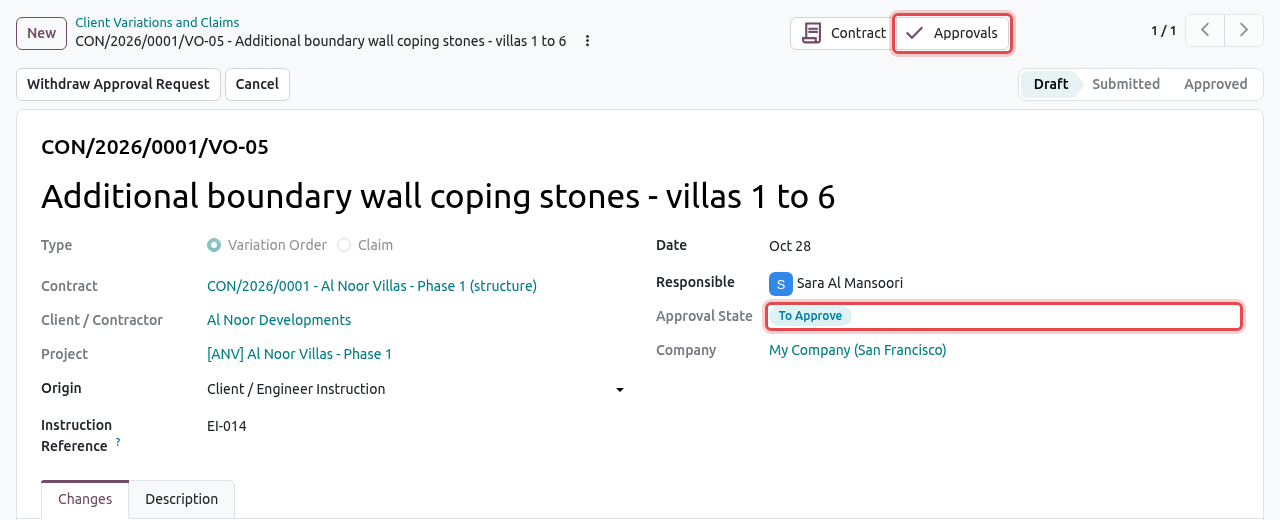
The variation is waiting for approval.
Each approver of the first step receives an activity Approve: ... (the clock icon in the top bar) and an email notification.
2. Approve
Mitchell opens . The list shows only the requests where he must decide now (filter To Approve by Me).
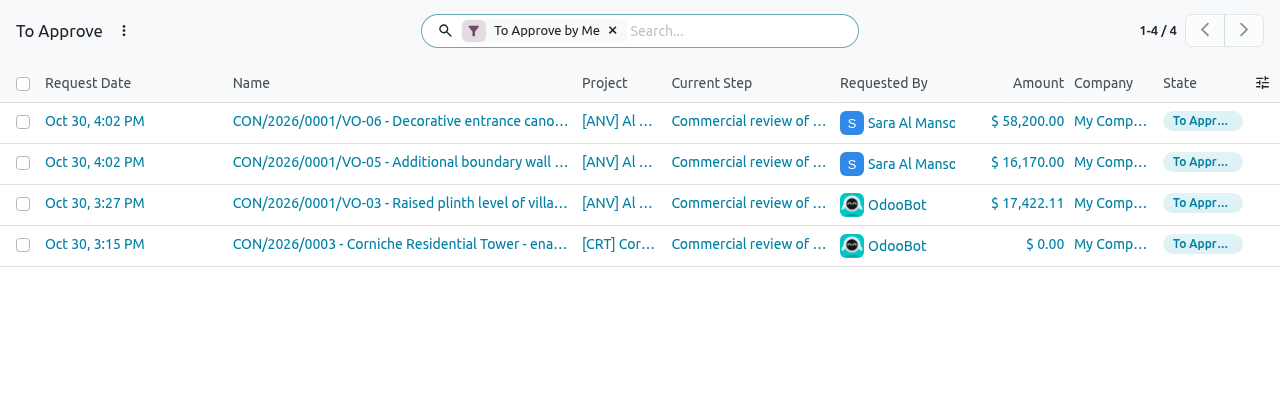
Requests waiting for my decision, with the project, current step, requester and amount. He clicks the request to open it. The form shows the document, its amount, who asked, and the list of steps with their approvers. Click the Document smart button to read the variation itself before deciding.
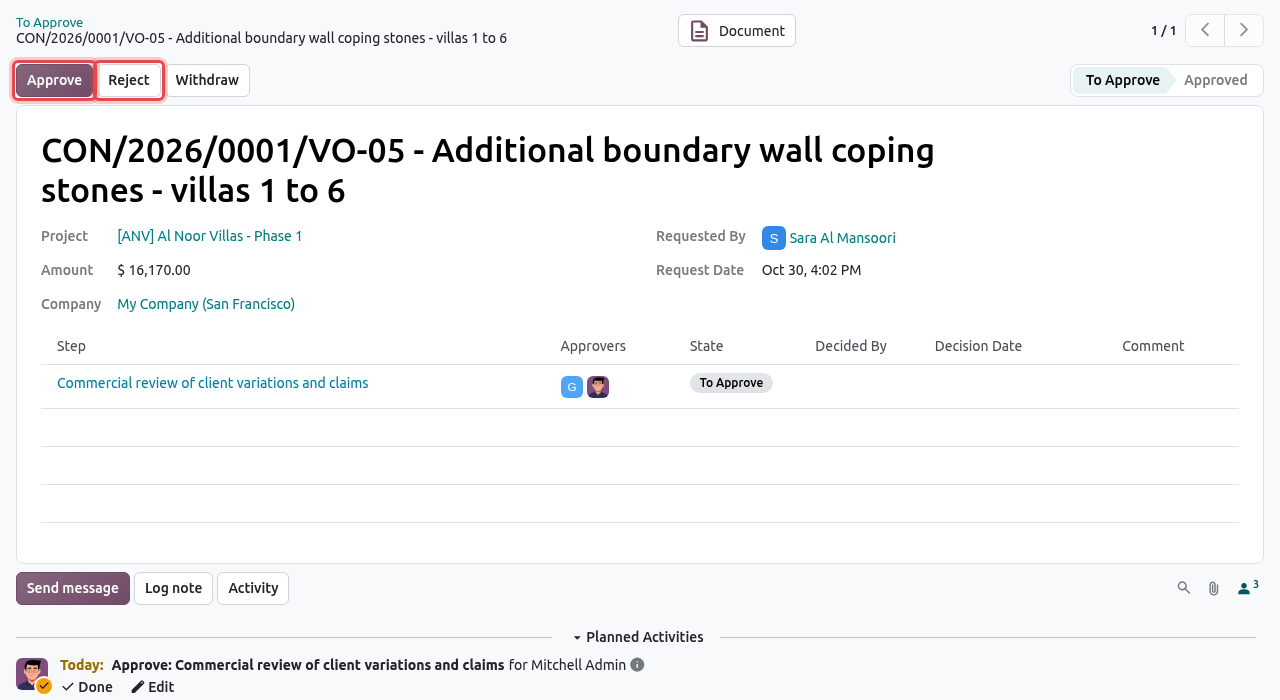
An approval request. The Approve and Reject buttons are shown only to the approvers of the current step. He clicks Approve. If there is another step, it becomes To Approve and its approvers are notified. When the last step is approved, the request becomes Approved. The decision is logged in the chatter.
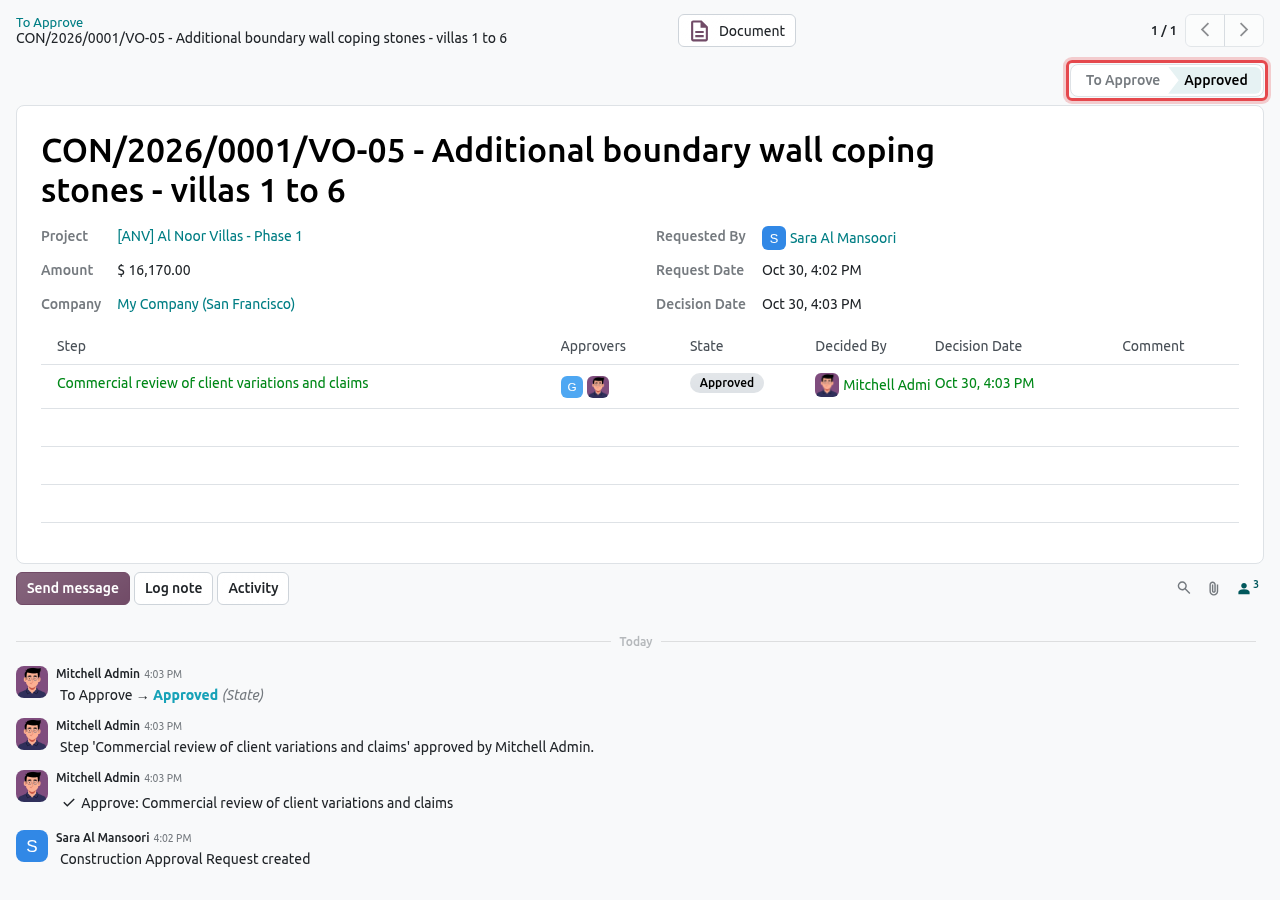
The request is approved: the step shows who decided and when. Back on the variation, the Approval State is Approved. Sara can now click Submit to send the variation to the client.
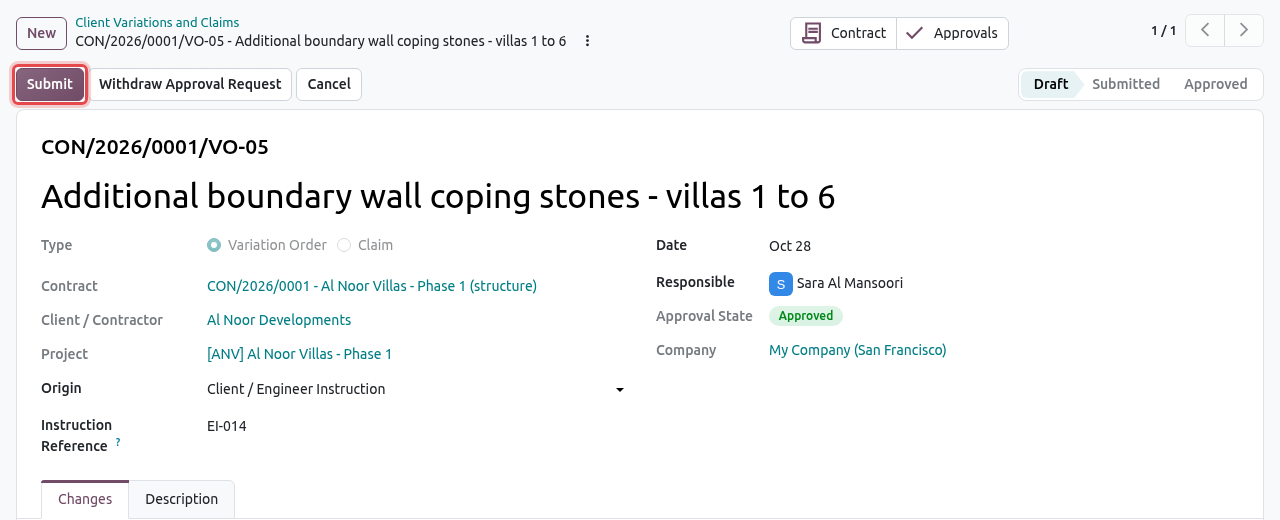
The approved variation, ready to be submitted.
3. Reject
In the same way, Mitchell opens the request of variation VO-06 - Decorative entrance canopies and clicks Reject. A window asks for the reason. He types it and clicks Reject.
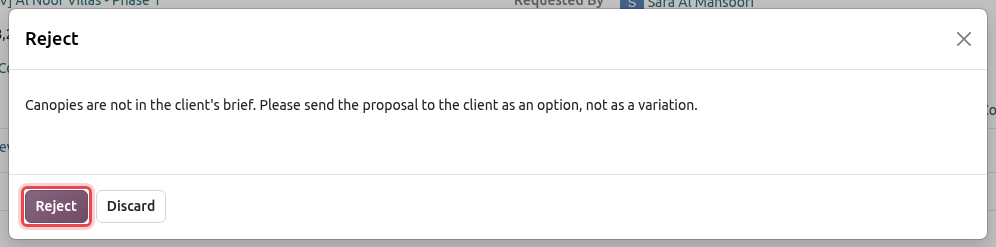
The reason is required and is shown to the requester. The request becomes Rejected; the next steps are cancelled. The reason appears in the Comment column and in the chatter. The variation's Approval State is Rejected: Sara can correct it and click Request Approval again.
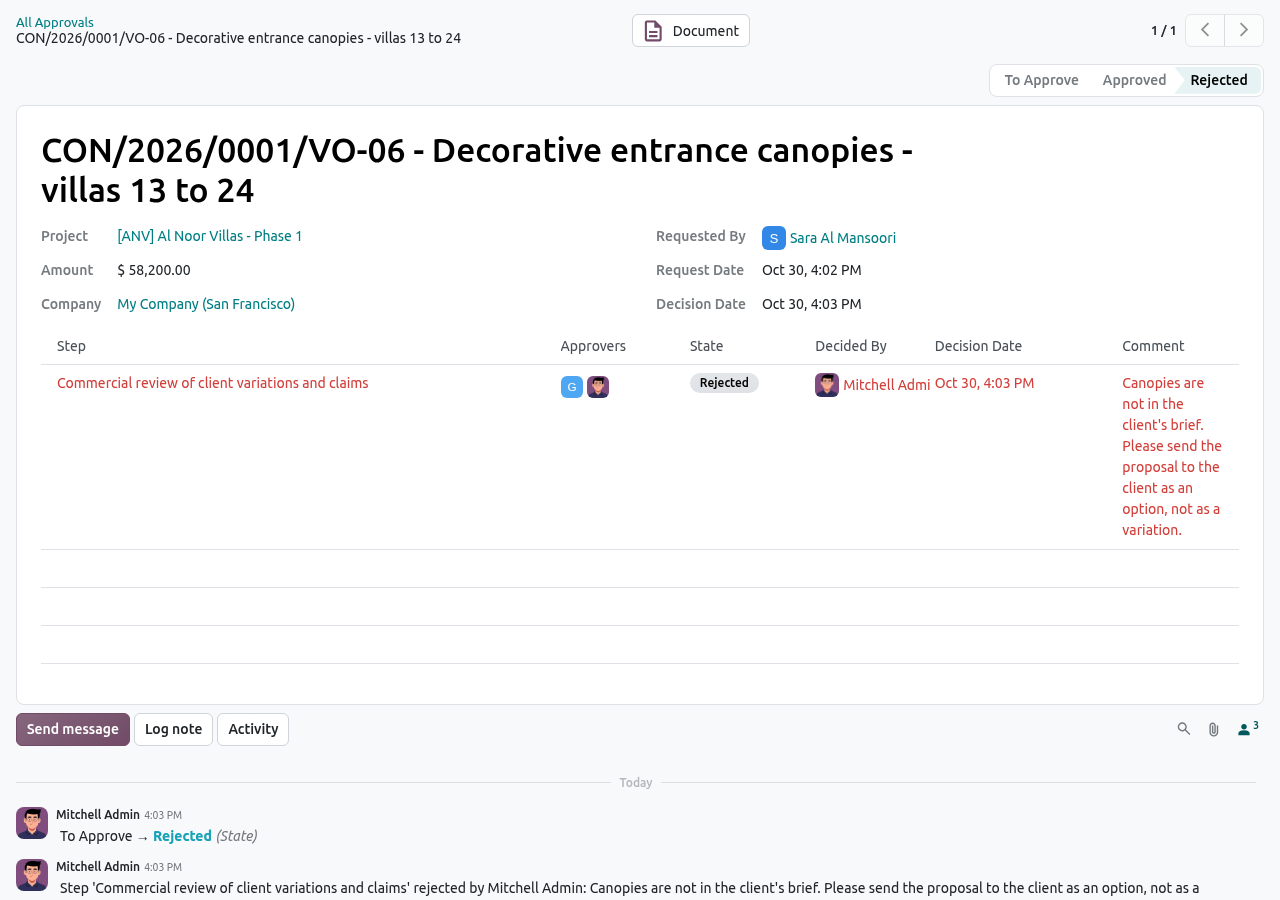
A rejected request with the approver's comment.
WARNING
Clicking Submit (or Confirm, Approve...) on a document that is not approved yet shows ... must be approved first. Ask for approval and wait for the decision. When an approved document is reset to draft, its approval is withdrawn and must be asked again.
Withdraw a request
On a request To Approve, the requester (or a construction administrator) can click Withdraw to cancel it, for example to change the document. The request becomes Cancelled.
All Approvals
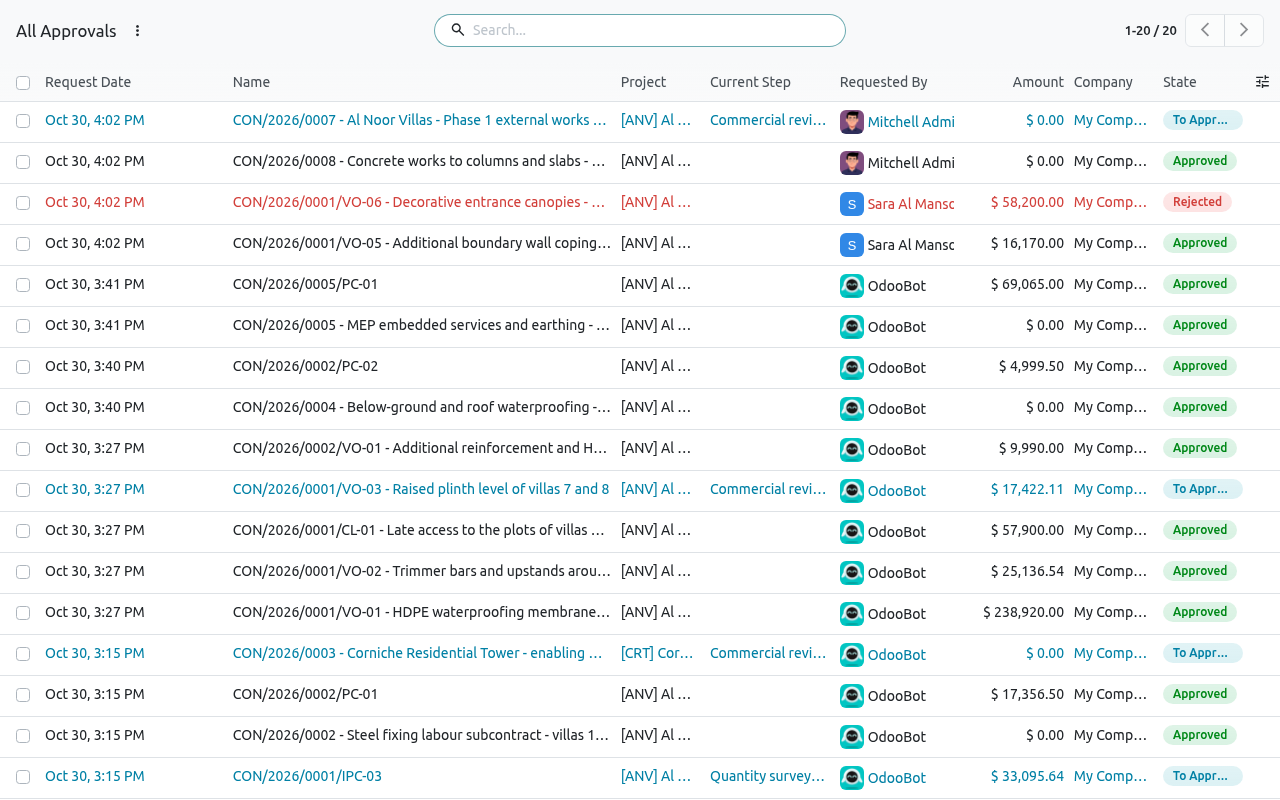
lists every approval request, whatever its state: who asked, when, for which project and amount, and the result. Lines in blue are waiting, lines in red were rejected. Use the filters My Requests, Pending, Approved, Rejected and group by Project, Document Type or Status to follow approvals or to audit decisions.
TIP
The Dashboard shows the number of Approvals Waiting for Me; click it to open the same list.